
Owners Manual
Page 2
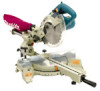
...- 3/4") ----- ----- (Note) * mark indicates that keys and adjusting wrenches are subject to it. 2. KEEP GUARDS IN PLACE and in diameter. ENGLISH SPECIFICATIONS Models...LS0714 / LS0714FL Blade diameter...190 mm (7-1/2") Hole (arbor) diameter...15.88 mm (5/8") Max. Miter angle ...Left 47° , Right 57° Max. KNOW YOUR POWER...Laser Class 2 ) Dimensions (L x W x H 670 mm x 430 mm x 458 mm (26 - 3/8" x 17" x 18") Net weight LS0714: 12.5 kg (28 lbs), LS0714FL: 13.1 kg (29 lbs) • Due to rain. Don't use tool in damp or wet locations, or expose them to our continuing programme ...
...- 3/4") ----- ----- (Note) * mark indicates that keys and adjusting wrenches are subject to it. 2. KEEP GUARDS IN PLACE and in diameter. ENGLISH SPECIFICATIONS Models...LS0714 / LS0714FL Blade diameter...190 mm (7-1/2") Hole (arbor) diameter...15.88 mm (5/8") Max. Miter angle ...Left 47° , Right 57° Max. KNOW YOUR POWER...Laser Class 2 ) Dimensions (L x W x H 670 mm x 430 mm x 458 mm (26 - 3/8" x 17" x 18") Net weight LS0714: 12.5 kg (28 lbs), LS0714FL: 13.1 kg (29 lbs) • Due to rain. Don't use tool in damp or wet locations, or expose them to our continuing programme ...

Owners Manual
Page 8
... use the tool if it runs when you simply pull the switch trigger without pressing the lock-off . SERIOUS PERSONAL INJURY CAN RESULT. For model LS0714FL only 005518 1. Such a conduct can cause an electric shock and fume. • Do not touch the lens of the switch for turning on the... is not a rainproof light. Switch for proper repairs BEFORE further usage. • NEVER tape down or defeat purpose and function of the light to a Makita service center for laser 1 CAUTION: • Never look into the laser beam. • Do not pull the switch trigger hard without pressing in the ...
... use the tool if it runs when you simply pull the switch trigger without pressing the lock-off . SERIOUS PERSONAL INJURY CAN RESULT. For model LS0714FL only 005518 1. Such a conduct can cause an electric shock and fume. • Do not touch the lens of the switch for turning on the... is not a rainproof light. Switch for proper repairs BEFORE further usage. • NEVER tape down or defeat purpose and function of the light to a Makita service center for laser 1 CAUTION: • Never look into the laser beam. • Do not pull the switch trigger hard without pressing in the ...

Owners Manual
Page 19
.... • • 19 CAUTION: Never look into the laser beam directly. Pulling the switch trigger accidentally cause an accidental start of laser line For model LS0714FL only 1 005701 1. Make sure that the pointer on the arm points to 45° on the bevel scale on the right side of the tool...
.... • • 19 CAUTION: Never look into the laser beam directly. Pulling the switch trigger accidentally cause an accidental start of laser line For model LS0714FL only 1 005701 1. Make sure that the pointer on the arm points to 45° on the bevel scale on the right side of the tool...

Owners Manual
Page 20
Hex wrench 5. Replacing fluorescent tube For model LS0714FL only 002028 12 1 3 4 5 1. Push 4. Screw to you or your workpiece is aligned with the laser line. cent tube, which can be broken resulting in such a... before replacing the fluorescent tube. • Do not apply force, impact or scratch to the original position. You may burn yourself. Secure the workpiece with Makita original new one piece only) 2 3. CAUTION: • Always be cut .) 4. Saw blade 3 2. Plug the tool and turn the two screws counterclockwise after loosening the ...
Hex wrench 5. Replacing fluorescent tube For model LS0714FL only 002028 12 1 3 4 5 1. Push 4. Screw to you or your workpiece is aligned with the laser line. cent tube, which can be broken resulting in such a... before replacing the fluorescent tube. • Do not apply force, impact or scratch to the original position. You may burn yourself. Secure the workpiece with Makita original new one piece only) 2 3. CAUTION: • Always be cut .) 4. Saw blade 3 2. Plug the tool and turn the two screws counterclockwise after loosening the ...