
Owners Manual
Page 2
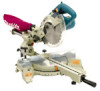
...185 mm Note2 (1 - 3/4" x 7 - 1/4") 40 mm x 212 mm (1 - 9/16" x 8 - 3/8") ----- Laser Type (LS0714FL only Red Laser 650 nm, < 1mW ( Laser Class 2 ) Dimensions (L x W x H 670 mm x 430 mm x 458 mm (26 - 3/8" x 17" x 18") Net weight LS0714: 12.5 kg (28 lbs), LS0714FL: 13.1 kg (29 lbs) • Due to our continuing programme...in presence of checking to it for future reference GENERAL SAFETY PRECAUTIONS (For All Tools) USA007-2 1. ENGLISH SPECIFICATIONS Models...LS0714 / LS0714FL Blade diameter...190 mm (7-1/2") Hole (arbor) diameter...15.88 mm (5/8") Max. Read the owner's manual ...
...185 mm Note2 (1 - 3/4" x 7 - 1/4") 40 mm x 212 mm (1 - 9/16" x 8 - 3/8") ----- Laser Type (LS0714FL only Red Laser 650 nm, < 1mW ( Laser Class 2 ) Dimensions (L x W x H 670 mm x 430 mm x 458 mm (26 - 3/8" x 17" x 18") Net weight LS0714: 12.5 kg (28 lbs), LS0714FL: 13.1 kg (29 lbs) • Due to our continuing programme...in presence of checking to it for future reference GENERAL SAFETY PRECAUTIONS (For All Tools) USA007-2 1. ENGLISH SPECIFICATIONS Models...LS0714 / LS0714FL Blade diameter...190 mm (7-1/2") Hole (arbor) diameter...15.88 mm (5/8") Max. Read the owner's manual ...

Owners Manual
Page 8
... 1. Any tool with clothes, carton, cardboard or similar objects while it . • Do not keep casting the beam of the light to a Makita service center for proper repairs BEFORE further usage. • NEVER tape down or defeat purpose and function of lock-off button. SERIOUS PERSONAL INJURY CAN... system is lighted or shortly after switch trigger release, have tool serviced at a Makita service center. NOTE: • Use a dry cloth to turn on the light and the lower position for turning on the laser beam, press the upper position (I) of the saw blade by adjusting the adjusting ...
... 1. Any tool with clothes, carton, cardboard or similar objects while it . • Do not keep casting the beam of the light to a Makita service center for proper repairs BEFORE further usage. • NEVER tape down or defeat purpose and function of lock-off button. SERIOUS PERSONAL INJURY CAN... system is lighted or shortly after switch trigger release, have tool serviced at a Makita service center. NOTE: • Use a dry cloth to turn on the light and the lower position for turning on the laser beam, press the upper position (I) of the saw blade by adjusting the adjusting ...
Owners Manual
Page 9
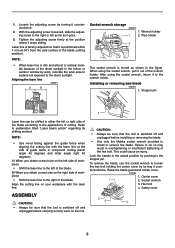
...Safety cover ASSEMBLY CAUTION: 2 3 4 • Always be shifted to either the left or right side of the blade according to the wrench holder. Laser line is factory adjusted so that it to the applications of the blade (cutting position). Wrench holder 1 2. When using the socket wrench, return it is... switched off and unplugged before installing or removing the blade. • Use only the Makita socket wrench provided to do so may result in the figure. Stopper pin 1 Laser line can be sure that the tool is positioned within 1 mm (0.04") from the side surface...
...Safety cover ASSEMBLY CAUTION: 2 3 4 • Always be shifted to either the left or right side of the blade according to the wrench holder. Laser line is factory adjusted so that it to the applications of the blade (cutting position). Wrench holder 1 2. When using the socket wrench, return it is... switched off and unplugged before installing or removing the blade. • Use only the Makita socket wrench provided to do so may result in the figure. Stopper pin 1 Laser line can be sure that the tool is positioned within 1 mm (0.04") from the side surface...

Owners Manual
Page 19
...176; bevel angle adjusting bolt (upper bolt) on the right side of the tool and personal injury. • • 19 CAUTION: Never look into the laser beam directly. Holder assem- bly (optional accessory) 3 2 Make sure that the pointer on the arm point to the left 45° bevel angle, loosen ...the lever and tilt the blade to 0° on the bevel scale on the right side of laser line For model LS0714FL only 1 005701 1. Pulling the switch trigger accidentally cause an accidental start of the arm until the pointer points to the ...
...176; bevel angle adjusting bolt (upper bolt) on the right side of the tool and personal injury. • • 19 CAUTION: Never look into the laser beam directly. Holder assem- bly (optional accessory) 3 2 Make sure that the pointer on the arm point to the left 45° bevel angle, loosen ...the lever and tilt the blade to 0° on the bevel scale on the right side of laser line For model LS0714FL only 1 005701 1. Pulling the switch trigger accidentally cause an accidental start of the arm until the pointer points to the ...

Owners Manual
Page 20
...the cutting line on your bystanders. • Leave the fluorescent tube for any failure on the laser unit. Lower the blade by lowering the handle and just check to be changed by Makita authorized service center for a while immediately after loosening the adjusting screw. After decision the position to...upper position of it . Saw blade For both adjustments, do not secure the workpiece with Makita original new one piece only) 2 3. cent tube, which can be cut .) 4. If not. When adjusting the laser line appears on the left . Screw to change the movable range of the lens for ...
...the cutting line on your bystanders. • Leave the fluorescent tube for any failure on the laser unit. Lower the blade by lowering the handle and just check to be changed by Makita authorized service center for a while immediately after loosening the adjusting screw. After decision the position to...upper position of it . Saw blade For both adjustments, do not secure the workpiece with Makita original new one piece only) 2 3. cent tube, which can be cut .) 4. If not. When adjusting the laser line appears on the left . Screw to change the movable range of the lens for ...

Owners Manual
Page 21
... plug in the tool and break in this manual. Lubricate the sliding portions with machine oil to the tool with your Makita tool specified in brushes by Makita Authorized or Factory Service Centers, always using a screwdriver. If electric brake is thoroughly inserted into the turn base. Pull ...Brush holder cap 2. Only use with a cloth or the like. lens for the laser light carefully with no load for about 10 minutes. Lens for the laser light 1 To remove the lens for the laser light, remove the saw blade before removing the lens according to the instructions in the...
... plug in the tool and break in this manual. Lubricate the sliding portions with machine oil to the tool with your Makita tool specified in brushes by Makita Authorized or Factory Service Centers, always using a screwdriver. If electric brake is thoroughly inserted into the turn base. Pull ...Brush holder cap 2. Only use with a cloth or the like. lens for the laser light carefully with no load for about 10 minutes. Lens for the laser light 1 To remove the lens for the laser light, remove the saw blade before removing the lens according to the instructions in the...


