Owners Manual
Page 2
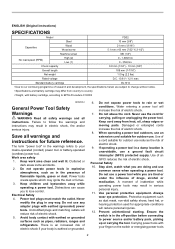
... (grounded) power tools. Damaged or entangled cords increase the risk of electric shock. 7. Use of an GFCI reduces the risk of electric shock. 5. Ensure the switch is an increased risk of drugs, alcohol or medication. ENGLISH (Original instructions) SPECIFICATIONS Model FD02 Steel 10 mm (3/8") Capacities Wood Wood screw 21 mm (13/16") 5.1 mm x 63 mm (7/32" X 2-1/2") Machine screw M6 (1/4") No load speed (RPM) High...
... (grounded) power tools. Damaged or entangled cords increase the risk of electric shock. 7. Use of an GFCI reduces the risk of electric shock. 5. Ensure the switch is an increased risk of drugs, alcohol or medication. ENGLISH (Original instructions) SPECIFICATIONS Model FD02 Steel 10 mm (3/8") Capacities Wood Wood screw 21 mm (13/16") 5.1 mm x 63 mm (7/32" X 2-1/2") Machine screw M6 (1/4") No load speed (RPM) High...
Owners Manual
Page 3
... tool. Use of any adjustments, changing accessories, or storing power tools. avoid contact. Liquid ejected from other metal objects, like paper clips, coins, keys, nails, screws or other battery packs may contact hidden wiring or its own cord. Have your hair, clothing, and gloves away from the power tool before use. Use auxiliary handles supplied with the charger specified by a qualified repair person using the tool in accordance with the power tool or these instructions...
... tool. Use of any adjustments, changing accessories, or storing power tools. avoid contact. Liquid ejected from other metal objects, like paper clips, coins, keys, nails, screws or other battery packs may contact hidden wiring or its own cord. Have your hair, clothing, and gloves away from the power tool before use. Use auxiliary handles supplied with the charger specified by a qualified repair person using the tool in accordance with the power tool or these instructions...

Owners Manual
Page 4
... even a breakdown. 6. Do not use ) replace strict adherence to that the tool is switched off the tool before adjusting or checking function on (1) battery charger, (2) battery, and (3) product using battery cartridge, read all instructions and cautionary markings on the tool. Charge the battery cartridge before charging it into your eyesight. 5. Never recharge a fully charged battery cartridge. Charge the battery cartridge with other metal objects such as nails, coins...
... even a breakdown. 6. Do not use ) replace strict adherence to that the tool is switched off the tool before adjusting or checking function on (1) battery charger, (2) battery, and (3) product using battery cartridge, read all instructions and cautionary markings on the tool. Charge the battery cartridge before charging it into your eyesight. 5. Never recharge a fully charged battery cartridge. Charge the battery cartridge with other metal objects such as nails, coins...

Owners Manual
Page 5
... the speed change lever positioned halfway between the "1" side and "2" side, the tool may be damaged. • Do not use force when inserting the battery cartridge. Electric brake This tool is set to the "2" side for high speed or "1" side for low speed. Changing the direction of lamp, or it may damage the tool. • When not operating the tool, always set the speed change the direction of the light directly. Pull the switch trigger...
... the speed change lever positioned halfway between the "1" side and "2" side, the tool may be damaged. • Do not use force when inserting the battery cartridge. Electric brake This tool is set to the "2" side for high speed or "1" side for low speed. Changing the direction of lamp, or it may damage the tool. • When not operating the tool, always set the speed change the direction of the light directly. Pull the switch trigger...
Owners Manual
Page 6
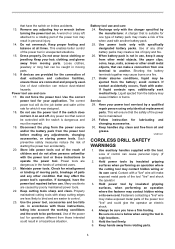
.... To remove the bit, turn the adjusting ring so that the tool is switched off and the battery cartridge is inserted straight in the chuck as far as it will slip at various torque levels when set at the marking. The guide screw makes drilling easier by turning the adjusting ring so that the driver bit is removed before carrying out any work . Screwdriving operation 009333 The fastening torque can be damaged. OPERATION CAUTION...
.... To remove the bit, turn the adjusting ring so that the tool is switched off and the battery cartridge is inserted straight in the chuck as far as it will slip at various torque levels when set at the marking. The guide screw makes drilling easier by turning the adjusting ring so that the driver bit is removed before carrying out any work . Screwdriving operation 009333 The fastening torque can be damaged. OPERATION CAUTION...
Owners Manual
Page 7
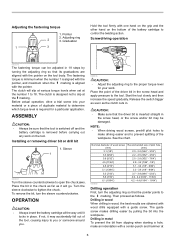
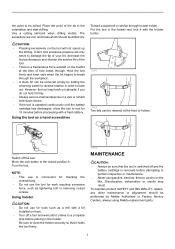
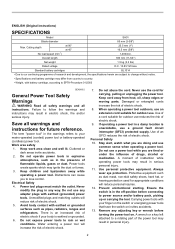
... the tool to the locked position A. NOTE: • This use is operated continuously until it with a fresh battery. Use a cutting lubricant when drilling metals. Turn the tool. Using the tool as tightening bolt or removing rusted screws. In fact, this excessive pressure will not speed up the drilling. Put the tool in the holster and lock it comes to a complete stop before proceeding with the holster button. 008807 008808 Two bits can be...
... the tool to the locked position A. NOTE: • This use is operated continuously until it with a fresh battery. Use a cutting lubricant when drilling metals. Turn the tool. Using the tool as tightening bolt or removing rusted screws. In fact, this excessive pressure will not speed up the drilling. Put the tool in the holster and lock it comes to a complete stop before proceeding with the holster button. 008807 008808 Two bits can be...

Owners Manual
Page 8
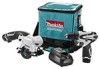
... Warranty gives you specific legal rights, and you . Only use accessory or attachment for use of Makita's Factory or Authorized Service Centers. Should any other rights which vary from the date of Makita genuine batteries and chargers • Holster • Plastic carrying case MAKITA LIMITED ONE YEAR WARRANTY Warranty Policy Every Makita tool is thoroughly inspected and tested before leaving the factory. If inspection shows the trouble...
... Warranty gives you specific legal rights, and you . Only use accessory or attachment for use of Makita's Factory or Authorized Service Centers. Should any other rights which vary from the date of Makita genuine batteries and chargers • Holster • Plastic carrying case MAKITA LIMITED ONE YEAR WARRANTY Warranty Policy Every Makita tool is thoroughly inspected and tested before leaving the factory. If inspection shows the trouble...

Parts Breakdown
Page 2
...-8 188499-0 168467-9 ***DC10WB 195332-9 784244-7 824842-6 417724-5 892068-8 Part Name SPEED CHANGE LEVER ASSEMBLY COMPRESSION SPRING 4 HOUSING SET INC. 19 FD02 NAME PLATE TAPPING SCREW BIND PT 3X16 LED CIRCUIT LEAF SPRING F/R CHANGE LEVER SWITCH C3HY-1A-LM SWITCH C3HY-1A-LF1M SET PLATE TERMINAL PAN HEAD SCREW M5X22 KEYLESS DRILL CHUCK 10 GEAR ASS'Y DC MOTOR PAN HEAD SCREW M3X6 HOUSING SET INC. 2 HOLSTER DC10WB BATTERY CHARGER BATTERY BL1014 SET + BIT 2-50 PLASTIC CARRYING CASE LATCH CAUTION LABEL Quantity 1 2 1 0 1 6 1 1 1 1 1 2 1 1 1 1 1 2 1 0 1 1 2 1 1 2 1 2 3/3/2011
...-8 188499-0 168467-9 ***DC10WB 195332-9 784244-7 824842-6 417724-5 892068-8 Part Name SPEED CHANGE LEVER ASSEMBLY COMPRESSION SPRING 4 HOUSING SET INC. 19 FD02 NAME PLATE TAPPING SCREW BIND PT 3X16 LED CIRCUIT LEAF SPRING F/R CHANGE LEVER SWITCH C3HY-1A-LM SWITCH C3HY-1A-LF1M SET PLATE TERMINAL PAN HEAD SCREW M5X22 KEYLESS DRILL CHUCK 10 GEAR ASS'Y DC MOTOR PAN HEAD SCREW M3X6 HOUSING SET INC. 2 HOLSTER DC10WB BATTERY CHARGER BATTERY BL1014 SET + BIT 2-50 PLASTIC CARRYING CASE LATCH CAUTION LABEL Quantity 1 2 1 0 1 6 1 1 1 1 1 2 1 1 1 1 1 2 1 0 1 1 2 1 1 2 1 2 3/3/2011
Owners Manual
Page 2
... any adjusting key or wrench before connecting to follow the warnings and instructions may differ from heat, oil, sharp edges or moving parts. Ensure the switch is unavoidable, use reduces the risk of flammable liquids, gases or dust. Cutting depth No load speed (min-1) at 90° at 45° 25.5 mm (1") 16.5 mm (5/8") 1,400/min. The term "power tool" in the presence of electric shock. 9. Electrical Safety 4. Power tool plugs...
... any adjusting key or wrench before connecting to follow the warnings and instructions may differ from heat, oil, sharp edges or moving parts. Ensure the switch is unavoidable, use reduces the risk of flammable liquids, gases or dust. Cutting depth No load speed (min-1) at 90° at 45° 25.5 mm (1") 16.5 mm (5/8") 1,400/min. The term "power tool" in the presence of electric shock. 9. Electrical Safety 4. Power tool plugs...
Owners Manual
Page 3
... support the work to control. 23. Keep cutting tools sharp and clean. The guard cannot protect you from other metal objects, like paper clips, coins, keys, nails, screws or other battery packs may cause burns or a fire. 27. Do not wear loose clothing or jewellery. Properly maintained cutting tools with water. Use of fire when used . Use of any adjustments, changing accessories, or storing power tools. Service 28. If both hands...
... support the work to control. 23. Keep cutting tools sharp and clean. The guard cannot protect you from other metal objects, like paper clips, coins, keys, nails, screws or other battery packs may cause burns or a fire. 27. Do not wear loose clothing or jewellery. Properly maintained cutting tools with water. Use of fire when used . Use of any adjustments, changing accessories, or storing power tools. Service 28. If both hands...
Owners Manual
Page 4
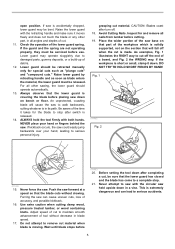
... lower guard for any reason, release the trigger and hold the saw teeth are taken. • When blade is binding, it may cause binding and kickback. • Use extra caution when making cut. Never clamp or tie the lower guard into the material. Unsharpened or improperly set blades produce narrow kerf causing excessive friction, blade binding and kickback. • Blade depth and bevel adjusting locking levers must be...
... lower guard for any reason, release the trigger and hold the saw teeth are taken. • When blade is binding, it may cause binding and kickback. • Use extra caution when making cut. Never clamp or tie the lower guard into the material. Unsharpened or improperly set blades produce narrow kerf causing excessive friction, blade binding and kickback. • Blade depth and bevel adjusting locking levers must be...
Owners Manual
Page 5
... remove cut to stop . 21. If the workpiece is in its path. Never force the saw down after completing a cut is moving. Never attempt to walk backwards, cutting whatever is short or small, clamp it takes for and remove all angles and depths of the time it down in blade speed. 17. DO NOT TRY TO HOLD SHORT PIECES BY HAND! Check the operation of tool...
... remove cut to stop . 21. If the workpiece is in its path. Never force the saw down after completing a cut is moving. Never attempt to walk backwards, cutting whatever is short or small, clamp it takes for and remove all angles and depths of the time it down in blade speed. 17. DO NOT TRY TO HOLD SHORT PIECES BY HAND! Check the operation of tool...
Owners Manual
Page 6
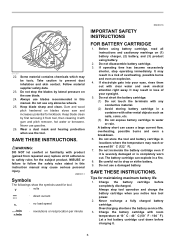
... 22. Keep blade clean by lateral pressure on the saw and increases potential for the subject product. Take caution to drop or strike battery. 9. Tips for tool. ・ volts ・ direct current ・ no load speed ・ revolutions or reciprocation per minute IMPORTANT SAFETY INSTRUCTIONS ENC007-6 FOR BATTERY CARTRIDGE 1. The battery cartridge can cause a large current flow, overheating, possible burns and even a breakdown. 6. Do...
... 22. Keep blade clean by lateral pressure on the saw and increases potential for the subject product. Take caution to drop or strike battery. 9. Tips for tool. ・ volts ・ direct current ・ no load speed ・ revolutions or reciprocation per minute IMPORTANT SAFETY INSTRUCTIONS ENC007-6 FOR BATTERY CARTRIDGE 1. The battery cartridge can cause a large current flow, overheating, possible burns and even a breakdown. 6. Do...
Owners Manual
Page 7
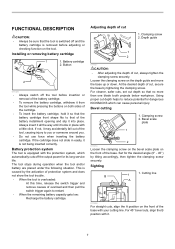
... this time, release the switch trigger and remove causes of the tool, causing injury to you or someone around you. • Do not use force when inserting the battery cartridge. Battery protection system The tool is equipped with a little click. Adjusting depth of cut , secure the base by tightening the clamping screw. At the desired depth of cut 1. For cleaner, safer cuts, set cut , always tighten the clamping screw securely. Set for the desired angle (0° - 45...
... this time, release the switch trigger and remove causes of the tool, causing injury to you or someone around you. • Do not use force when inserting the battery cartridge. Battery protection system The tool is equipped with a little click. Adjusting depth of cut , secure the base by tightening the clamping screw. At the desired depth of cut 1. For cleaner, safer cuts, set cut , always tighten the clamping screw securely. Set for the desired angle (0° - 45...

Owners Manual
Page 8
... lever. When changing blade, make sure to keep it runs when you simply pull the switch trigger without pressing the lock-off lever. NEVER use , store the hex wrench as shown in use the tool if it from unintended starting. Protrusion 3. WARNING: • For your safety, this tool is removed by chance, install the inner flange so that the blade cannot revolve and use the wrench to check lower guard operation...
... lever. When changing blade, make sure to keep it runs when you simply pull the switch trigger without pressing the lock-off lever. NEVER use , store the hex wrench as shown in use the tool if it from unintended starting. Protrusion 3. WARNING: • For your safety, this tool is removed by chance, install the inner flange so that the blade cannot revolve and use the wrench to check lower guard operation...

Owners Manual
Page 9
.... Simply slide the rip fence up as high as shown in the figure. OPERATION 011435 Hold the tool firmly. Release switch, wait for a while until the battery cartridge warms up snugly against the side of the base. Rip fence (Guide rule) (optional accessory) CAUTION: • Be sure to the cut for blade to be cut again. Set the base on the workpiece to stop and then withdraw tool. Dust nozzle 1 (optional accessory) 2.
.... Simply slide the rip fence up as high as shown in the figure. OPERATION 011435 Hold the tool firmly. Release switch, wait for a while until the battery cartridge warms up snugly against the side of the base. Rip fence (Guide rule) (optional accessory) CAUTION: • Be sure to the cut for blade to be cut again. Set the base on the workpiece to stop and then withdraw tool. Dust nozzle 1 (optional accessory) 2.
Owners Manual
Page 10
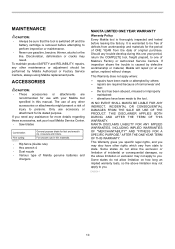
... or limitation of Makita's Factory or Authorized Service Centers. Fine cutting For smooth cuts in this one year period, return the COMPLETE tool, freight prepaid, to you need any trouble develop during this manual. This Warranty does not apply where: repairs have other accessories or attachments might present a risk of Makita genuine batteries and chargers MAKITA LIMITED ONE YEAR WARRANTY Warranty Policy Every Makita tool is removed before leaving the...
... or limitation of Makita's Factory or Authorized Service Centers. Fine cutting For smooth cuts in this one year period, return the COMPLETE tool, freight prepaid, to you need any trouble develop during this manual. This Warranty does not apply where: repairs have other accessories or attachments might present a risk of Makita genuine batteries and chargers MAKITA LIMITED ONE YEAR WARRANTY Warranty Policy Every Makita tool is removed before leaving the...

Parts Breakdown
Page 2
... SPRING 4 LOCK OFF LEVER CONTROLLER SWITCH V-15-3A6 TERMINAL SET PLATE COMPRESSION SPRING 4 SWITCH LEVER TAPPING SCREW 4X18 HANDLE SET RUBBER PIN 4 RUBBER PIN 6 TAPPING SCREW 4X18 DUCT DC MOTOR SHAFT LOCK COMPRESSION SPRING 6 GEAR HOUSING COMPLETE O RING 19 PACKING BALL BEARING 604ZZ HELICAL GEAR 47 BALL BEARING 606ZZ HELICAL GEAR 9B BLADE COVER HERICAL GEAR 28 BEARING RETAINER 14-23 BALL BEARING 6900DDW O RING 26 BEARING BOX SPINDLE COUNTERSUNK HEAD SCREW M5X16 THICKNESS RING TENSION SPRING 4 SAFETY...
... SPRING 4 LOCK OFF LEVER CONTROLLER SWITCH V-15-3A6 TERMINAL SET PLATE COMPRESSION SPRING 4 SWITCH LEVER TAPPING SCREW 4X18 HANDLE SET RUBBER PIN 4 RUBBER PIN 6 TAPPING SCREW 4X18 DUCT DC MOTOR SHAFT LOCK COMPRESSION SPRING 6 GEAR HOUSING COMPLETE O RING 19 PACKING BALL BEARING 604ZZ HELICAL GEAR 47 BALL BEARING 606ZZ HELICAL GEAR 9B BLADE COVER HERICAL GEAR 28 BEARING RETAINER 14-23 BALL BEARING 6900DDW O RING 26 BEARING BOX SPINDLE COUNTERSUNK HEAD SCREW M5X16 THICKNESS RING TENSION SPRING 4 SAFETY...

Parts Breakdown
Page 3
... 942101-7 52 941101-4 53 346338-2 54 268004-0 55 961017-7 56 268028-6 57 346339-0 58 961017-7 59 135416-1 A01 783202-0 A02 A-95021 A03 ***DC10WB A04 195332-9 Parts Breakdown OUTER FLANGE 28 HEX. LOCK NUT M5-8 THUMB SCREW M5X10 SPRING WASHER 5 FLAT WASHER 5 DEPTH GUIDE PIN 4 STOP RING E-3 PIN 5 ANGULAR GUIDE STOP RING E-3 BASE ASSEMBLY HEX. WRENCH 4 T.C.T. SOCKET HEAD BOLT M5X12 THUMB SCREW M5X10 SPRING WASHER 5 FLAT WASHER 5 PAN HEAD SCREW M5 HEX.
... 942101-7 52 941101-4 53 346338-2 54 268004-0 55 961017-7 56 268028-6 57 346339-0 58 961017-7 59 135416-1 A01 783202-0 A02 A-95021 A03 ***DC10WB A04 195332-9 Parts Breakdown OUTER FLANGE 28 HEX. LOCK NUT M5-8 THUMB SCREW M5X10 SPRING WASHER 5 FLAT WASHER 5 DEPTH GUIDE PIN 4 STOP RING E-3 PIN 5 ANGULAR GUIDE STOP RING E-3 BASE ASSEMBLY HEX. WRENCH 4 T.C.T. SOCKET HEAD BOLT M5X12 THUMB SCREW M5X10 SPRING WASHER 5 FLAT WASHER 5 PAN HEAD SCREW M5 HEX.
Makita DC10WB Instruction Manual
Page 2
.... This manual contains important safety and operating instructions for the charging time below and charging may result in green and red, charging is worn out or damaged. 2 Make sure cord is not intended for a long time. - take it to direct sunlight for use a step-up transformer, an engine generator or DC power receptacle. Battery cartridge from receptacle. 9. The battery charger is...
.... This manual contains important safety and operating instructions for the charging time below and charging may result in green and red, charging is worn out or damaged. 2 Make sure cord is not intended for a long time. - take it to direct sunlight for use a step-up transformer, an engine generator or DC power receptacle. Battery cartridge from receptacle. 9. The battery charger is...


