
Owners Manual
Page 4
... for a while. Watch for lubricating and changing accessories. 25. Wait until the blade attains full speed before any adjusting. 13. Do not leave the tool running. Use only Makita blades specified in this tool unsafely or incorrectly, you are securely tightened before operation. 7.... Always be performed. SAVE THESE INSTRUCTIONS. Clean out chips with product (gained from rotating parts. 9. Avoid cutting nails. Use only sharp blades. Always use ) replace strict adherence to planer safety rules. GEB010-2 SPECIFIC SAFETY RULES DO NOT let comfort or familiarity with a stick...
... for a while. Watch for lubricating and changing accessories. 25. Wait until the blade attains full speed before any adjusting. 13. Do not leave the tool running. Use only Makita blades specified in this tool unsafely or incorrectly, you are securely tightened before operation. 7.... Always be performed. SAVE THESE INSTRUCTIONS. Clean out chips with product (gained from rotating parts. 9. Avoid cutting nails. Use only sharp blades. Always use ) replace strict adherence to planer safety rules. GEB010-2 SPECIFIC SAFETY RULES DO NOT let comfort or familiarity with a stick...

Owners Manual
Page 5
...gloves or rags to protect your fingers or hands when removing or installing the blades. • Use only the Makita wrench provided to the drum or blades. Bolt 2. Planer blade 4. Screws 6. Place the blade on the drum, unscrew the installation bolts with electronic function are tightened securely....shock, and makes the tool start the tool, simply pull the switch trigger. Heel 8 7. Place the adjusting plate on the blade, then simply press in overtightening or insufficient tightening of the rear base. Rear base 3. Constant speed control Electronic speed control for ...
...gloves or rags to protect your fingers or hands when removing or installing the blades. • Use only the Makita wrench provided to the drum or blades. Bolt 2. Planer blade 4. Screws 6. Place the blade on the drum, unscrew the installation bolts with electronic function are tightened securely....shock, and makes the tool start the tool, simply pull the switch trigger. Heel 8 7. Place the adjusting plate on the blade, then simply press in overtightening or insufficient tightening of the rear base. Rear base 3. Constant speed control Electronic speed control for ...

Owners Manual
Page 6
... of the gauge base. Slip the heel of the adjusting plate into the drum groove, then fit the drum cover on the other blade. Set plate 4. Drum 2 002566 7. The blade must be mounted so that the cutting edge is absolutely level, that is, parallel to the set plate with the pan head... screws and set plate and screw in the three hex flange head bolts so that the blade ends are clear and equidistant from the housing on one side and the metal bracket on it. plate into the groove of the drum. 6. To...
... of the gauge base. Slip the heel of the adjusting plate into the drum groove, then fit the drum cover on the other blade. Set plate 4. Drum 2 002566 7. The blade must be mounted so that the cutting edge is absolutely level, that is, parallel to the set plate with the pan head... screws and set plate and screw in the three hex flange head bolts so that the blade ends are clear and equidistant from the housing on one side and the metal bracket on it. plate into the groove of the drum. 6. To...

Owners Manual
Page 7
... the dust bag of chip discharge so that the recessed part fits to the rear base surface. Gouging at end (A) EN0004-1 Change of the blades run perfectly parallel to protrusion. 1. Chip discharge opening 1 007643 007687 1 2 Chip discharge direction can be changed to rear base line. Chip ...discharge opening Cause: One or both blades fails to have edge parallel to the right or left. Protrusion Attach the dust bag onto the chip discharge opening is about half full, ...
... the dust bag of chip discharge so that the recessed part fits to the rear base surface. Gouging at end (A) EN0004-1 Change of the blades run perfectly parallel to protrusion. 1. Chip discharge opening 1 007643 007687 1 2 Chip discharge direction can be changed to rear base line. Chip ...discharge opening Cause: One or both blades fails to have edge parallel to the right or left. Protrusion Attach the dust bag onto the chip discharge opening is about half full, ...

Owners Manual
Page 8
... cleaner to this tool, more slowly. Adjust the shiplapping depth using a depth guide (accessory). Draw a cutting line on and wait until the blades attain full speed. Vacuum cleaner 1 007644 When you should reduce the depth of planing. Apply pressure on it out. 002580 To make a stepped...be increased, while for a good finish you wish to perform clean planing operation, connect a Makita vacuum cleaner to perform cleaner work. Planing operation 1 2 1. To remove it, just pull it . Align the blade edge with one hand on the knob and the other hand on the tool by chips. 007802...
... cleaner to this tool, more slowly. Adjust the shiplapping depth using a depth guide (accessory). Draw a cutting line on and wait until the blades attain full speed. Vacuum cleaner 1 007644 When you should reduce the depth of planing. Apply pressure on it out. 002580 To make a stepped...be increased, while for a good finish you wish to perform clean planing operation, connect a Makita vacuum cleaner to perform cleaner work. Planing operation 1 2 1. To remove it, just pull it . Align the blade edge with one hand on the knob and the other hand on the tool by chips. 007802...

Owners Manual
Page 9
Blade edge 2. Otherwise uneven planing may wish to add to the length of the fence by attaching an extra piece of chamfering) 3. V groove (small amount of ... slightly (0.2 mm - 0.4 mm) for shiplapping. 0.2 - 0.4mm 007649 003634 To make a chamfering cut as shown in contact with the side of the workpiece. CAUTION: • The blade edge should be made to 4 mm. Depth guide 1 007647 3 2 007714 Install the edge fence on both sides of the front of the tool and set...
Blade edge 2. Otherwise uneven planing may wish to add to the length of the fence by attaching an extra piece of chamfering) 3. V groove (small amount of ... slightly (0.2 mm - 0.4 mm) for shiplapping. 0.2 - 0.4mm 007649 003634 To make a chamfering cut as shown in contact with the side of the workpiece. CAUTION: • The blade edge should be made to 4 mm. Depth guide 1 007647 3 2 007714 Install the edge fence on both sides of the front of the tool and set...
Owners Manual
Page 10
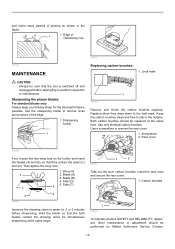
...free to remove nicks and produce a fine edge. 1. Use only identical carbon brushes. Wing nut 1 2. Blade (B) 4. Sharpening the planer blades For standard blades only Always keep your blades sharp for 2 or 3 minutes before attempting to remove the rear cover. 1. Screwdriver 2. Rear cover 002588.... Carbon brushes 1 007652 To maintain product SAFETY and RELIABILITY, repairs, any other maintenance or adjustment should be performed by Makita Authorized Service Centers, 10 Use the sharpening holder to slip in the holders. Both carbon brushes should be replaced at the...
...free to remove nicks and produce a fine edge. 1. Use only identical carbon brushes. Wing nut 1 2. Blade (B) 4. Sharpening the planer blades For standard blades only Always keep your blades sharp for 2 or 3 minutes before attempting to remove the rear cover. 1. Screwdriver 2. Rear cover 002588.... Carbon brushes 1 007652 To maintain product SAFETY and RELIABILITY, repairs, any other maintenance or adjustment should be performed by Makita Authorized Service Centers, 10 Use the sharpening holder to slip in the holders. Both carbon brushes should be replaced at the...
Owners Manual
Page 11
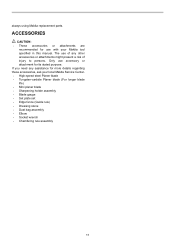
... accessories or attachments are recommended for its stated purpose. The use with your local Makita Service Center. • High-speed steel Planer blade • Tungsten-carbide Planer blade (For longer blade life) • Mini planer blade • Sharpening holder assembly • Blade gauge • Set plate set • Edge fence (Guide rule) • Dressing stone •...
... accessories or attachments are recommended for its stated purpose. The use with your local Makita Service Center. • High-speed steel Planer blade • Tungsten-carbide Planer blade (For longer blade life) • Mini planer blade • Sharpening holder assembly • Blade gauge • Set plate set • Edge fence (Guide rule) • Dressing stone •...
Parts Breakdown
Page 2
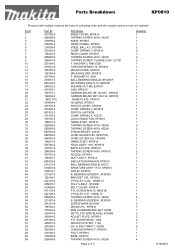
... ASS'Y 115V, KP0810 BAFFLE PLATE, KP0810 TAPPING SCREW 5X55, KP0810 NOZZLE, KP0810 DUCT ASS'Y, KP0810 INSULATION WASHER, KP0810 BALL BEARING 608LLB, 9227C ARMATURE ASS'Y 115V, KP0810 FAN 62, KP0810 B. BEARING 6200DDW, JR3000V SCREW M4X8, BO6030 DRUM CPL., KP0810 MINI PLANER BLADE SET,1923B SET PLATE (MINI BLADE), N1900B ADJUST PLATE, KP0810 P.H. WASHER 5, HM1303B TORSION SPRING 10, KP0810 DRUM COVER, KP0810 DRUM HOLDER, KP0810 F. SCREW M4X18...
... ASS'Y 115V, KP0810 BAFFLE PLATE, KP0810 TAPPING SCREW 5X55, KP0810 NOZZLE, KP0810 DUCT ASS'Y, KP0810 INSULATION WASHER, KP0810 BALL BEARING 608LLB, 9227C ARMATURE ASS'Y 115V, KP0810 FAN 62, KP0810 B. BEARING 6200DDW, JR3000V SCREW M4X8, BO6030 DRUM CPL., KP0810 MINI PLANER BLADE SET,1923B SET PLATE (MINI BLADE), N1900B ADJUST PLATE, KP0810 P.H. WASHER 5, HM1303B TORSION SPRING 10, KP0810 DRUM COVER, KP0810 DRUM HOLDER, KP0810 F. SCREW M4X18...

Flyer (English)
Page 1
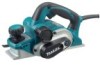
3-1/4" PLANER PLANES UP TO 3-1/4'' WIDE AND 5/32'' DEEP IN A SINGLE PASS Powerful Yet Lightweight (7.5 AMP Motor, 7.2 lbs.) 2-Blade Cutter Head for Fast Stock Removal; 16,000 RPM Chip Ejection Can Be Directed to Either Side of the Tool for Convenience Conveniently Located Lock-... to read scale and click stops for precise depth adjustment CONVENIENCE Lock-on/off button can be operated from either side of handle DURABILITY Model KP0810 Planer blade drum is held by rigid die-cast aluminum housing bracket LIGHTWEIGHT. USER FRIENDLY. makitatools.com
3-1/4" PLANER PLANES UP TO 3-1/4'' WIDE AND 5/32'' DEEP IN A SINGLE PASS Powerful Yet Lightweight (7.5 AMP Motor, 7.2 lbs.) 2-Blade Cutter Head for Fast Stock Removal; 16,000 RPM Chip Ejection Can Be Directed to Either Side of the Tool for Convenience Conveniently Located Lock-... to read scale and click stops for precise depth adjustment CONVENIENCE Lock-on/off button can be operated from either side of handle DURABILITY Model KP0810 Planer blade drum is held by rigid die-cast aluminum housing bracket LIGHTWEIGHT. USER FRIENDLY. makitatools.com

Flyer (English)
Page 2
...9632; Planes up to 1" Model KP0810 Makita offers a wide variety of handle ■ Depth adjust knob features an easy to read scale with set with click stops in a single pass ■ Powerful yet lightweight (7.5 AMP motor, 7.2 lbs.) ■ 2-Blade cutter head for fast stock removal... housing supports planer drum for increased durability ■ Foot on planer base elevates the base protecting the workpiece and planer blades from damage STANDARD EQUIPMENT ■ Blade gauge assembly (123062-2) ■ Socket wrench (782209-3) ■ Guide rule (122785-9) ■ Depth guide (342390...
...9632; Planes up to 1" Model KP0810 Makita offers a wide variety of handle ■ Depth adjust knob features an easy to read scale with set with click stops in a single pass ■ Powerful yet lightweight (7.5 AMP motor, 7.2 lbs.) ■ 2-Blade cutter head for fast stock removal... housing supports planer drum for increased durability ■ Foot on planer base elevates the base protecting the workpiece and planer blades from damage STANDARD EQUIPMENT ■ Blade gauge assembly (123062-2) ■ Socket wrench (782209-3) ■ Guide rule (122785-9) ■ Depth guide (342390...


