
Owners Manual
Page 4
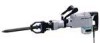
... 0 6 10 12 Not More Than 6 10 12 16 Volts 120 V Total length of cord in the Maintenance section of power and overheating. Be sure the bit is also highly recommended that you can suffer serious personal injury. 1. Wear a hard hat (safety helmet), safety glasses and/or face shield. It is secured...
... 0 6 10 12 Not More Than 6 10 12 16 Volts 120 V Total length of cord in the Maintenance section of power and overheating. Be sure the bit is also highly recommended that you can suffer serious personal injury. 1. Wear a hard hat (safety helmet), safety glasses and/or face shield. It is secured...

Owners Manual
Page 5
... any one is difficult. 7. Always be sure you have a firm footing. Do not touch the bit or parts close to prevent dust inhalation and skin contact. tion. Take caution to the bit immediately after operation; The bit could burn your skin. 13. Without proper warm-up, hammering operation is below when using the...
... any one is difficult. 7. Always be sure you have a firm footing. Do not touch the bit or parts close to prevent dust inhalation and skin contact. tion. Take caution to the bit immediately after operation; The bit could burn your skin. 13. Without proper warm-up, hammering operation is below when using the...

Owners Manual
Page 7
.... (2) For bits without a collar 002935 1 2 3 4 1. To install the bit, follow either with or without coller 002928 1 2 Installing or removing the bit This tool accepts bits either procedure (1) or (2) described below. (1) For bits with collar 2. Bit 3. To securely retain the bit, return the tool... CAUTION: • Always assure that the bit is retained 5 Fig.(2) 2. Insert the bit into the tool holder as far as it will go . When the bit is securely retained by attempting to securely retain the bit. 7 When the bit is inserted Pivot the tool retainer back and...
.... (2) For bits without a collar 002935 1 2 3 4 1. To install the bit, follow either with or without coller 002928 1 2 Installing or removing the bit This tool accepts bits either procedure (1) or (2) described below. (1) For bits with collar 2. Bit 3. To securely retain the bit, return the tool... CAUTION: • Always assure that the bit is retained 5 Fig.(2) 2. Insert the bit into the tool holder as far as it will go . When the bit is securely retained by attempting to securely retain the bit. 7 When the bit is inserted Pivot the tool retainer back and...
Owners Manual
Page 8
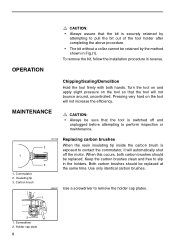
... off the motor. Use only identical carbon brushes. 002957 Use a screwdriver to remove the holder cap plates. 1 2 1. To remove the bit, follow the installation procedure in the holders. Commutator 2. Holder cap plate 8 Keep the carbon brushes clean and free to slip 3 in reverse...not bounce around, uncontrolled. MAINTENANCE CAUTION: • Always be retained by attempting to pull the bit out of the tool holder after completing the above procedure. • The bit without a collar cannot be sure that the tool will not increase the efficiency. OPERATION CAUTION: &#...
... off the motor. Use only identical carbon brushes. 002957 Use a screwdriver to remove the holder cap plates. 1 2 1. To remove the bit, follow the installation procedure in the holders. Commutator 2. Holder cap plate 8 Keep the carbon brushes clean and free to slip 3 in reverse...not bounce around, uncontrolled. MAINTENANCE CAUTION: • Always be retained by attempting to pull the bit out of the tool holder after completing the above procedure. • The bit without a collar cannot be sure that the tool will not increase the efficiency. OPERATION CAUTION: &#...


