
Owners Manual
Page 1
INSTRUCTION MANUAL MANUEL D'INSTRUCTION MANUAL DE INSTRUCCIONES Straight Grinder Meuleuse Droite Esmeril recto GS5000 GS6000 DOUBLE INSULATION DOUBLE ISOLATION DOBLE AISLAMIENTO 013595 IMPORTANT: Read Before Using. IMPORTANT: Lire avant usage. IMPORTANTE: Leer antes de usar. 1
INSTRUCTION MANUAL MANUEL D'INSTRUCTION MANUAL DE INSTRUCCIONES Straight Grinder Meuleuse Droite Esmeril recto GS5000 GS6000 DOUBLE INSULATION DOUBLE ISOLATION DOBLE AISLAMIENTO 013595 IMPORTANT: Read Before Using. IMPORTANT: Lire avant usage. IMPORTANTE: Leer antes de usar. 1

Owners Manual
Page 2
... inattention while operating power tools may result in the presence of electric shock. Use personal protective equipment. Ensure the switch is in a damp location is earthed or grounded. 6. ENGLISH (Original instructions) SPECIFICATIONS Model GS5000 GS6000 Maximum wheel capacity (diameter x thickness) 125 mm ( 5 ") × 20 mm ( 3/4") 150 mm (6") × 20 mm (3/4") Spindle thread 5/8" No load speed (RPM) 5,600 /min Overall length With support cover Without support cover...
... inattention while operating power tools may result in the presence of electric shock. Use personal protective equipment. Ensure the switch is in a damp location is earthed or grounded. 6. ENGLISH (Original instructions) SPECIFICATIONS Model GS5000 GS6000 Maximum wheel capacity (diameter x thickness) 125 mm ( 5 ") × 20 mm ( 3/4") 150 mm (6") × 20 mm (3/4") Spindle thread 5/8" No load speed (RPM) 5,600 /min Overall length With support cover Without support cover...

Owners Manual
Page 3
... power tool repaired before making any other condition that the safety of starting the power tool accidentally. 20. Properly maintained cutting tools with the switch is intended to function as sanding, wire brushing, polishing or cutting-off . Use the power tool, accessories and tool bits etc. This will cause a drop in line voltage resulting in a hazardous situation. Keep handles dry, clean and free from the power tool before use and care 17. When using only identical replacement parts...
... power tool repaired before making any other condition that the safety of starting the power tool accidentally. 20. Properly maintained cutting tools with the switch is intended to function as sanding, wire brushing, polishing or cutting-off . Use the power tool, accessories and tool bits etc. This will cause a drop in line voltage resulting in a hazardous situation. Keep handles dry, clean and free from the power tool before use and care 17. When using only identical replacement parts...
Owners Manual
Page 4
... where power tool will normally break apart during start-up. The rated speed of power tool misuse and/or incorrect operating procedures or conditions and can be adequately guarded or controlled. 6. Before each use face shield, safety goggles or safety glasses. Kickback and Related Warnings Kickback is the result of the accessory must match the grinder spindle thread. c) Do not position your hand. Incorrectly sized accessories cannot...
... where power tool will normally break apart during start-up. The rated speed of power tool misuse and/or incorrect operating procedures or conditions and can be adequately guarded or controlled. 6. Before each use face shield, safety goggles or safety glasses. Kickback and Related Warnings Kickback is the result of the accessory must match the grinder spindle thread. c) Do not position your hand. Incorrectly sized accessories cannot...

Owners Manual
Page 5
... wheel types that the wheel continues to rotate after operation; Safety Warnings Specific for your skin. 24. Proper wheel flanges support the wheel thus reducing the possibility of snagging. Be careful not to damage the spindle, the flange (especially the installing surface) or the lock nut. If working corners, sharp edges etc. MISUSE or failure to follow the safety rules stated in wheel breakage. 19. d) Do not use ) replace...
... wheel types that the wheel continues to rotate after operation; Safety Warnings Specific for your skin. 24. Proper wheel flanges support the wheel thus reducing the possibility of snagging. Be careful not to damage the spindle, the flange (especially the installing surface) or the lock nut. If working corners, sharp edges etc. MISUSE or failure to follow the safety rules stated in wheel breakage. 19. d) Do not use ) replace...

Owners Manual
Page 6
... that has larger diameter than 10N.m to stop . Release the switch trigger to tighten sufficiently will cause flutter. Hex lock nut 2 5 4. To start the tool, push in the lock lever (in the A direction) and then pull the switch trigger (in the A direction). For tool with the blotter that a blotter part does not have any work on both sides of operator comfort during extended use the grinding wheel with support cover only (country specific) 1 1.
... that has larger diameter than 10N.m to stop . Release the switch trigger to tighten sufficiently will cause flutter. Hex lock nut 2 5 4. To start the tool, push in the lock lever (in the A direction) and then pull the switch trigger (in the A direction). For tool with the blotter that a blotter part does not have any work on both sides of operator comfort during extended use the grinding wheel with support cover only (country specific) 1 1.
Owners Manual
Page 7
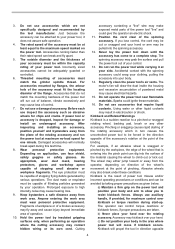
... type) 3 4 1. Spindle OPERATION CAUTION: • Apply light pressure on the tool will only cause a poor finish and overloading of the motor. • The grinding wheel continues to loosen the hex nut. Inner flange 2 4. Hex nut 2. Grinding wheel 4. Outer flange (flat type) 3. Screwdriver 1 2. Grip the hex nut with the wrench, turning in the direction of the tool housing. 7 Then install the wheel, outer flange and hex nut. Tighten the hex nut in the direction of...
... type) 3 4 1. Spindle OPERATION CAUTION: • Apply light pressure on the tool will only cause a poor finish and overloading of the motor. • The grinding wheel continues to loosen the hex nut. Inner flange 2 4. Hex nut 2. Grinding wheel 4. Outer flange (flat type) 3. Screwdriver 1 2. Grip the hex nut with the wrench, turning in the direction of the tool housing. 7 Then install the wheel, outer flange and hex nut. Tighten the hex nut in the direction of...
Owners Manual
Page 8
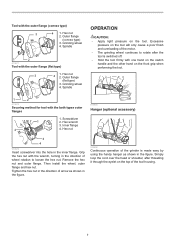
... unhooking hook A or B may result. 1. Screwdriver 013743 To remove, lift it up by using a slotted bit screwdriver near the hook A. Regularly clean the tool's air vents or whenever the vents start to be kept clean. Hook A 3. Insert hook B into vent A lightly. MAINTENANCE 2 1 CAUTION: • Always be sure that the tool is switched off and unplugged before installing or removing the dust cover attachments. • Failure to...
... unhooking hook A or B may result. 1. Screwdriver 013743 To remove, lift it up by using a slotted bit screwdriver near the hook A. Regularly clean the tool's air vents or whenever the vents start to be kept clean. Hook A 3. Insert hook B into vent A lightly. MAINTENANCE 2 1 CAUTION: • Always be sure that the tool is switched off and unplugged before installing or removing the dust cover attachments. • Failure to...
Owners Manual
Page 9
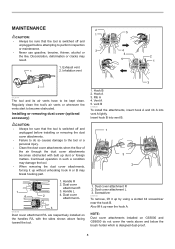
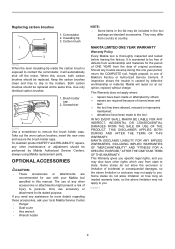
... by Makita Authorized Service Centers, always using Makita replacement parts. This Warranty does not apply where: repairs have been made to the tool. Insulating tip 3. Carbon brush 3 001146 When the resin insulating tip inside the carbon brush is warranted to be free of defects from workmanship and materials for use of any assistance for its stated purpose. When this manual. To maintain product SAFETY and RELIABILITY, repairs, any trouble...
... by Makita Authorized Service Centers, always using Makita replacement parts. This Warranty does not apply where: repairs have been made to the tool. Insulating tip 3. Carbon brush 3 001146 When the resin insulating tip inside the carbon brush is warranted to be free of defects from workmanship and materials for use of any assistance for its stated purpose. When this manual. To maintain product SAFETY and RELIABILITY, repairs, any trouble...

Flyer (English)
Page 1
...; "Tool-less" Guard Cap Removal for Quick Wheel Changes • Spiral Bevel Gears for Smoother Rotations and a More Efficient Transfer of Energy • Externally Accessible Brushes for Easier Serviceability 5,600 RPM Powerful 7.0 AMP motor delivers more output and 5,600 RPM COMFORT Rubberized gear housing and handle for operator comfort and control CONVENIENCE "Tool-less" guard cap for quick wheel removal SERVICEABILITY Model GS5000 **shown with optional abrasive wheel Externally accessible brushes for easier serviceability COMFORT...
...; "Tool-less" Guard Cap Removal for Quick Wheel Changes • Spiral Bevel Gears for Smoother Rotations and a More Efficient Transfer of Energy • Externally Accessible Brushes for Easier Serviceability 5,600 RPM Powerful 7.0 AMP motor delivers more output and 5,600 RPM COMFORT Rubberized gear housing and handle for operator comfort and control CONVENIENCE "Tool-less" guard cap for quick wheel removal SERVICEABILITY Model GS5000 **shown with optional abrasive wheel Externally accessible brushes for easier serviceability COMFORT...

Flyer (English)
Page 2
... hand. For a complete listing, please refer to help prevent dust and debris from penetrating the main bearing or gear box n Spring loaded sealed drive bearing is the registered trade dress of tools and accessories. 5" STRAIGHT GRINDER Model GS5000 FEATURES & BENEFITS n Powerful 7.0 AMP motor delivers more output and 5,600 RPM for demanding applications n Rubberized handle and gear housing for increased operator comfort and control n "Tool-less" guard cap removal for quick wheel changes n Spiral bevel gears...
... hand. For a complete listing, please refer to help prevent dust and debris from penetrating the main bearing or gear box n Spring loaded sealed drive bearing is the registered trade dress of tools and accessories. 5" STRAIGHT GRINDER Model GS5000 FEATURES & BENEFITS n Powerful 7.0 AMP motor delivers more output and 5,600 RPM for demanding applications n Rubberized handle and gear housing for increased operator comfort and control n "Tool-less" guard cap removal for quick wheel changes n Spiral bevel gears...


