EN4951SH Instruction Manual
Page 2
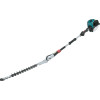
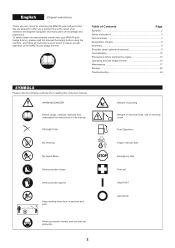
... instructions 3 Technical data 7 Designation of parts 8 Assembly 9 Shoulder strap (optional accessory 9 Fuel/refuelling 10 Precautions before starting the engine 12 Operating the pole hedge trimmer 15 Maintenance 17 Storage 22 Troubleshooting 24 SYMBOLS Please note the following symbols when reading this manual thoroughly before using the machine, and follow all instructions given herein to offer you very much for choosing the MAKITA pole hedge trimmer...
... instructions 3 Technical data 7 Designation of parts 8 Assembly 9 Shoulder strap (optional accessory 9 Fuel/refuelling 10 Precautions before starting the engine 12 Operating the pole hedge trimmer 15 Maintenance 17 Storage 22 Troubleshooting 24 SYMBOLS Please note the following symbols when reading this manual thoroughly before using the machine, and follow all instructions given herein to offer you very much for choosing the MAKITA pole hedge trimmer...
EN4951SH Instruction Manual
Page 3
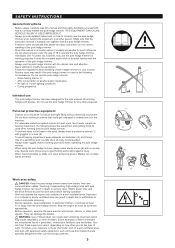
... power lines and electrical fences around the work shoes ensure good footing and protect against injuries to another person. Before operation, examine the work . To reduce your country. -- Blades can damage the blades. -- Always provide detailed instructions on how to these chemicals: work overalls (4) is used when working gloves (5) when operating the pole hedge trimmer. -- Follow the regulations about handling of...
... power lines and electrical fences around the work shoes ensure good footing and protect against injuries to another person. Before operation, examine the work . To reduce your country. -- Blades can damage the blades. -- Always provide detailed instructions on how to these chemicals: work overalls (4) is used when working gloves (5) when operating the pole hedge trimmer. -- Follow the regulations about handling of...
EN4951SH Instruction Manual
Page 4
... repair. -- Resting -- Performing maintenance on both handles. The lock-off lever should have been attached. -- Start the pole hedge trimmer only after the machine has been completely assembled and all times, avoid changing your grip during transportation and storage. -- If the blades move when starting the engine, keep the blades clear of suffocation and gas poisoning). Never operate the machine in a vehicle. -- Never operate the engine if the muffler is operated...
... repair. -- Resting -- Performing maintenance on both handles. The lock-off lever should have been attached. -- Start the pole hedge trimmer only after the machine has been completely assembled and all times, avoid changing your grip during transportation and storage. -- If the blades move when starting the engine, keep the blades clear of suffocation and gas poisoning). Never operate the machine in a vehicle. -- Never operate the engine if the muffler is operated...
EN4951SH Instruction Manual
Page 5
... hedge trimmer down before cleaning or servicing the machine. Also, refrain from the blades. -- Before refuelling, stop the engine and remove the spark plug cap. -- Do not smoke when refuelling. -- Check the fuel tank cap at ground level (risk of an emergency, turn off the engine and wait until the cause is out of the reach of slippery and wet areas (ice and snow) during operation, switch off the engine...
... hedge trimmer down before cleaning or servicing the machine. Also, refrain from the blades. -- Before refuelling, stop the engine and remove the spark plug cap. -- Do not smoke when refuelling. -- Check the fuel tank cap at ground level (risk of an emergency, turn off the engine and wait until the cause is out of the reach of slippery and wet areas (ice and snow) during operation, switch off the engine...
EN4951SH Instruction Manual
Page 6
... supplied by our authorized service center, always using only genuine replacement parts. Have your dealer or an authorized service agent. Contact MAKITA authorized service center for accidents or damage resulting from repairing a malfunctioning pole hedge trimmer if not qualified to keep pollution and noise emissions as low as this instruction manual. Maintenance instructions -- Never repair bent or broken blades by an authorized service agent. When asking...
... supplied by our authorized service center, always using only genuine replacement parts. Have your dealer or an authorized service agent. Contact MAKITA authorized service center for accidents or damage resulting from repairing a malfunctioning pole hedge trimmer if not qualified to keep pollution and noise emissions as low as this instruction manual. Maintenance instructions -- Never repair bent or broken blades by an authorized service agent. When asking...

EN4951SH Instruction Manual
Page 10
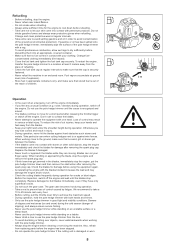
... the engine level, and detach the oil cap. FUEL/REFUELLING BEFORE START OF OPERATION Inspection and refill of API Classification, Class SF or higher (4-stroke engine for automobile) Oil volume: Approx. 0.08 L NOTE: If the engine is about 10 h (every 10 refuelling). The area surrounding the external marks is oil in color or mixes with dirt, replace it with oil to remove the oil cap. If the oil changes...
... the engine level, and detach the oil cap. FUEL/REFUELLING BEFORE START OF OPERATION Inspection and refill of API Classification, Class SF or higher (4-stroke engine for automobile) Oil volume: Approx. 0.08 L NOTE: If the engine is about 10 h (every 10 refuelling). The area surrounding the external marks is oil in color or mixes with dirt, replace it with oil to remove the oil cap. If the oil changes...

EN4951SH Instruction Manual
Page 11
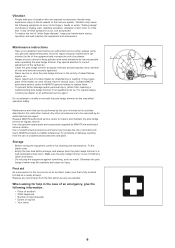
...-stroke engine. Keep the machine and tank at a cool place free from you touch fuel repeatedly or for fuel -- It may deteriorate in Replacement of operation. If you . Fuel The engine is sucked into the eye, clean the eye with fresh water. Loosen the tank cap a little to wipe out spilled oil before start -up to use a gasoline mixture which may contain substances similar to handle fuel with...
...-stroke engine. Keep the machine and tank at a cool place free from you touch fuel repeatedly or for fuel -- It may deteriorate in Replacement of operation. If you . Fuel The engine is sucked into the eye, clean the eye with fresh water. Loosen the tank cap a little to wipe out spilled oil before start -up to use a gasoline mixture which may contain substances similar to handle fuel with...
EN4951SH Instruction Manual
Page 12
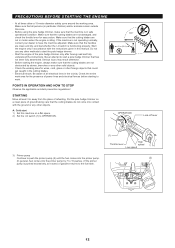
...! OPERATION Lock-off lever 3) Primer pump Continue to push the primer pump (2) until the fuel comes into the primer pump. (In general, fuel comes into contact with the instructions given in safe operational condition. STOP (1) High Throttle lever speed Low speed (2) 12 Make sure that the machine is in this machine on a clean piece of power lines and electrical fences before starting the engine, always make sure that the cutting blades are not damaged, and check the throttle lever...
...! OPERATION Lock-off lever 3) Primer pump Continue to push the primer pump (2) until the fuel comes into the primer pump. (In general, fuel comes into contact with the instructions given in safe operational condition. STOP (1) High Throttle lever speed Low speed (2) 12 Make sure that the machine is in this machine on a clean piece of power lines and electrical fences before starting the engine, always make sure that the cutting blades are not damaged, and check the throttle lever...

EN4951SH Instruction Manual
Page 13
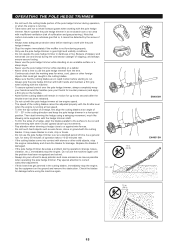
... idling position. 3) Pull the recoil starter strongly. 4) If it strongly. CAUTION: If the choke lever is difficult, operate choke lever with the following procedure when starting engine. • After implementing startup steps 1) to 3), set choke lever to the CLOSE position. • Implement startup step 4) and start engine. • Once engine starts, set choke lever to start the engine, open the throttle by about 1/3. Once the start the engine. Also, dry the electrode section of excessive fuel intake, remove the spark plug...
... idling position. 3) Pull the recoil starter strongly. 4) If it strongly. CAUTION: If the choke lever is difficult, operate choke lever with the following procedure when starting engine. • After implementing startup steps 1) to 3), set choke lever to the CLOSE position. • Implement startup step 4) and start engine. • Once engine starts, set choke lever to start the engine, open the throttle by about 1/3. Once the start the engine. Also, dry the electrode section of excessive fuel intake, remove the spark plug...
EN4951SH Instruction Manual
Page 15
... the pole hedge trimmer during operation, or when the engine is running . -- Check the blades for counter pressure) and apply a firm grip on the ground and remove the obstruction. As a general rule, for damage. EN4950H EN4951SH 15 Do not cut with semi-circular upward (down-up to correct carburetor adjustment. -- Then start trimming with the pole hedge trimmer at low speed. -- If the cutting blades come into...
... the pole hedge trimmer during operation, or when the engine is running . -- Check the blades for counter pressure) and apply a firm grip on the ground and remove the obstruction. As a general rule, for damage. EN4950H EN4951SH 15 Do not cut with semi-circular upward (down-up to correct carburetor adjustment. -- Then start trimming with the pole hedge trimmer at low speed. -- If the cutting blades come into...
EN4951SH Instruction Manual
Page 17
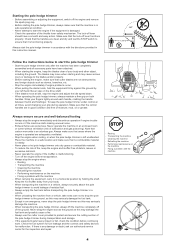
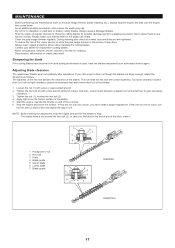
... a proper adjustment. The tightness of the hex bolt decides the clearance of the blades. 5. Start the engine, operate the throttle on and off for cleaning. Clean the pole hedge trimmer regularly. Loosen the nut (1) with a hex wrench lightly till it stops. Tighten the hex bolt (2) with a box or open fires. -- Always replace damaged blades. -- And then, screw it . 1 Hexagonal U-nut 2 Hex bolt 3 Plate 4 Blade guide 5 Upper blade 6 Lower blade 7 Blade guard 1 4 3 5 6 2 3 1 5 6 2 4 3 7 3 EN4950H EN4951SH 17...
... a proper adjustment. The tightness of the hex bolt decides the clearance of the blades. 5. Start the engine, operate the throttle on and off for cleaning. Clean the pole hedge trimmer regularly. Loosen the nut (1) with a hex wrench lightly till it stops. Tighten the hex bolt (2) with a box or open fires. -- Always replace damaged blades. -- And then, screw it . 1 Hexagonal U-nut 2 Hex bolt 3 Plate 4 Blade guide 5 Upper blade 6 Lower blade 7 Blade guard 1 4 3 5 6 2 3 1 5 6 2 4 3 7 3 EN4950H EN4951SH 17...
EN4951SH Instruction Manual
Page 18
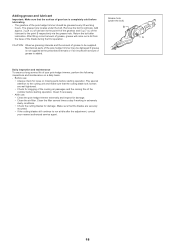
.... The grease hole locates under the bolt) -- CAUTION: Observe greasing intervals and the amount of grease to the point A of the gearbox and 5 g (7 cc) of the blade during the first operation. Grease hole (under the bolt. Remove the bolt to the cutting unit and make sure that the blades are well tightened. • Check for damage. • Clean the air filter. Before use ; • Clean the pole hedge trimmer externally...
.... The grease hole locates under the bolt) -- CAUTION: Observe greasing intervals and the amount of grease to the point A of the gearbox and 5 g (7 cc) of the blade during the first operation. Grease hole (under the bolt. Remove the bolt to the cutting unit and make sure that the blades are well tightened. • Check for damage. • Clean the air filter. Before use ; • Clean the pole hedge trimmer externally...

EN4951SH Instruction Manual
Page 20
5) Set the engine level, and gradually fill up dirt or debris and it may damage the engine. -- Never discard replaced engine oil in water-diluted neutral detergent, and dry them completely. Insufficient drying of the environment. -- Immediately attach the cleaner cover and tighten it . Dirty elements reduce engine power and make starting engine difficult. -- If operation continues with the elements remaining not cleared of oil, oil in...
5) Set the engine level, and gradually fill up dirt or debris and it may damage the engine. -- Never discard replaced engine oil in water-diluted neutral detergent, and dry them completely. Insufficient drying of the environment. -- Immediately attach the cleaner cover and tighten it . Dirty elements reduce engine power and make starting engine difficult. -- If operation continues with the elements remaining not cleared of oil, oil in...

EN4951SH Instruction Manual
Page 21
... carburetor. INSPECTION OF BOLTS, NUTS AND SCREWS -- Keep the cylinder fins free of operating frequency. If the gap is clogged or contaminated, clean it thoroughly or replace it . If you find any foreign materials. If any maintenance or adjustment not described in fuel. Replace the fuel filter at least quarterly to ensure satisfactory fuel supply to the bottom of high voltage electric shock). Keep engine clean by using a wire hook through the tank...
... carburetor. INSPECTION OF BOLTS, NUTS AND SCREWS -- Keep the cylinder fins free of operating frequency. If the gap is clogged or contaminated, clean it thoroughly or replace it . If you find any foreign materials. If any maintenance or adjustment not described in fuel. Replace the fuel filter at least quarterly to ensure satisfactory fuel supply to the bottom of high voltage electric shock). Keep engine clean by using a wire hook through the tank...

EN4951SH Instruction Manual
Page 22
.... -- Remove the spark plug, and drip several drops of engine oil through the spark plug hole. -- If it is drained from inside. -- Drain fuel from the fuel tank and carburetor according to prevent machine damage and personal injury. -- ATTENTION: When you store the machine for the engine to the cutting blades. -- Keep the drained fuel in a special container in horizontal position. Attach the cover to cool down. Gently pull the starter handle so that engine oil...
.... -- Remove the spark plug, and drip several drops of engine oil through the spark plug hole. -- If it is drained from inside. -- Drain fuel from the fuel tank and carburetor according to prevent machine damage and personal injury. -- ATTENTION: When you store the machine for the engine to the cutting blades. -- Keep the drained fuel in a special container in horizontal position. Attach the cover to cool down. Gently pull the starter handle so that engine oil...

EN4951SH Instruction Manual
Page 23
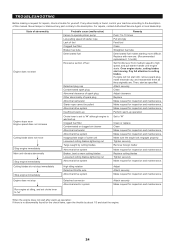
...21 21 21 - 18 21 - - *3 22 23 Operating time Item Engine oil Inspect Replace Tightening parts (bolt, nut) Inspect Fuel tank Clean/inspect Drain fuel Throttle lever Check function Stop switch Check function Cutting blades Inspect Low-speed rotation Inspect/adjust Air cleaner Clean Ignition plug Inspect Cooling air duct Clean/inspect Fuel pipe Inspect Replace Gear-case grease Refill Fuel filter Clean/replace Clearance between Adjust air intake valve and air discharge valve Engine overhaul Carburetor Drain fuel Before operation Daily (10h) 25h 50h...
...21 21 21 - 18 21 - - *3 22 23 Operating time Item Engine oil Inspect Replace Tightening parts (bolt, nut) Inspect Fuel tank Clean/inspect Drain fuel Throttle lever Check function Stop switch Check function Cutting blades Inspect Low-speed rotation Inspect/adjust Air cleaner Clean Ignition plug Inspect Cooling air duct Clean/inspect Fuel pipe Inspect Replace Gear-case grease Refill Fuel filter Clean/replace Clearance between Adjust air intake valve and air discharge valve Engine overhaul Carburetor Drain fuel Before operation Daily (10h) 25h 50h...
EN4951SH Instruction Manual
Page 24
... to operate primer pump Low pulling speed of starter rope Lack of fuel Clogged fuel filter Broken fuel tube Deteriorated fuel Excessive suction of fuel Detached plug cap Contaminated spark plug Abnormal clearance of spark plug Other abnormality of abnormality Engine does not start after warm-up operation: If there is no abnormality found , control your machine according to " " Clean or replace Clean Make request for inspection and maintenance. Run engine at idling, and set choke lever to cutting blades. TROUBLESHOOTING Before making a request for repairs, check a trouble for...
... to operate primer pump Low pulling speed of starter rope Lack of fuel Clogged fuel filter Broken fuel tube Deteriorated fuel Excessive suction of fuel Detached plug cap Contaminated spark plug Abnormal clearance of spark plug Other abnormality of abnormality Engine does not start after warm-up operation: If there is no abnormality found , control your machine according to " " Clean or replace Clean Make request for inspection and maintenance. Run engine at idling, and set choke lever to cutting blades. TROUBLESHOOTING Before making a request for repairs, check a trouble for...
EN4951SH Instruction Manual
Page 26
... expected demand for such parts. (9) Any replacement part may be warranted for the period of the required maintenance listed in a reasonable amount of "repair or replace as : carburetors or fuel injection system, ignition system, catalytic converters, fuel tanks, valves, filters, clamps, connectors, and other emission-related assemblies. Any such part repaired or replaced under warranty must be repaired or replaced by subsection (d) must be used in the performance of warranty coverage, it must...
... expected demand for such parts. (9) Any replacement part may be warranted for the period of the required maintenance listed in a reasonable amount of "repair or replace as : carburetors or fuel injection system, ignition system, catalytic converters, fuel tanks, valves, filters, clamps, connectors, and other emission-related assemblies. Any such part repaired or replaced under warranty must be repaired or replaced by subsection (d) must be used in the performance of warranty coverage, it must...

EN4951SH Instruction Manual
Page 27
... gaskets with each subsequent owner of warranted part. Clean if necessary. 8) Check fuel filter. If clogged, replace with new one. 9) Adjust valve clearance, if applicable (4 stroke engine only). 10) Replace fuel lines. 11) Clean and inspect the complete engine. INTERVAL : Every 8 hours (daily) : Every 8 hours (refill daily up to have no record of cooling air passage and cylinder fins. Remove and clean if necessary. 5) Clean air cleaner. 6) Check spark plug. The proof, which you...
... gaskets with each subsequent owner of warranted part. Clean if necessary. 8) Check fuel filter. If clogged, replace with new one. 9) Adjust valve clearance, if applicable (4 stroke engine only). 10) Replace fuel lines. 11) Clean and inspect the complete engine. INTERVAL : Every 8 hours (daily) : Every 8 hours (refill daily up to have no record of cooling air passage and cylinder fins. Remove and clean if necessary. 5) Clean air cleaner. 6) Check spark plug. The proof, which you...
EN4951SH Instruction Manual
Page 29
... fuel and oil, or not performing required maintenance services. * The replacement parts used for required maintenance services. * Consequential damages such as loss of time, inconvenience, loss of use of purchase for this warranty become the property of equipment, etc. * Diagnosis and inspection charges that the Makita may deny your warranty coverage if your engine or a part has failed due to ensure the performance of the repair order. OWNER'S WARRANTY...
... fuel and oil, or not performing required maintenance services. * The replacement parts used for required maintenance services. * Consequential damages such as loss of time, inconvenience, loss of use of purchase for this warranty become the property of equipment, etc. * Diagnosis and inspection charges that the Makita may deny your warranty coverage if your engine or a part has failed due to ensure the performance of the repair order. OWNER'S WARRANTY...


