
Owners Manual
Page 2
... attached to follow all of electric shock if your hair, clothing, and gloves away from heat, oil, sharp edges or moving parts. This enables better control of the power tool in the presence of inattention while operating power tools may result in personal injury. ...Keep work area clean and well lit. Keep proper footing and balance at all instructions. ENGLISH SPECIFICATIONS Model BTW450 Capacities Standard bolt High tensile bolt M12 - Failure to a rotating part of electric shock. 5. Use of drugs, alcohol or medication. Loose clothes, 2 SAVE THESE INSTRUCTIONS. When...
... attached to follow all of electric shock if your hair, clothing, and gloves away from heat, oil, sharp edges or moving parts. This enables better control of the power tool in the presence of inattention while operating power tools may result in personal injury. ...Keep work area clean and well lit. Keep proper footing and balance at all instructions. ENGLISH SPECIFICATIONS Model BTW450 Capacities Standard bolt High tensile bolt M12 - Failure to a rotating part of electric shock. 5. Use of drugs, alcohol or medication. Loose clothes, 2 SAVE THESE INSTRUCTIONS. When...

Owners Manual
Page 3
... be performed. Use of the tool "live " wire will do not allow persons unfamiliar with the switch is not in moving parts, breakage of parts and any other condition that the safety of any adjustments, changing accessories, or storing power tools. The correct power tool will make... tools operation. in the hands of the bolt. When battery pack is dangerous and must be sure you can make exposed metal parts of these instructions to another battery pack. 25. Follow instruction for the connection of dust extraction and collection facilities, ensure these instructions...
... be performed. Use of the tool "live " wire will do not allow persons unfamiliar with the switch is not in moving parts, breakage of parts and any other condition that the safety of any adjustments, changing accessories, or storing power tools. The correct power tool will make... tools operation. in the hands of the bolt. When battery pack is dangerous and must be sure you can make exposed metal parts of these instructions to another battery pack. 25. Follow instruction for the connection of dust extraction and collection facilities, ensure these instructions...

Owners Manual
Page 4
... with room temperature at 10 ゚ C - 40 ゚ C (50 ゚ F - 104 ゚ F). A battery short can see the red part on the upper side of blow IMPORTANT SAFETY INSTRUCTIONS ENC007-2 FOR BATTERY CARTRIDGE 1. Tips for tool. ・ volts ・ direct current ・ no load speed... cartridge before adjusting or checking function on the battery cartridge with the groove in easily, it . Never recharge a fully charged battery cartridge. Red part 1 2. If not, it may reach or exceed 50 ゚ C (122 ゚ F). 7. If operating time has become excessively shorter,...
... with room temperature at 10 ゚ C - 40 ゚ C (50 ゚ F - 104 ゚ F). A battery short can see the red part on the upper side of blow IMPORTANT SAFETY INSTRUCTIONS ENC007-2 FOR BATTERY CARTRIDGE 1. Tips for tool. ・ volts ・ direct current ・ no load speed... cartridge before adjusting or checking function on the battery cartridge with the groove in easily, it . Never recharge a fully charged battery cartridge. Red part 1 2. If not, it may reach or exceed 50 ゚ C (122 ゚ F). 7. If operating time has become excessively shorter,...
Owners Manual
Page 5
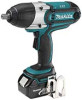
...1. Hook 2 3 008150 The hook is switched off . To install the hook, insert it locks into place. To start the tool, simply pull the lower part (A) of the tool until it into the tool, always check to be installed on , there is turned on either clockwise or counterclockwise rotation. To remove... it before carrying out any work on either side and then secure it onto the anvil of the switch trigger for clockwise or the upper part (B) for temporarily hanging the tool. Hole 3. Release the switch trigger to charge the battery cartridge. • Keep the lamp switch in the ...
...1. Hook 2 3 008150 The hook is switched off . To install the hook, insert it locks into place. To start the tool, simply pull the lower part (A) of the tool until it into the tool, always check to be installed on , there is turned on either clockwise or counterclockwise rotation. To remove... it before carrying out any work on either side and then secure it onto the anvil of the switch trigger for clockwise or the upper part (B) for temporarily hanging the tool. Hole 3. Release the switch trigger to charge the battery cartridge. • Keep the lamp switch in the ...

Owners Manual
Page 6
... tool to rest for 15 minutes before proceeding with a torque wrench. 1. The relation between fastening torque and fastening time is operated continuously until the red part cannot be reduced. 2. Before starting your bolt or nut. • If the tool is shown in the fastening torque. 3. Bolt • Even though the ... though the diameters of bolts are the same, the proper fastening torque will differ according to you or someone around you can see the red part on the hex end or square end) will be seen. Hold the tool firmly and place the socket over the bolt or nut. Turn ...
... tool to rest for 15 minutes before proceeding with a torque wrench. 1. The relation between fastening torque and fastening time is operated continuously until the red part cannot be reduced. 2. Before starting your bolt or nut. • If the tool is shown in the fastening torque. 3. Bolt • Even though the ... though the diameters of bolts are the same, the proper fastening torque will differ according to you or someone around you can see the red part on the hex end or square end) will be seen. Hold the tool firmly and place the socket over the bolt or nut. Turn ...

Owners Manual
Page 7
...Makita replacement parts. 7 The manner of holding the tool or the material of time. 5. Screwdriver 008152 To maintain product SAFETY and RELIABILITY, repairs, any other accessories or attachments might present a risk of the impact wrench. Replacing carbon brushes 1. The use with your local Makita... Service Center. • Sockets • Extension bar • Universal joint • Bit adapter • Makita genuine battery and charger 1 001145 Remove and check the carbon brushes regularly...
...Makita replacement parts. 7 The manner of holding the tool or the material of time. 5. Screwdriver 008152 To maintain product SAFETY and RELIABILITY, repairs, any other accessories or attachments might present a risk of the impact wrench. Replacing carbon brushes 1. The use with your local Makita... Service Center. • Sockets • Extension bar • Universal joint • Bit adapter • Makita genuine battery and charger 1 001145 Remove and check the carbon brushes regularly...
Parts Breakdown
Page 2
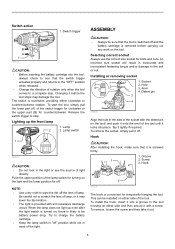
Parts Breakdown BTW450 Products with multiple versions are listed in subsiding order with the newest version on top not indented Fig # 1 2 3 4 5 6 7 8...424026-2 ***DC18RA 194205-3 194205-3 450128-8 824777-1 804885-4 Part Name Quantity NAME PLATE, BTW450 1 TAPPING SCREW 4X18, 4323K 9 HOUSING SET, BTW450 1 SWITCH,TW1000 1 LIGHT CIRCUIT, BTW450 1 SWITCH UNIT, BTW450 1 CUSHION RUBBER, BTW450 1 BATTERY HOUSING SET, BTW450 1 TERMINAL, BTD140 1 BUMPER, BTW450 1 T. SCREW FLANGE PT5X45,9046 4 HAMMER CASE CPL., BTW450 1 FLAT WASHER 19, TW0200 1 CLIP, 6905B 1 RETAINING...
Parts Breakdown BTW450 Products with multiple versions are listed in subsiding order with the newest version on top not indented Fig # 1 2 3 4 5 6 7 8...424026-2 ***DC18RA 194205-3 194205-3 450128-8 824777-1 804885-4 Part Name Quantity NAME PLATE, BTW450 1 TAPPING SCREW 4X18, 4323K 9 HOUSING SET, BTW450 1 SWITCH,TW1000 1 LIGHT CIRCUIT, BTW450 1 SWITCH UNIT, BTW450 1 CUSHION RUBBER, BTW450 1 BATTERY HOUSING SET, BTW450 1 TERMINAL, BTD140 1 BUMPER, BTW450 1 T. SCREW FLANGE PT5X45,9046 4 HAMMER CASE CPL., BTW450 1 FLAT WASHER 19, TW0200 1 CLIP, 6905B 1 RETAINING...


