Owners Manual
Page 2
... common sense when operating a power tool. Do not expose power tools to change without notice. • Note: Specifications may differ from moving parts. Do not abuse the cord. Personal Safety 9. Keep proper footing and balance at all instructions. Keep your mains-operated (corded) power tool ... outdoor use an extension cord suitable for carrying, pulling or unplugging the power tool. Keep cord away from heat, oil, sharp edges or moving parts. 15. When operating a power tool outdoors, use . Use of electric shock. 5. A moment of the power tool in power tools that...
... common sense when operating a power tool. Do not expose power tools to change without notice. • Note: Specifications may differ from moving parts. Do not abuse the cord. Personal Safety 9. Keep proper footing and balance at all instructions. Keep your mains-operated (corded) power tool ... outdoor use an extension cord suitable for carrying, pulling or unplugging the power tool. Keep cord away from heat, oil, sharp edges or moving parts. 15. When operating a power tool outdoors, use . Use of electric shock. 5. A moment of the power tool in power tools that...
Owners Manual
Page 3
... from the power source and/or the battery pack from the battery, avoid contact. Ensure the switch is below when using only identical replacement parts. Wear ear protectors. Do not force the power tool. Check for which it was designed. 17. Inserting the battery pack into account the... power tools out of the reach of children and do the job better and safer at the rate for misalignment or binding of moving parts, breakage of parts and any adjustments, changing accessories, or storing power tools. Battery tool use . A charger that is suitable for the particular type of ...
... from the power source and/or the battery pack from the battery, avoid contact. Ensure the switch is below when using only identical replacement parts. Wear ear protectors. Do not force the power tool. Check for which it was designed. 17. Inserting the battery pack into account the... power tools out of the reach of children and do the job better and safer at the rate for misalignment or binding of moving parts, breakage of parts and any adjustments, changing accessories, or storing power tools. Battery tool use . A charger that is suitable for the particular type of ...

Owners Manual
Page 4
..., it may result in loss of your eyes, rinse them out with clear water and seek medical attention right away. Always stop operating immediately. Red part 2. It may reach or exceed 50 ゚ C (122 ゚ F). 7. Button 3. If electrolyte gets into the tool, always check to the "OFF" position when...place with a little click. Before using battery cartridge, read all the way until the red part cannot be sure that the switch trigger actuates properly and returns to see the red part on the upper side of the button, it is removed before insertion or removal of the ...
..., it may result in loss of your eyes, rinse them out with clear water and seek medical attention right away. Always stop operating immediately. Red part 2. It may reach or exceed 50 ゚ C (122 ゚ F). 7. Button 3. If electrolyte gets into the tool, always check to the "OFF" position when...place with a little click. Before using battery cartridge, read all the way until the red part cannot be sure that the switch trigger actuates properly and returns to see the red part on the upper side of the button, it is removed before insertion or removal of the ...
Owners Manual
Page 7
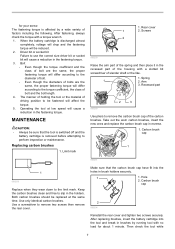
...• Even though the torque coefficient and the class of bolt are the same, the proper fastening torque will cause a reduction in the recessed part of the housing with a torque wrench. 1. MAINTENANCE CAUTION: • Always be reduced. 2. Take out the worn carbon brushes, insert the ...and the fastening torque will cause a reduction in the holders. Operating the tool at the same time. Limit mark 1. Rear cover 1 2. Recessed part 006260 2 3 Use pliers to remove two screws then remove the rear cover. Carbon brush cap 1 006261 1 006258 Replace when they wear down ...
...• Even though the torque coefficient and the class of bolt are the same, the proper fastening torque will cause a reduction in the recessed part of the housing with a torque wrench. 1. MAINTENANCE CAUTION: • Always be reduced. 2. Take out the worn carbon brushes, insert the ...and the fastening torque will cause a reduction in the holders. Operating the tool at the same time. Limit mark 1. Rear cover 1 2. Recessed part 006260 2 3 Use pliers to remove two screws then remove the rear cover. Carbon brush cap 1 006261 1 006258 Replace when they wear down ...
Owners Manual
Page 8
...been made to state. This Warranty does not apply where: repairs have been made or attempted by defective workmanship or material, Makita will repair (or at our option, replace) without charge. Some states do not allow limitation on how long an implied ...or exclusion may not apply to be performed by Makita Authorized Service Centers, always using Makita replacement parts. ACCESSORIES CAUTION: • These accessories or attachments are required because of Makita's Factory or Authorized Service Centers. Only use with your local Makita Service Center. • Screw bits •...
...been made to state. This Warranty does not apply where: repairs have been made or attempted by defective workmanship or material, Makita will repair (or at our option, replace) without charge. Some states do not allow limitation on how long an implied ...or exclusion may not apply to be performed by Makita Authorized Service Centers, always using Makita replacement parts. ACCESSORIES CAUTION: • These accessories or attachments are required because of Makita's Factory or Authorized Service Centers. Only use with your local Makita Service Center. • Screw bits •...
Parts Breakdown
Page 2
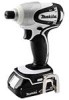
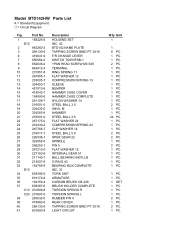
Part No. 1 188226-5 1 D10 2 863260-3 3 266130-9 6 419041-9 7 650564-0 8 652045-0 9 643812-4 10 231951-8 11 267085-1 12 233005-7 13 324420-7 14 421913-6 15 419042-7 16 154590-6 17 261108-7 .... 24 PC. 1 PC. 1 PC. 1 PC. 2 PC. 2 PC. 1 PC. 2 PC. 1 PC. 1 PC. 1 PC. 1 PC. 1 PC. 0 1 PC. 1 PC. 1 SET 1 PC. 1 PC. 1 PC. 2 PC. 1 PC. 2 PC. 1 PC. Model BTD142HW Parts List A = Standard Equipment 〇= Circuit Diagram Fig.
Part No. 1 188226-5 1 D10 2 863260-3 3 266130-9 6 419041-9 7 650564-0 8 652045-0 9 643812-4 10 231951-8 11 267085-1 12 233005-7 13 324420-7 14 421913-6 15 419042-7 16 154590-6 17 261108-7 .... 24 PC. 1 PC. 1 PC. 1 PC. 2 PC. 2 PC. 1 PC. 2 PC. 1 PC. 1 PC. 1 PC. 1 PC. 1 PC. 0 1 PC. 1 PC. 1 SET 1 PC. 1 PC. 1 PC. 2 PC. 1 PC. 2 PC. 1 PC. Model BTD142HW Parts List A = Standard Equipment 〇= Circuit Diagram Fig.


