Owners Manual
Page 2
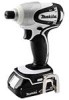
... these are subject to change without notice. • Note: Specifications may differ from country to rain or wet conditions. The term "power tool" in all instructions listed below refers to a rotating part of electric shock if your hair, clothing, and gloves away from heat, oil, sharp edges or moving parts. Keep work area clean and well lit. Remove any adjusting key or wrench before plugging in...
... these are subject to change without notice. • Note: Specifications may differ from country to rain or wet conditions. The term "power tool" in all instructions listed below refers to a rotating part of electric shock if your hair, clothing, and gloves away from heat, oil, sharp edges or moving parts. Keep work area clean and well lit. Remove any adjusting key or wrench before plugging in...
Owners Manual
Page 3
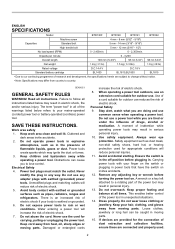
... cutting tools sharp and clean. Battery tool use this instruction manual may contact hidden wiring or its own cord. Use of any other battery packs may cause burns or a fire. 27. Liquid ejected from one is not in high locations. 3. Follow instruction for tool. ・ volts ・ direct current ・ no one terminal to impact driver safety rules. Hold power tools by a qualified repair person using the tool in use the power tool if the switch does...
... cutting tools sharp and clean. Battery tool use this instruction manual may contact hidden wiring or its own cord. Use of any other battery packs may cause burns or a fire. 27. Liquid ejected from one is not in high locations. 3. Follow instruction for tool. ・ volts ・ direct current ・ no one terminal to impact driver safety rules. Hold power tools by a qualified repair person using the tool in use the power tool if the switch does...

Owners Manual
Page 4
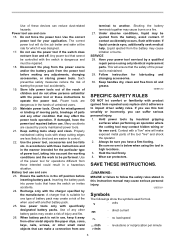
... the red part on the upper side of your eyes, rinse them out with a little click. Always stop operating immediately. Overcharging shortens the battery service life. 3. Installing or removing battery cartridge 1 2 1. Always insert it is severely damaged or is removed before completely discharged. Switch action 1. IMPORTANT SAFETY INSTRUCTIONS ENC007-2 FOR BATTERY CARTRIDGE 1. Before using battery. 2. If operating time has become excessively shorter, stop tool operation and charge the battery cartridge when...
... the red part on the upper side of your eyes, rinse them out with a little click. Always stop operating immediately. Overcharging shortens the battery service life. 3. Installing or removing battery cartridge 1 2 1. Always insert it is severely damaged or is removed before completely discharged. Switch action 1. IMPORTANT SAFETY INSTRUCTIONS ENC007-2 FOR BATTERY CARTRIDGE 1. Before using battery. 2. If operating time has become excessively shorter, stop tool operation and charge the battery cartridge when...
Owners Manual
Page 5
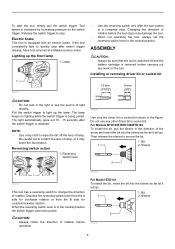
... 1. Bit 1 2. Electric brake This tool is being pulled. Lighting up the lamp. Then release the sleeve to change the direction of rotation before operation. 006249 For Model BTD141 To install the bit, insert the bit into the sleeve as far as it may damage the tool. • When not operating the tool, always set the reversing switch lever to stop. CAUTION: • Always check the direction of rotation. Pull the switch trigger to...
... 1. Bit 1 2. Electric brake This tool is being pulled. Lighting up the lamp. Then release the sleeve to change the direction of rotation before operation. 006249 For Model BTD141 To install the bit, insert the bit into the sleeve as far as it may damage the tool. • When not operating the tool, always set the reversing switch lever to stop. CAUTION: • Always check the direction of rotation. Pull the switch trigger to...
Owners Manual
Page 6
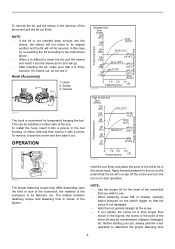
... tool. Hook 2. To install the hook, insert it comes out, do not use . • When fastening screw M8 or smaller, carefully adjust pressure on either side of the workpiece to use it with a screw. Hold the tool firmly and place the point of the driver bit in the direction of the screw/bolt that you wish to be secured. Fastening torque Proper fastening torque To remove the bit...
... tool. Hook 2. To install the hook, insert it comes out, do not use . • When fastening screw M8 or smaller, carefully adjust pressure on either side of the workpiece to use it with a screw. Hold the tool firmly and place the point of the driver bit in the direction of the screw/bolt that you wish to be secured. Fastening torque Proper fastening torque To remove the bit...
Owners Manual
Page 7
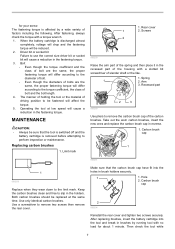
... 1 minute. Use a screwdriver to use the correct size driver bit or socket bit will cause a reduction in brush holders securely. 1 1. After replacing brushes, insert the battery cartridge into the holes in the fastening torque. Keep the carbon brushes clean and free to be sure that the carbon brush cap have fit into the tool and break in the fastening torque. 3. Arm 3. After fastening, always check the torque with no load for your screw. The...
... 1 minute. Use a screwdriver to use the correct size driver bit or socket bit will cause a reduction in brush holders securely. 1 1. After replacing brushes, insert the battery cartridge into the holes in the fastening torque. Keep the carbon brushes clean and free to be sure that the carbon brush cap have fit into the tool and break in the fastening torque. 3. Arm 3. After fastening, always check the torque with no load for your screw. The...
Owners Manual
Page 8
... persons. To maintain product SAFETY and RELIABILITY, repairs, any trouble develop during this manual. Should any other maintenance or adjustment should be free of Makita's Factory or Authorized Service Centers. If you may not apply to the tool. This Warranty does not apply where: repairs have been made or attempted by Makita Authorized Service Centers, always using Makita replacement parts. ACCESSORIES CAUTION: • These accessories or attachments are required because...
... persons. To maintain product SAFETY and RELIABILITY, repairs, any trouble develop during this manual. Should any other maintenance or adjustment should be free of Makita's Factory or Authorized Service Centers. If you may not apply to the tool. This Warranty does not apply where: repairs have been made or attempted by Makita Authorized Service Centers, always using Makita replacement parts. ACCESSORIES CAUTION: • These accessories or attachments are required because...
Parts Breakdown
Page 2
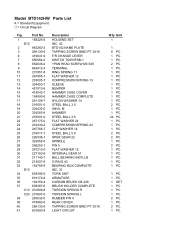
... 631693-8 Description HOUSING SET INC. 42 BTD142 NAME PLATE TAPPING SCREW BIND PT 3X16 F/R CHANGE LEVER SWITCH TG553FSB-1 +PAN HEAD SCREW M3.5X5 TERMINAL RING SPRING 11 FLAT WASHER 12 COMPRESSION SPRING 13 SLEEVE BUMPER HAMMER CASE COVER HAMMER CASE COMPLETE NYLON WASHER 14 STEEL BALL 3.5 ANVIL M HAMMER STEEL BALL 3.5 FLAT WASHER 24 COMPRESSION SPRING 24 CUP WASHER 14 STEEL BALL 5.6 SPUR GEAR 22 SPINDLE PIN 5 FLAT WASHER 12 INTERNAL GEAR 51 BALL BEARING 6901LLB...
... 631693-8 Description HOUSING SET INC. 42 BTD142 NAME PLATE TAPPING SCREW BIND PT 3X16 F/R CHANGE LEVER SWITCH TG553FSB-1 +PAN HEAD SCREW M3.5X5 TERMINAL RING SPRING 11 FLAT WASHER 12 COMPRESSION SPRING 13 SLEEVE BUMPER HAMMER CASE COVER HAMMER CASE COMPLETE NYLON WASHER 14 STEEL BALL 3.5 ANVIL M HAMMER STEEL BALL 3.5 FLAT WASHER 24 COMPRESSION SPRING 24 CUP WASHER 14 STEEL BALL 5.6 SPUR GEAR 22 SPINDLE PIN 5 FLAT WASHER 12 INTERNAL GEAR 51 BALL BEARING 6901LLB...
Parts Breakdown
Page 3
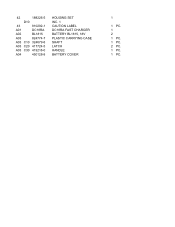
42 188226-5 42 D10 43 810292-1 A01 DC18RA A02 BL1815 A03 824774-7 A03 C10 324679-6 A03 C20 417724-5 A03 C30 419216-0 A04 450128-8 HOUSING SET INC. 1 CAUTION LABEL DC18RA FAST CHARGER BATTERY BL1815, 18V PLASTIC CARRYING CASE SHAFT LATCH HANDLE BATTERY COVER 1 0 1 PC. 1 2 1 PC. 1 PC. 2 PC. 1 PC. 1 PC.
42 188226-5 42 D10 43 810292-1 A01 DC18RA A02 BL1815 A03 824774-7 A03 C10 324679-6 A03 C20 417724-5 A03 C30 419216-0 A04 450128-8 HOUSING SET INC. 1 CAUTION LABEL DC18RA FAST CHARGER BATTERY BL1815, 18V PLASTIC CARRYING CASE SHAFT LATCH HANDLE BATTERY COVER 1 0 1 PC. 1 2 1 PC. 1 PC. 2 PC. 1 PC. 1 PC.


