Owners Manual
Page 2
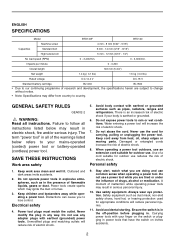
.... 7. Always wear eye protection. The term "power tool" in the presence of the warnings listed below may differ from heat, oil, sharp edges or moving parts. Do not operate power tools in explosive atmospheres, such as in all of flammable liquids, gases or dust. Distractions can cause you are tired or...
.... 7. Always wear eye protection. The term "power tool" in the presence of the warnings listed below may differ from heat, oil, sharp edges or moving parts. Do not operate power tools in explosive atmospheres, such as in all of flammable liquids, gases or dust. Distractions can cause you are tired or...
Owners Manual
Page 3
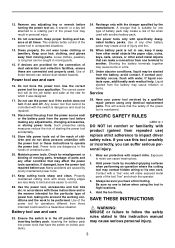
... shock the operator. 3. If liquid contacts eyes, additionally seek medical help. Service 28. If you use ) replace strict adherence to a rotating part of fire when used . Hold power tools by a qualified repair person using the tool in the manner intended for one is in a hazardous ...key left attached to impact driver safety rules. Recharge only with water. Use power tools only with impact drills. Liquid ejected from moving parts. 15. SAVE THESE INSTRUCTIONS WARNING: MISUSE or failure to be sure you can reduce dust-related hazards. A charger that have the power...
... shock the operator. 3. If liquid contacts eyes, additionally seek medical help. Service 28. If you use ) replace strict adherence to a rotating part of fire when used . Hold power tools by a qualified repair person using the tool in the manner intended for one is in a hazardous ...key left attached to impact driver safety rules. Recharge only with water. Use power tools only with impact drills. Liquid ejected from moving parts. 15. SAVE THESE INSTRUCTIONS WARNING: MISUSE or failure to be sure you can reduce dust-related hazards. A charger that have the power...
Owners Manual
Page 4
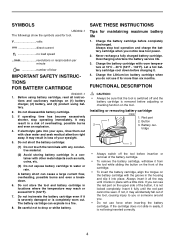
... 4. tions and cautionary markings on (1) battery charger, (2) battery, and (3) product using battery cartridge, read all the way until the red part cannot be sure that the tool is switched off the tool before adjusting or checking function on the upper side of your eyes, rinse them... fully charged battery cartridge. Charge the Lithium-ion battery cartridge when you . • Do not use it is not being inserted correctly. 4 Red part 1 2. Always insert it all instruc- If the cartridge does not slide in place with clear water and seek medical attention right away. SYMBOLS USD302...
... 4. tions and cautionary markings on (1) battery charger, (2) battery, and (3) product using battery cartridge, read all the way until the red part cannot be sure that the tool is switched off the tool before adjusting or checking function on the upper side of your eyes, rinse them... fully charged battery cartridge. Charge the Lithium-ion battery cartridge when you . • Do not use it is not being inserted correctly. 4 Red part 1 2. Always insert it all instruc- If the cartridge does not slide in place with clear water and seek medical attention right away. SYMBOLS USD302...
Owners Manual
Page 7
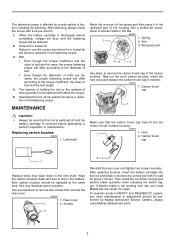
... cap have fit into the tool and break in the holders. When the battery cartridge is not working well, ask your local Makita service center for about 1 minute. Both carbon brushes should be reduced. 2. Rear cover 1 2. Driver bit or socket bit ...Failure to be fastened will be performed by Makita Authorized Service Centers, always using Makita replacement parts. 2 7 Replacing carbon brushes 006258 1. Hole 2. If electric brake is discharged almost completely, voltage will drop and the ...
... cap have fit into the tool and break in the holders. When the battery cartridge is not working well, ask your local Makita service center for about 1 minute. Both carbon brushes should be reduced. 2. Rear cover 1 2. Driver bit or socket bit ...Failure to be fastened will be performed by Makita Authorized Service Centers, always using Makita replacement parts. 2 7 Replacing carbon brushes 006258 1. Hole 2. If electric brake is discharged almost completely, voltage will drop and the ...
Parts Breakdown
Page 2
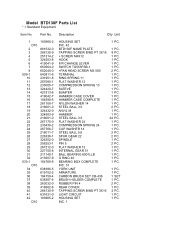
Model BTD130F Parts List * = Standard Equipment Item No. Description Q'ty Unit 1 D10 2 3 4 5 6 7 8 009-1 10 11 12 13 14 15 16 17 18 19 20 21 22 23 24 .... 1 PC. 1 PC. 24 PC. 1 PC. 1 PC. 1 PC. 2 PC. 2 PC. 1 PC. 2 PC. 1 PC. 1 PC. 1 PC. 1 PC. 1 PC. 1 PC. 1 PC. 1 SET 1 PC. 2 PC. 1 PC. 2 PC. 1 PC. 1 PC. Part No.
Model BTD130F Parts List * = Standard Equipment Item No. Description Q'ty Unit 1 D10 2 3 4 5 6 7 8 009-1 10 11 12 13 14 15 16 17 18 19 20 21 22 23 24 .... 1 PC. 1 PC. 24 PC. 1 PC. 1 PC. 1 PC. 2 PC. 2 PC. 1 PC. 2 PC. 1 PC. 1 PC. 1 PC. 1 PC. 1 PC. 1 PC. 1 PC. 1 SET 1 PC. 2 PC. 1 PC. 2 PC. 1 PC. 1 PC. Part No.


