Owners Manual
Page 2
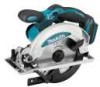
... expose power tools to change without notice. • Note: Specifications may result in serious personal injury. 10. Use of inattention while operating power tools may ignite the dust or fumes. 3. A moment of a cord suitable for carrying, pulling or unplugging the power tool. Avoid accidental starting. GENERAL SAFETY RULES GEA002-3 WARNING: Read all instructions listed below refers to your mains-operated (corded) power tool or battery-operated (cordless) power tool. Power tools create sparks which may result in electric...
... expose power tools to change without notice. • Note: Specifications may result in serious personal injury. 10. Use of inattention while operating power tools may ignite the dust or fumes. 3. A moment of a cord suitable for carrying, pulling or unplugging the power tool. Avoid accidental starting. GENERAL SAFETY RULES GEA002-3 WARNING: Read all instructions listed below refers to your mains-operated (corded) power tool or battery-operated (cordless) power tool. Power tools create sparks which may result in electric...
Owners Manual
Page 3
... battery pack is dangerous and must be cut in the hands of the power tool in personal injury. 13. Follow instruction for operations different from the power tool before making any other condition that is important to support the work to a rotating part of any adjustments, changing accessories, or storing power tools. Keep hands away from repeated use , keep it away from other metal objects like paper clips, coins, keys, nails, screws...
... battery pack is dangerous and must be cut in the hands of the power tool in personal injury. 13. Follow instruction for operations different from the power tool before making any other condition that is important to support the work to a rotating part of any adjustments, changing accessories, or storing power tools. Keep hands away from repeated use , keep it away from other metal objects like paper clips, coins, keys, nails, screws...
Owners Manual
Page 4
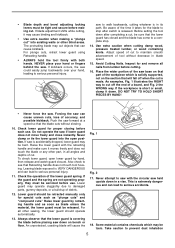
... the power tool "live " wire will run eccentrically, causing loss of the saw on the saw and position your saw misuse and/or incorrect operating procedures or conditions and can dig into the material. Keep blade clean by the kerf closing down, the blade stalls and the motor reaction drives the unit rapidly back toward the operator. Never use a rip fence or straight edge guide. Causes and Operator...
... the power tool "live " wire will run eccentrically, causing loss of the saw on the saw and position your saw misuse and/or incorrect operating procedures or conditions and can dig into the material. Keep blade clean by the kerf closing down, the blade stalls and the motor reaction drives the unit rapidly back toward the operator. Never use a rip fence or straight edge guide. Causes and Operator...
Owners Manual
Page 5
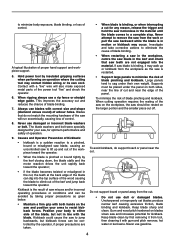
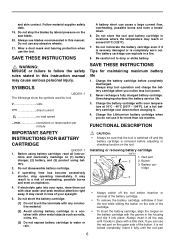
... setting the tool it moves freely and does not touch the blade or any other part, in all behind the saw. Adjust speed of cut to see that can cause uneven cuts, loss of a board, and Fig. 2 the WRONG way. Avoid Cutting Nails. Place the wider portion of the lower guard spring. To check lower guard, open position. If the guard and the spring are not operating...
... setting the tool it moves freely and does not touch the blade or any other part, in all behind the saw. Adjust speed of cut to see that can cause uneven cuts, loss of a board, and Fig. 2 the WRONG way. Avoid Cutting Nails. Place the wider portion of the lower guard spring. To check lower guard, open position. If the guard and the spring are not operating...
Owners Manual
Page 6
... strike battery. V volts direct current n no load speed .../min revolutions or reciprocation per minute SAVE THESE INSTRUCTIONS Tips for tool. Always stop operating immediately. Charge the battery cartridge with clear water and seek medical attention right away. Before using battery. 2. tions and cautionary markings on (1) battery charger, (2) battery, and (3) product using battery cartridge, read all the way until the red part 6 If operating time has become excessively shorter, stop tool operation and...
... strike battery. V volts direct current n no load speed .../min revolutions or reciprocation per minute SAVE THESE INSTRUCTIONS Tips for tool. Always stop operating immediately. Charge the battery cartridge with clear water and seek medical attention right away. Before using battery. 2. tions and cautionary markings on (1) battery charger, (2) battery, and (3) product using battery cartridge, read all the way until the red part 6 If operating time has become excessively shorter, stop tool operation and...
Owners Manual
Page 7
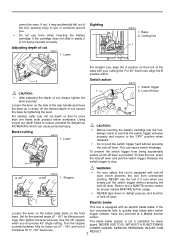
... desired depth of cut 006701 1. NEVER use force when inserting the battery cartridge. Loosen the lever on the front trigger release, have tool serviced at a Makita service base. Switch trigger 2 2. To start the tool, press the lock-off lever. Return tool a MAKITA service center for lower when you simply pull the switch trigger without pressing the lock-off lever. If the tool consistently fails to reduce potential for the desired angle (0° - 50°) by tightening the lever. center. Use the...
... desired depth of cut 006701 1. NEVER use force when inserting the battery cartridge. Loosen the lever on the front trigger release, have tool serviced at a Makita service base. Switch trigger 2 2. To start the tool, press the lock-off lever. Return tool a MAKITA service center for lower when you simply pull the switch trigger without pressing the lock-off lever. If the tool consistently fails to reduce potential for the desired angle (0° - 50°) by tightening the lever. center. Use the...
Owners Manual
Page 8
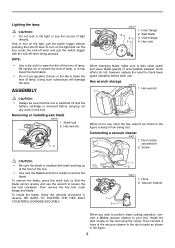
... installing saw blade 006706 1. Shaft lock 2. Then remove the hex bolt, outer flange and blade. Vacuum cleaner When you wish to perform clean cutting operation, connect a Makita vacuum cleaner to turn on the tool using the screw. Only to your tool. Dust nozzle (accessory) 2. To remove the blade, press the shaft lock so that the tool is switched off and the battery cartridge is installed with the lock-off lever.To turn on the light, pull the switch trigger...
... installing saw blade 006706 1. Shaft lock 2. Then remove the hex bolt, outer flange and blade. Vacuum cleaner When you wish to perform clean cutting operation, connect a Makita vacuum cleaner to turn on the tool using the screw. Only to your tool. Dust nozzle (accessory) 2. To remove the blade, press the shaft lock so that the tool is switched off and the battery cartridge is installed with the lock-off lever.To turn on the light, pull the switch trigger...

Owners Manual
Page 9
... operator to best grasp the tool. Rip fence (Guide rule) 006710 1. Rear handle 2. To get clean cuts, keep your sawing line straight and your intended cut line. Release switch, wait for blade to help avoid injury. Use eye protection to stop and then withdraw tool. Adjusting screw for 15 minutes before attempting to be replaced at the factory. OPERATION CAUTION: • Always insert the battery cartridge all the way until it locks...
... operator to best grasp the tool. Rip fence (Guide rule) 006710 1. Rear handle 2. To get clean cuts, keep your sawing line straight and your intended cut line. Release switch, wait for blade to help avoid injury. Use eye protection to stop and then withdraw tool. Adjusting screw for 15 minutes before attempting to be replaced at the factory. OPERATION CAUTION: • Always insert the battery cartridge all the way until it locks...
Owners Manual
Page 10
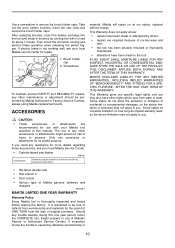
... replacing brushes, insert the battery cartridge into the tool and break in this one of Makita genuine batteries and chargers EN0006-1 MAKITA LIMITED ONE YEAR WARRANTY Warranty Policy Every Makita tool is not working well, ask your local Makita Service Center. • Carbide-tipped saw blades 006540 Combination General purpose blade for about 1 minute. Screwdriver 2 To maintain product SAFETY and RELIABILITY, repairs, any assistance for more details regarding these accessories, ask your local Makita service...
... replacing brushes, insert the battery cartridge into the tool and break in this one of Makita genuine batteries and chargers EN0006-1 MAKITA LIMITED ONE YEAR WARRANTY Warranty Policy Every Makita tool is not working well, ask your local Makita Service Center. • Carbide-tipped saw blades 006540 Combination General purpose blade for about 1 minute. Screwdriver 2 To maintain product SAFETY and RELIABILITY, repairs, any assistance for more details regarding these accessories, ask your local Makita service...
Parts Breakdown
Page 2
... HANDLE COVER SWITCH TG72BD COMPRESSION SPRING 4 LOCK OFF LEVER POWER SUPPLY CIRCUIT COMPRESSION SPRING 4 LEAD UNIT TERMINAL SWITCH LEVER TAPPING SCREW 4X18 REAR COVER BRUSH HOLDER CAP CARBON BRUSH SET CB-432 PAN HEAD SCREW M5X40 BRUSH HOLDER BRUSH HOLDER BSS610 NAME PLATE MOTOR HOUSING YOKE UNIT BAFFLE PLATE TAPPING SCREW 4X65 BALL BEARING 627DDW ARMATURE ASS'Y 18V INC. 23,25,26 FAN 55 BALL BEARING 6000LLB SHAFT LOCK COMPRESSION SPRING 5 PAN HEAD SCREW M4X12 BLOWER NOZZLE BLADE CASE SET O RING 26 OPERATIONAL...
... HANDLE COVER SWITCH TG72BD COMPRESSION SPRING 4 LOCK OFF LEVER POWER SUPPLY CIRCUIT COMPRESSION SPRING 4 LEAD UNIT TERMINAL SWITCH LEVER TAPPING SCREW 4X18 REAR COVER BRUSH HOLDER CAP CARBON BRUSH SET CB-432 PAN HEAD SCREW M5X40 BRUSH HOLDER BRUSH HOLDER BSS610 NAME PLATE MOTOR HOUSING YOKE UNIT BAFFLE PLATE TAPPING SCREW 4X65 BALL BEARING 627DDW ARMATURE ASS'Y 18V INC. 23,25,26 FAN 55 BALL BEARING 6000LLB SHAFT LOCK COMPRESSION SPRING 5 PAN HEAD SCREW M4X12 BLOWER NOZZLE BLADE CASE SET O RING 26 OPERATIONAL...
Parts Breakdown
Page 3
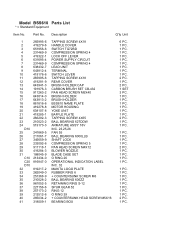
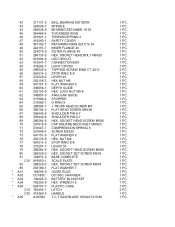
LOCK NUT M5-8 ANGULAR GUIDE STOPPER O RING 9 + TRUSS HEAD SCREW M5 FLAT HEAD SCREW M6X90 SHOULDER PIN 6-7 SHOULDER PIN 6-7 HEX. SOCKET SET SCREW M5X8 BASE COMPLETE SCALE PLATE HEX. SOCKET HEAD BOLT M6X20 LED CIRCUIT CONNECTOR BOX LIGHT COVER TAPPING SCREW BIND CT 4X12 STOP RING E-8 LEVER 40 HEX.NUT M6 FLAT WASHER 6 DEPTH GUIDE HEX. NUT M6 STOP RING E-8 LEVER 30 HEX. WRENCH 5 PLASTIC CASE LATCH HANDLE T.C.T.SAW BLADE 165X24TX15.88 1 PC. 1 PC. 1 PC. 1 PC. 1 PC. 1 PC. 1 PC. 1 PC. 1 PC...
LOCK NUT M5-8 ANGULAR GUIDE STOPPER O RING 9 + TRUSS HEAD SCREW M5 FLAT HEAD SCREW M6X90 SHOULDER PIN 6-7 SHOULDER PIN 6-7 HEX. SOCKET SET SCREW M5X8 BASE COMPLETE SCALE PLATE HEX. SOCKET HEAD BOLT M6X20 LED CIRCUIT CONNECTOR BOX LIGHT COVER TAPPING SCREW BIND CT 4X12 STOP RING E-8 LEVER 40 HEX.NUT M6 FLAT WASHER 6 DEPTH GUIDE HEX. NUT M6 STOP RING E-8 LEVER 30 HEX. WRENCH 5 PLASTIC CASE LATCH HANDLE T.C.T.SAW BLADE 165X24TX15.88 1 PC. 1 PC. 1 PC. 1 PC. 1 PC. 1 PC. 1 PC. 1 PC. 1 PC...


