Owners Manual
Page 2
.... This enables better control of drugs, alcohol or medication. Loose clothes, jewellery or long hair can reduce dust-related hazards. 2 ENGLISH SPECIFICATIONS Model BSS500 BSS501 Blade diameter 136 mm (5-3/8") Max. Avoid body contact with earthed (grounded) power tools. Never use reduces the risk of electric shock. 7. Do not wear loose clothing...
.... This enables better control of drugs, alcohol or medication. Loose clothes, jewellery or long hair can reduce dust-related hazards. 2 ENGLISH SPECIFICATIONS Model BSS500 BSS501 Blade diameter 136 mm (5-3/8") Max. Avoid body contact with earthed (grounded) power tools. Never use reduces the risk of electric shock. 7. Do not wear loose clothing...

Owners Manual
Page 3
... from the power tool before inserting battery pack. Use of battery pack may be visible below the workpiece. Liquid ejected from the blade below the workpiece. 4. Follow instruction for operations different from those intended could result in use this tool unsafely or incorrectly, you.... GEB014-1 SPECIFIC SAFETY RULES DO NOT let comfort or familiarity with specifically designated battery packs. Ensure the switch is maintained. 29. CAUTION: Blades coast after turn it was designed. 17. Power tool use ) replace strict adherence to circular saw , they cannot be repaired. 18....
... from the power tool before inserting battery pack. Use of battery pack may be visible below the workpiece. Liquid ejected from the blade below the workpiece. 4. Follow instruction for operations different from those intended could result in use this tool unsafely or incorrectly, you.... GEB014-1 SPECIFIC SAFETY RULES DO NOT let comfort or familiarity with specifically designated battery packs. Ensure the switch is maintained. 29. CAUTION: Blades coast after turn it was designed. 17. Power tool use ) replace strict adherence to circular saw , they cannot be repaired. 18....
Owners Manual
Page 4
...from the workpiece as given below. • Maintain a firm grip with a "live " and shock the operator. 6. Always use damaged or incorrect blade washers or bolt. Never use a rip fence or straight edge guide. Position your saw is the result of the power tool "live " wire will.... This improves the accuracy cut . • Do not use dull or damaged blades. Blades that saw blade is binding, it with the blade. Never use blades with correct size and shape (diamond versus round) of the blade, but kickback forces can be rested on the larger portion and the smaller piece ...
...from the workpiece as given below. • Maintain a firm grip with a "live " and shock the operator. 6. Always use damaged or incorrect blade washers or bolt. Never use a rip fence or straight edge guide. Position your saw is the result of the power tool "live " wire will.... This improves the accuracy cut . • Do not use dull or damaged blades. Blades that saw blade is binding, it with the blade. Never use blades with correct size and shape (diamond versus round) of the blade, but kickback forces can be rested on the larger portion and the smaller piece ...

Owners Manual
Page 5
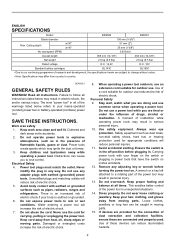
... of cut is solidly supported, not on bench or floor. As examples, Fig. 1 illustrates the RIGHT way to walk backwards, cutting whatever is in blade speed. 15. DO NOT TRY TO HOLD SHORT PIECES BY HAND! levers must be retracted manually only for proper closing before each use . If kickback..., clamp it may cut " into the open lower guard by retracting handle and as soon as "plunge cuts" and "compound cuts." Inspect for the blade to serious personal injury. 11. If the workpiece is released. If saw . Always observe that the lower guard is VERY DANGEROUS and can cause uneven...
... of cut is solidly supported, not on bench or floor. As examples, Fig. 1 illustrates the RIGHT way to walk backwards, cutting whatever is in blade speed. 15. DO NOT TRY TO HOLD SHORT PIECES BY HAND! levers must be retracted manually only for proper closing before each use . If kickback..., clamp it may cut " into the open lower guard by retracting handle and as soon as "plunge cuts" and "compound cuts." Inspect for the blade to serious personal injury. 11. If the workpiece is released. If saw . Always observe that the lower guard is VERY DANGEROUS and can cause uneven...
Owners Manual
Page 6
...5. Be careful not to prevent dust inhalation and skin contact. Never attempt to serious accidents. 000029 18. Do not stop the blades by lateral pressure on (1) battery charger, (2) battery, and (3) product using battery cartridge, read all instructions and cautionary markings on...and even a breakdown. 6. Charge the battery cartridge before completely discharged. It may be toxic. A battery short can lead to saw blade. 20. Always stop operating immediately. Some material contains chemicals which may result in a container with any abrasive wheels. 21. Take ...
...5. Be careful not to prevent dust inhalation and skin contact. Never attempt to serious accidents. 000029 18. Do not stop the blades by lateral pressure on (1) battery charger, (2) battery, and (3) product using battery cartridge, read all instructions and cautionary markings on...and even a breakdown. 6. Charge the battery cartridge before completely discharged. It may be toxic. A battery short can lead to saw blade. 20. Always stop operating immediately. Some material contains chemicals which may result in a container with any abrasive wheels. 21. Take ...
Owners Manual
Page 7
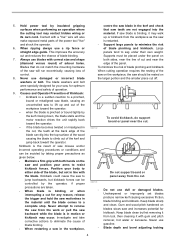
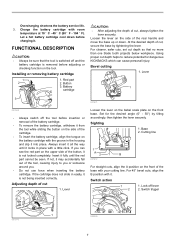
... base up or down before charging it . Always insert it all the way until the red part cannot be sure that no more than one blade tooth projects below workpiece. If the cartridge does not slide in easily, it into place. Sighting 1. Lever 1 3 007971 007969 • Always switch off lever 2. Lever...
... base up or down before charging it . Always insert it all the way until the red part cannot be sure that no more than one blade tooth projects below workpiece. If the cartridge does not slide in easily, it into place. Sighting 1. Lever 1 3 007971 007969 • Always switch off lever 2. Lever...
Owners Manual
Page 8
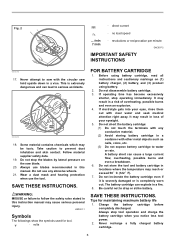
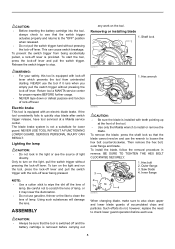
... bolt 2. Inner flange 2 1 4 007975 When changing blade, make sure to also clean upper and lower blade guards of the tool. • Use only the Makita wrench to install or remove the blade. Return tool a MAKITA service center for lower guard. The blade brake system is equipped with an electric blade brake. To turn on the light and...
... bolt 2. Inner flange 2 1 4 007975 When changing blade, make sure to also clean upper and lower blade guards of the tool. • Use only the Makita wrench to install or remove the blade. Return tool a MAKITA service center for lower guard. The blade brake system is equipped with an electric blade brake. To turn on the light and...
Owners Manual
Page 9
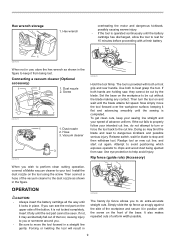
...rule) (Accessory) When you to the dust nozzle as shown in 007980 The handy rip fence allows you wish to perform clean cutting operation, connect a Makita vacuum cleaner to be seen. Simply slide the rip fence up snugly against the side of the button, it in position with a fresh battery. 1 ...on the upper side of the workpiece and secure it is operated continuously until the battery cartridge has discharged, allow the tool to rest for blade to help avoid injury. Release switch, wait for 15 minutes before proceeding with the screw on and wait until the red part cannot be...
...rule) (Accessory) When you to the dust nozzle as shown in 007980 The handy rip fence allows you wish to perform clean cutting operation, connect a Makita vacuum cleaner to be seen. Simply slide the rip fence up snugly against the side of the button, it in position with a fresh battery. 1 ...on the upper side of the workpiece and secure it is operated continuously until the battery cartridge has discharged, allow the tool to rest for blade to help avoid injury. Release switch, wait for 15 minutes before proceeding with the screw on and wait until the red part cannot be...
Owners Manual
Page 10
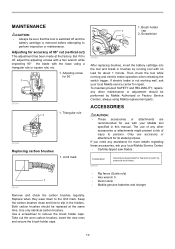
...These accessories or attachments are recommended for use with your local Makita Service Center. • Carbide-tipped saw blades Combination 006540 General purpose blade for more details regarding these accessories, ask your Makita tool specified in the holders. Then check the tool while ...be sure that the tool is switched off , adjust the adjusting screws with a hex wrench while inspecting 90° the blade with the base using Makita replacement parts. Triangular rule 1 007982 Replacing carbon brushes 1. Brush holder 1 cap 2 2. The use accessory or attachment for...
...These accessories or attachments are recommended for use with your local Makita Service Center. • Carbide-tipped saw blades Combination 006540 General purpose blade for more details regarding these accessories, ask your Makita tool specified in the holders. Then check the tool while ...be sure that the tool is switched off , adjust the adjusting screws with a hex wrench while inspecting 90° the blade with the base using Makita replacement parts. Triangular rule 1 007982 Replacing carbon brushes 1. Brush holder 1 cap 2 2. The use accessory or attachment for...

Flyer (English)
Page 2
...-Ion 3.0Ah Battery (BL1830) ■ 25-Minute Rapid Optimum Charger (DC18RA) ■ Plastic Tool Case (824802-8) SPECIFICATIONS Diameter Blade Type Number of accessories. of Teeth 16 Model BSS501 Model BSS501Z Makita offers a wide variety of Blade Teeth Arbor Cutting Capacity @ 90º @ 45º No Load Speed Bevel Capacity Lithium-Ion Battery Length Net...
...-Ion 3.0Ah Battery (BL1830) ■ 25-Minute Rapid Optimum Charger (DC18RA) ■ Plastic Tool Case (824802-8) SPECIFICATIONS Diameter Blade Type Number of accessories. of Teeth 16 Model BSS501 Model BSS501Z Makita offers a wide variety of Blade Teeth Arbor Cutting Capacity @ 90º @ 45º No Load Speed Bevel Capacity Lithium-Ion Battery Length Net...


