
Accessory Catalog
Page 2
...; Low profile bump for efficient, level grass cutting with less drag. • Eyelets are replaceable and easy to remove. • Simple manual line adjustment. of .130 Includes: B-60109 Trimmer Head Stud M8 X P1.25 .095 trimmer line Stud M7 X P1.0 Nut M10 X P1.25 LH Special Wrench Nut M8 X P 1.25 Packaging: Retail Clamshell Line Capacity: 17 ft. of .080 Fit's Makita EM4250CA Models: EM4251CA EM2650LH EM2650UH 12 ft...
...; Low profile bump for efficient, level grass cutting with less drag. • Eyelets are replaceable and easy to remove. • Simple manual line adjustment. of .130 Includes: B-60109 Trimmer Head Stud M8 X P1.25 .095 trimmer line Stud M7 X P1.0 Nut M10 X P1.25 LH Special Wrench Nut M8 X P 1.25 Packaging: Retail Clamshell Line Capacity: 17 ft. of .080 Fit's Makita EM4250CA Models: EM4251CA EM2650LH EM2650UH 12 ft...

Accessory Catalog
Page 3
...'s Makita Curved Shafted Trimmers Models: Special Wrench Line Capacity: 17 ft. Includes: B-60115 manual trimmer head .130 line Packaging: Retail Carton Fit's Makita EM4250CA Models: EM4251CA EM2650LH EM2650UH NOTE: B-60115 requires arbor nut with washer for easy assembly. • Quick and easy loading. of .105 B-60121 Description: Trimmer Head, Bump & Auto Features: • Eyelets are replaceable and easy to remove. • Spring lock, locks spool in place for installation: M10 x 1.25 LH Nut Part # 264025...
...'s Makita Curved Shafted Trimmers Models: Special Wrench Line Capacity: 17 ft. Includes: B-60115 manual trimmer head .130 line Packaging: Retail Carton Fit's Makita EM4250CA Models: EM4251CA EM2650LH EM2650UH NOTE: B-60115 requires arbor nut with washer for easy assembly. • Quick and easy loading. of .105 B-60121 Description: Trimmer Head, Bump & Auto Features: • Eyelets are replaceable and easy to remove. • Spring lock, locks spool in place for installation: M10 x 1.25 LH Nut Part # 264025...
Owners Manual
Page 2
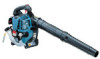
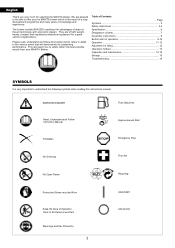
..., compact and represent professional equipment for selecting the MAKITA blower. Table of Contents Page Symbols 2 Safety instructions 3-5 Specification 6 Designation of parts 7 Assembly instructions 8 Before start of operation 9-10 Operation 11-12 Adjustment of state-ofthe-art technology with ergonomic design. The blower models BHX2500 combines the advantages of idling 12 Operation methed 13 Inspection and maintenance 14-16 Storage 16 Troubleshooting 18 SYMBOLS It is the result of...
..., compact and represent professional equipment for selecting the MAKITA blower. Table of Contents Page Symbols 2 Safety instructions 3-5 Specification 6 Designation of parts 7 Assembly instructions 8 Before start of operation 9-10 Operation 11-12 Adjustment of state-ofthe-art technology with ergonomic design. The blower models BHX2500 combines the advantages of idling 12 Operation methed 13 Inspection and maintenance 14-16 Storage 16 Troubleshooting 18 SYMBOLS It is the result of...
Owners Manual
Page 3
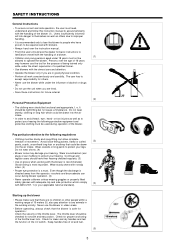
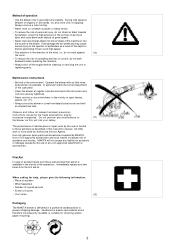
... action. Even though the discharge is recommended. Never use the tool for clean and dry handles and test the function of the throttle lever lock. Check for the purpose of being trained only while under the influence of the blower. Users insufficiently informed will risk danger to themselves as well as to avoid head-, eye-, hand- Avoid loose-fitting jackets, flared...
... action. Even though the discharge is recommended. Never use the tool for clean and dry handles and test the function of the throttle lever lock. Check for the purpose of being trained only while under the influence of the blower. Users insufficiently informed will risk danger to themselves as well as to avoid head-, eye-, hand- Avoid loose-fitting jackets, flared...
Owners Manual
Page 4
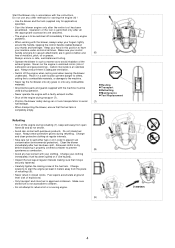
... gas. Place it in a safe location prevent danger to others, setting fire to combustible materials, or damage to the machine. • Never lay the hot blower onto dry grass or onto any other methods for starting the engine (6) ! • Use the blower and the tools supplied only for vacuum attachment) are any fuel contact with petroleum products. Change your thumb and forefinger. Start the Blower...
... gas. Place it in a safe location prevent danger to others, setting fire to combustible materials, or damage to the machine. • Never lay the hot blower onto dry grass or onto any other methods for starting the engine (6) ! • Use the blower and the tools supplied only for vacuum attachment) are any fuel contact with petroleum products. Change your thumb and forefinger. Start the Blower...
Owners Manual
Page 5
.... Maintenance instructions • Be kind to be done by the use of the operations. In particular check the correct adjustment of the carburetor. • Clean the blower at regular intervals and check that a well-stocked first-aid kit is limited to those activities as a result of open flames, sparks, etc. (11). • Always store the blower in the vicinity of the object or broken parts...
.... Maintenance instructions • Be kind to be done by the use of the operations. In particular check the correct adjustment of the carburetor. • Clean the blower at regular intervals and check that a well-stocked first-aid kit is limited to those activities as a result of open flames, sparks, etc. (11). • Always store the blower in the vicinity of the object or broken parts...
Owners Manual
Page 6
..., Class SF or higher (4-stroke engine for automobile) 0.08 (2.7 fl.oz) WALBRO WYL Solid state ignition NGK CMR6A 0.7 - 0.8 (0.028-0.031 in) 6 engine speed (kg) (mm) ( /min) Idling speed ( /min) Engine displacement (mL) Fuel Fuel tank capacity (L) Engine oil Engine oil volume (L) Carburetor (Diaphragm-carburetor) Ignition system Spark plug Electrode gap (mm) Notes: 1. Use the oil and spark plug specified by MAKITA. 2. This specification is subject to change without blower pipe L x W x H) Max. SPECIFICATION Model Mass (without blower pipe) Dimension (without prior notice...
..., Class SF or higher (4-stroke engine for automobile) 0.08 (2.7 fl.oz) WALBRO WYL Solid state ignition NGK CMR6A 0.7 - 0.8 (0.028-0.031 in) 6 engine speed (kg) (mm) ( /min) Idling speed ( /min) Engine displacement (mL) Fuel Fuel tank capacity (L) Engine oil Engine oil volume (L) Carburetor (Diaphragm-carburetor) Ignition system Spark plug Electrode gap (mm) Notes: 1. Use the oil and spark plug specified by MAKITA. 2. This specification is subject to change without blower pipe L x W x H) Max. SPECIFICATION Model Mass (without blower pipe) Dimension (without prior notice...
Owners Manual
Page 11
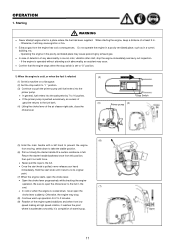
... or when the engine is completion of warming-up operation for 2 to 3 minutes. (9) Rotation of the air cleaner right side, close the choke lever. (2) Stop Switch (3) (4) Primer pump Close (6) (5) Hold the main handle with force. • Never pull the rope to take the stable position. (6) Pull out slowly the starter handle till a certain resistance is pulled, never release your hand immediately. OPERATION 1. Hold the start in a tunnel, building...
... or when the engine is completion of warming-up operation for 2 to 3 minutes. (9) Rotation of the air cleaner right side, close the choke lever. (2) Stop Switch (3) (4) Primer pump Close (6) (5) Hold the main handle with force. • Never pull the rope to take the stable position. (6) Pull out slowly the starter handle till a certain resistance is pulled, never release your hand immediately. OPERATION 1. Hold the start in a tunnel, building...
Owners Manual
Page 12
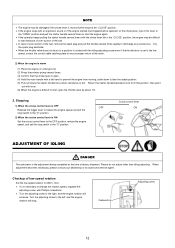
... pull the starter handle several times to start the engine again. • If the operator keeps pulling the starter handle several times with the choke lever left in contact with the idling adjusting screw even if the throttle lever is set the stop switch to the "O" position. 2) When the cruise control lever is the adjustment being completed at the time of the valve. 2) When the engine is warm (1) Place the engine on a flat ground. (2) Press the primary pump several times...
... pull the starter handle several times to start the engine again. • If the operator keeps pulling the starter handle several times with the choke lever left in contact with the idling adjusting screw even if the throttle lever is set the stop switch to the "O" position. 2) When the cruise control lever is the adjustment being completed at the time of the valve. 2) When the engine is warm (1) Place the engine on a flat ground. (2) Press the primary pump several times...
Owners Manual
Page 13
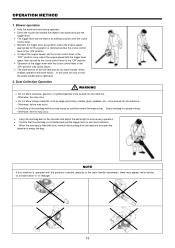
..." position. • To adjust the engine speed, set the cruise control lever to the "OFF" position once, adjust the engine speed with the trigger lever again, then set and fix the cruise control lever to the "ON" position. • Operation of the dust bag with dust may cause its overflow toward the object to be dusted and pull the trigger lever. • The trigger lever can be sure to hold the assist handle with...
..." position. • To adjust the engine speed, set the cruise control lever to the "OFF" position once, adjust the engine speed with the trigger lever again, then set and fix the cruise control lever to the "ON" position. • Operation of the dust bag with dust may cause its overflow toward the object to be dusted and pull the trigger lever. • The trigger lever can be sure to hold the assist handle with...
Owners Manual
Page 14
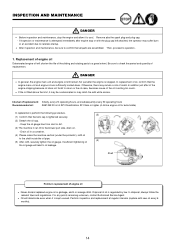
... engine and allow it is tightened securely. (2) Detach the oil cap. - INSPECTION AND MAINTENANCE DANGER • Before inspection and maintenance, stop or with the plug cap left attached, the operator may suffer burn or an accident due to careless startup. • After inspection and maintenance, be contaminated or may catch fire with new oil every 6 months). 14 Interval of replacement: Initially, every 20 operating...
... engine and allow it is tightened securely. (2) Detach the oil cap. - INSPECTION AND MAINTENANCE DANGER • Before inspection and maintenance, stop or with the plug cap left attached, the operator may suffer burn or an accident due to careless startup. • After inspection and maintenance, be contaminated or may catch fire with new oil every 6 months). 14 Interval of replacement: Initially, every 20 operating...
Owners Manual
Page 15
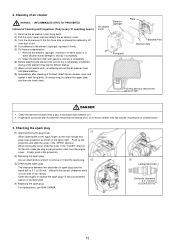
... over the engine cover. DANGER • Clean the element several times a day, if excessive dust adheres to the correct clearance when it is finished, attach the air cleaner cover and tighten it has accumulated carbon or contaminated. (4) Replacing the spark plug For replacement, use NGK-CMR6A. (3) Lateral electrode (-) Electrode clearance 0.7 - 0.8 mm (0.028-0.031 in oil contamination. 3. Adjust to it completely. 2. Clean thoroughly or replace the spark plug if...
... over the engine cover. DANGER • Clean the element several times a day, if excessive dust adheres to the correct clearance when it is finished, attach the air cleaner cover and tighten it has accumulated carbon or contaminated. (4) Replacing the spark plug For replacement, use NGK-CMR6A. (3) Lateral electrode (-) Electrode clearance 0.7 - 0.8 mm (0.028-0.031 in oil contamination. 3. Adjust to it completely. 2. Clean thoroughly or replace the spark plug if...
Owners Manual
Page 16
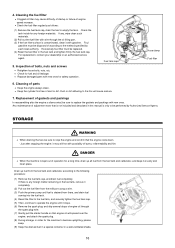
... free of bolts, nuts and screws • Retighten loose bolts, nuts, etc. • Check for fuel and oil leakage. • Replace damaged parts with wire through the spark plug hole. (7) Gently pull the starter handle so that engine oil will cause seizure. 7. STORAGE WARNING • When draining the fuel, be sure to stop the engine and confirm that is not included and described in the fuel tank, remove it completely. (2) Pull out the fuel filter from the fuel tank and carburetor...
... free of bolts, nuts and screws • Retighten loose bolts, nuts, etc. • Check for fuel and oil leakage. • Replace damaged parts with wire through the spark plug hole. (7) Gently pull the starter handle so that engine oil will cause seizure. 7. STORAGE WARNING • When draining the fuel, be sure to stop the engine and confirm that is not included and described in the fuel tank, remove it completely. (2) Pull out the fuel filter from the fuel tank and carburetor...
Owners Manual
Page 17
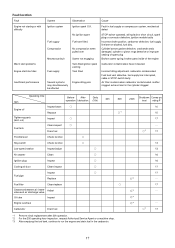
... spark plug Broken starter spring, broken parts inside of the engine Carburetor contaminated, have it cleaned Incorrect idling adjustment, carburetor contaminated Fuel tank vent defective, fuel supply line interrupted, cable or STOP-switch faulty Air filter contaminated, carburetor contaminated, muffler clogged, exhaust duct in the cylinder clogged Operating time Item Before After Daily operation lubrication (10h) 30h 50h Inspect/clean ○ Engine oil Replace ○*1 Tightening parts (bolt, nut) Inspect ○ Fuel tank Clean/inspect ○ Drain fuel Throttle lever...
... spark plug Broken starter spring, broken parts inside of the engine Carburetor contaminated, have it cleaned Incorrect idling adjustment, carburetor contaminated Fuel tank vent defective, fuel supply line interrupted, cable or STOP-switch faulty Air filter contaminated, carburetor contaminated, muffler clogged, exhaust duct in the cylinder clogged Operating time Item Before After Daily operation lubrication (10h) 30h 50h Inspect/clean ○ Engine oil Replace ○*1 Tightening parts (bolt, nut) Inspect ○ Fuel tank Clean/inspect ○ Drain fuel Throttle lever...
Owners Manual
Page 18
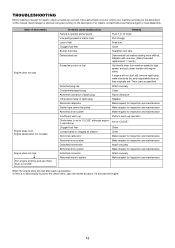
... originally are. Pull strongly. Feed fuel. If engine will not start after warm-up operation: If there is warmed up Clogged fuel filter Contaminated or clogged air cleaner Abnormal carburetor Abnormal drive system Detached throttle wire Abnormal drive system Detached connector Abnormal electric system Attach securely Clean Adjust clearance Replace Make request for the check items, open the throttle by about 1/3 and start the engine. 18 When the engine does not start still, remove spark plug, make...
... originally are. Pull strongly. Feed fuel. If engine will not start after warm-up operation: If there is warmed up Clogged fuel filter Contaminated or clogged air cleaner Abnormal carburetor Abnormal drive system Detached throttle wire Abnormal drive system Detached connector Abnormal electric system Attach securely Clean Adjust clearance Replace Make request for the check items, open the throttle by about 1/3 and start the engine. 18 When the engine does not start still, remove spark plug, make...

Owners Manual
Page 21
... operating instructions set forth in the 2000 and later Owner's Manual including: (1) improper or inadequate maintenance of any warranted parts (2) improper installation, adjustment or repair of the engine or of parts, which malfunctions, fails or is performed at the time of manufacture with the applicable regulations of the engine, for any emission-related part is found to be defective during the warranty period, you shall notify Makita...
... operating instructions set forth in the 2000 and later Owner's Manual including: (1) improper or inadequate maintenance of any warranted parts (2) improper installation, adjustment or repair of the engine or of parts, which malfunctions, fails or is performed at the time of manufacture with the applicable regulations of the engine, for any emission-related part is found to be defective during the warranty period, you shall notify Makita...
Owners Manual
Page 22
.... 2) Check and refill engine oil (4stroke) 3) Change engine oil (4stroke) 4) Check clogging of warranted part. If clogged, replace with new one. 9) Adjust valve clearance, if applicable (4stroke). 10) Replace fuel lines. 11) Overhaul engine. 12) Replace packings and gaskets and gaskets with respect to warranted parts. H. may deny a warranty claim if your responsibility to have no liability under this warranty with new ones. Remove and clean if necessary. 5) Clean air cleaner. 6) Check spark plug. When warranty repair is needed, the engine must...
.... 2) Check and refill engine oil (4stroke) 3) Change engine oil (4stroke) 4) Check clogging of warranted part. If clogged, replace with new one. 9) Adjust valve clearance, if applicable (4stroke). 10) Replace fuel lines. 11) Overhaul engine. 12) Replace packings and gaskets and gaskets with respect to warranted parts. H. may deny a warranty claim if your responsibility to have no liability under this warranty with new ones. Remove and clean if necessary. 5) Clean air cleaner. 6) Check spark plug. When warranty repair is needed, the engine must...

Owners Manual
Page 25
... nearest MAKITA Factory Service Center or service center authorized by MAKITA during a warranty repair), alteration, accident, failure to use the recommended fuel and oil, or not performing required maintenance services. * The replacement parts used for required maintenance services. * Consequential damages such as loss of time, inconvenience, loss of use of non-authorized parts. The dealer or service center authorized by MAKITA. OWNER'S WARRANTY RESPONSIBILITIES As the engine owner, you should contact the Makita Warranty Service Department at 1-800-4-MAKITA...
... nearest MAKITA Factory Service Center or service center authorized by MAKITA during a warranty repair), alteration, accident, failure to use the recommended fuel and oil, or not performing required maintenance services. * The replacement parts used for required maintenance services. * Consequential damages such as loss of time, inconvenience, loss of use of non-authorized parts. The dealer or service center authorized by MAKITA. OWNER'S WARRANTY RESPONSIBILITIES As the engine owner, you should contact the Makita Warranty Service Department at 1-800-4-MAKITA...
Parts Breakdown
Page 12
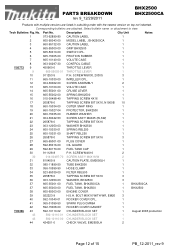
...-00 SWITCH CPL. 1 6 665-15005-00 FRICTION RUBBER 1 7 665-10140-00 VOLUTE CASE 1 8 063-00297-30 CONTROL CABLE 1 Y05773 9 450960-0 THROTTLE LEVER 1 9 665-55003-01 THROTTLE LEVER 1 10 911253-5 P.H. SCREW M5X30, 2030S 3 11 665-10030-00 IMPELLER CPL. 1 12 004-36062-00 SCREW ASSEMBLY 2 13 665-10100-00 VOLUTE CASE 1 14 665-55001-00 CRUISE LEVER 1 15 665-55002-00 SPRING BHX2500 1 16...
...-00 SWITCH CPL. 1 6 665-15005-00 FRICTION RUBBER 1 7 665-10140-00 VOLUTE CASE 1 8 063-00297-30 CONTROL CABLE 1 Y05773 9 450960-0 THROTTLE LEVER 1 9 665-55003-01 THROTTLE LEVER 1 10 911253-5 P.H. SCREW M5X30, 2030S 3 11 665-10030-00 IMPELLER CPL. 1 12 004-36062-00 SCREW ASSEMBLY 2 13 665-10100-00 VOLUTE CASE 1 14 665-55001-00 CRUISE LEVER 1 15 665-55002-00 SPRING BHX2500 1 16...
Parts Breakdown
Page 15
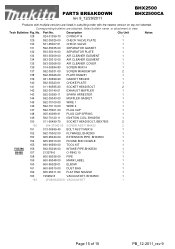
...-35023-01 CHOKE PLATE 1 141 011-90595-20 SOCKET HEAD BOLT 2 142 592-30140-01 EXHAUST MUFFLER 1 143 592-30080-11 SPARK ARRESTER 1 144 592-35043-00 MUFFLER GASKET 1 145 592-70100-00 WIRE 1 1 146 592-70110-00 WIRE 2 1 147 592-75001-00 PLUG CAP 1 148 065-40099-31 PLUG CAP SPRING 1 149 592-70120-11 IGNITION COIL, BHX2500 1 150 011-90499-70 SOCKET HEAD BOLT, BBX7600...
...-35023-01 CHOKE PLATE 1 141 011-90595-20 SOCKET HEAD BOLT 2 142 592-30140-01 EXHAUST MUFFLER 1 143 592-30080-11 SPARK ARRESTER 1 144 592-35043-00 MUFFLER GASKET 1 145 592-70100-00 WIRE 1 1 146 592-70110-00 WIRE 2 1 147 592-75001-00 PLUG CAP 1 148 065-40099-31 PLUG CAP SPRING 1 149 592-70120-11 IGNITION COIL, BHX2500 1 150 011-90499-70 SOCKET HEAD BOLT, BBX7600...


