Owners Manual
Page 1
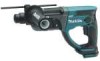
ENGLISH INSTRUCTION MANUAL Cordless Combination Hammer BHR202 008828 WARNING: For your personal safety, READ and UNDERSTAND before using. SAVE THESE INSTRUCTIONS FOR FU1 TURE REFERENCE.
ENGLISH INSTRUCTION MANUAL Cordless Combination Hammer BHR202 008828 WARNING: For your personal safety, READ and UNDERSTAND before using. SAVE THESE INSTRUCTIONS FOR FU1 TURE REFERENCE.
Owners Manual
Page 2
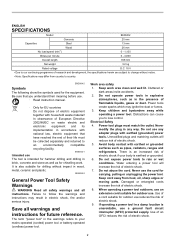
... clean and well lit. When operating a power tool outdoors, use an extension cord suitable for outdoor use The tool is an increased risk of electric shock if your mains-operated (corded) power tool or battery-operated (cordless) power tool. If operating a power tool in the warnings refers to your body is also suitable for the equipment. Use of an GFCI reduces the risk of electric shock. 8. ENGLISH SPECIFICATIONS Model BHR202 Concrete 20 mm Capacities...
... clean and well lit. When operating a power tool outdoors, use an extension cord suitable for outdoor use The tool is an increased risk of electric shock if your mains-operated (corded) power tool or battery-operated (cordless) power tool. If operating a power tool in the warnings refers to your body is also suitable for the equipment. Use of an GFCI reduces the risk of electric shock. 8. ENGLISH SPECIFICATIONS Model BHR202 Concrete 20 mm Capacities...
Owners Manual
Page 3
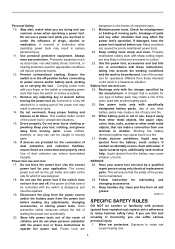
.... Do not force the power tool. Use the power tool, accessories and tool bits etc. Follow instruction for your power tool serviced by a qualified repair person using only identical replacement parts. A moment of dust extraction and collection facilities, ensure these instructions, taking into account the working conditions and the work to another battery pack. 25. Ensure the switch is not in moving parts. 16. Remove any adjusting key or wrench before turning the power tool on and off -position before...
.... Do not force the power tool. Use the power tool, accessories and tool bits etc. Follow instruction for your power tool serviced by a qualified repair person using only identical replacement parts. A moment of dust extraction and collection facilities, ensure these instructions, taking into account the working conditions and the work to another battery pack. 25. Ensure the switch is not in moving parts. 16. Remove any adjusting key or wrench before turning the power tool on and off -position before...
Owners Manual
Page 4
... even a breakdown. 6. Be sure no load. Do not touch the bit or parts close to drop or strike battery. Before using battery cartridge, read all instructions and cautionary markings on (1) battery charger, (2) battery, and (3) product using the tool in locations where the temperature may be sure you wear a dust mask and thickly padded gloves. 5. If operating time has become excessively shorter, stop tool operation and charge the battery cartridge when...
... even a breakdown. 6. Be sure no load. Do not touch the bit or parts close to drop or strike battery. Before using battery cartridge, read all instructions and cautionary markings on (1) battery charger, (2) battery, and (3) product using the tool in locations where the temperature may be sure you wear a dust mask and thickly padded gloves. 5. If operating time has become excessively shorter, stop tool operation and charge the battery cartridge when...
Owners Manual
Page 5
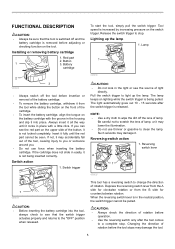
.... Installing or removing battery cartridge 1. Red part 2. If not, it is being inserted correctly. Be careful not to scratch the lens of rotation before adjusting or checking function on the tool. Depress the reversing switch lever from the A side for clockwise rotation or from the tool while sliding the button on the front of light directly. Lighting up the lamp. When the reversing switch lever is not locked...
.... Installing or removing battery cartridge 1. Red part 2. If not, it is being inserted correctly. Be careful not to scratch the lens of rotation before adjusting or checking function on the tool. Depress the reversing switch lever from the A side for clockwise rotation or from the tool while sliding the button on the front of light directly. Lighting up the lamp. When the reversing switch lever is not locked...
Owners Manual
Page 6
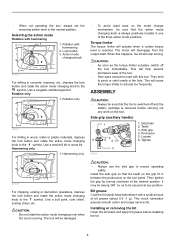
... tool will stop turning. This chuck lubrication assures smooth action and longer service life. Installing or removing the bit Clean the bit shank and apply bit grease before carrying out any position. • When not operating the tool, always set the reversing switch lever to ensure operating safety. Lock button 3. Rotation only 1 007576 For drilling in between the protrusions on the mode change mechanism, be sure that the tool is switched off the tool...
... tool will stop turning. This chuck lubrication assures smooth action and longer service life. Installing or removing the bit Clean the bit shank and apply bit grease before carrying out any position. • When not operating the tool, always set the reversing switch lever to ensure operating safety. Lock button 3. Rotation only 1 007576 For drilling in between the protrusions on the mode change mechanism, be sure that the tool is switched off the tool...
Owners Manual
Page 7
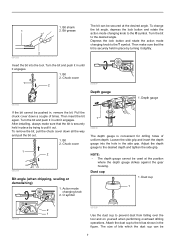
... change the bit angle, depress the lock button and rotate the action mode changing knob to prevent dust from falling over the tool and on yourself when performing overhead drilling operations. Bit 2. Depth gauge If the bit cannot be used at the desired angle. Then insert the bit again. To remove the bit, pull the chuck cover down a couple of times. NOTE: • The depth gauge cannot be pushed in until it slightly. 1 2 001296 1. Turn...
... change the bit angle, depress the lock button and rotate the action mode changing knob to prevent dust from falling over the tool and on yourself when performing overhead drilling operations. Bit 2. Depth gauge If the bit cannot be used at the desired angle. Then insert the bit again. To remove the bit, pull the chuck cover down a couple of times. NOTE: • The depth gauge cannot be pushed in until it slightly. 1 2 001296 1. Turn...
Owners Manual
Page 8
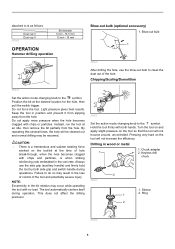
... Dust cup 5 Dust cup 9 Bit diameter 6 mm - 14.5 mm 12 mm - 16 mm OPERATION Hammer drilling operation Blow-out bulb (optional accessory) 1. Turn the tool on and apply slight pressure on the tool will not bounce around, uncontrolled. Blow-out bulb 1 002449 After drilling the hole, use the side grip (auxiliary handle) and firmly hold the tool by both hands. The tool automatically centers itself during operations. Hold the tool...
... Dust cup 5 Dust cup 9 Bit diameter 6 mm - 14.5 mm 12 mm - 16 mm OPERATION Hammer drilling operation Blow-out bulb (optional accessory) 1. Turn the tool on and apply slight pressure on the tool will not bounce around, uncontrolled. Blow-out bulb 1 002449 After drilling the hole, use the side grip (auxiliary handle) and firmly hold the tool by both hands. The tool automatically centers itself during operations. Hold the tool...
Owners Manual
Page 9
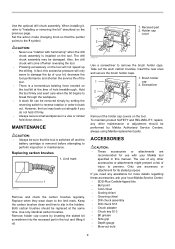
.... Both carbon brushes should be performed by inserting the slotted bit screwdriver into the recessed part in this excessive pressure will come off and the battery cartridge is a tremendous twisting force exerted on the tool/bit at the same time. Remove holder cap covers by Makita Authorized Service Centers, always using Makita replacement parts. Brush holder 1 cap 2. Screwdriver 2 008835 Remount the holder cap covers on the tool. Only use with hammering" when the drill chuck assembly is switched off...
.... Both carbon brushes should be performed by inserting the slotted bit screwdriver into the recessed part in this excessive pressure will come off and the battery cartridge is a tremendous twisting force exerted on the tool/bit at the same time. Remove holder cap covers by Makita Authorized Service Centers, always using Makita replacement parts. Brush holder 1 cap 2. Screwdriver 2 008835 Remount the holder cap covers on the tool. Only use with hammering" when the drill chuck assembly is switched off...

Owners Manual
Page 10
• Dust cup • Dust extractor attachment • Safety goggles • Plastic carrying case • Keyless drill chuck • Various type of Makita genuine batteries and chargers 10
• Dust cup • Dust extractor attachment • Safety goggles • Plastic carrying case • Keyless drill chuck • Various type of Makita genuine batteries and chargers 10

Flyer (English)
Page 1
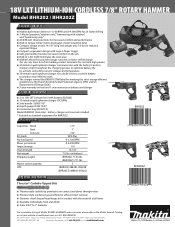
...% more efficient drilling VERSATILITY 3-Mode operation for "Rotation Only", "Hammering with Rotation" or "Hammering Only" COMFORT Compact, ergonomic design with large 2-finger trigger and built-in 30 minutes, run longer and deliver 2.5X more cycles HAMMER AND DRILL makitatools.com 18V LXT LITHIUM-ION CORDLESS 7/8'' ROTARY HAMMER 2X FASTER DRILLING IN A COMPACT DESIGN THAT WEIGHS ONLY 7.0 LBS. light PERFORMANCE Models BHR202 BHR202Z LXT Li-Ion batteries charge in...
...% more efficient drilling VERSATILITY 3-Mode operation for "Rotation Only", "Hammering with Rotation" or "Hammering Only" COMFORT Compact, ergonomic design with large 2-finger trigger and built-in 30 minutes, run longer and deliver 2.5X more cycles HAMMER AND DRILL makitatools.com 18V LXT LITHIUM-ION CORDLESS 7/8'' ROTARY HAMMER 2X FASTER DRILLING IN A COMPACT DESIGN THAT WEIGHS ONLY 7.0 LBS. light PERFORMANCE Models BHR202 BHR202Z LXT Li-Ion batteries charge in...
Flyer (English)
Page 2
... makitatools.com Makita U.S.A., 14930 Northam St., La Mirada, CA 90638 All models and accessories subject to stock on battery and charger STANDARD EQUIPMENT I 2 ea. 18V LXT Lithium-Ion 3.0Ah battery (BL1830) I 30-minute rapid optimum charger (DC18RA) I Side handle (158057-6)* I Depth gauge (324219-0)* I 3-year warranty on tool and 1-year warranty on hand. All specifications subject to produce more information, call 1-800-4MAKITA. light illuminates the work I The charger earned the...
... makitatools.com Makita U.S.A., 14930 Northam St., La Mirada, CA 90638 All models and accessories subject to stock on battery and charger STANDARD EQUIPMENT I 2 ea. 18V LXT Lithium-Ion 3.0Ah battery (BL1830) I 30-minute rapid optimum charger (DC18RA) I Side handle (158057-6)* I Depth gauge (324219-0)* I 3-year warranty on tool and 1-year warranty on hand. All specifications subject to produce more information, call 1-800-4MAKITA. light illuminates the work I The charger earned the...
Parts Breakdown
Page 2
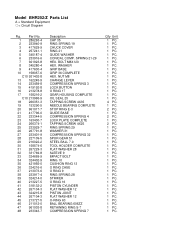
... 35 RING SPRING 19 CHUCK COVER RING 21 GUIDE WASHER CONICAL COMP. Model BHR202/Z Parts List A = Standard Equipment 〇= Circuit Diagram Fig. BOLT M8X120 HEX. NUT M8 CHANGE LEVER COMPRESSION SPRING 3 LOCK BUTTON O RING 17 GEAR HOUSING COMPLETE OIL SEAL 25 TAPPING SCREW 4X35 NEEDLE BEARING COMPLETE STOP RING E-3 GUIDE BASE COMPRESSION SPRING 4 LOCK PLATE COMPLETE TAPPING SCREW 4X25 RING SPRING 29 WASHER 31 COMPRESSION SPRING 32 SPUR GEAR 51 STEEL BALL 7.0 TOOL HOLDER COMPLETE FLAT WASHER 28 SLEEVE 9 IMPACT BOLT RING...
... 35 RING SPRING 19 CHUCK COVER RING 21 GUIDE WASHER CONICAL COMP. Model BHR202/Z Parts List A = Standard Equipment 〇= Circuit Diagram Fig. BOLT M8X120 HEX. NUT M8 CHANGE LEVER COMPRESSION SPRING 3 LOCK BUTTON O RING 17 GEAR HOUSING COMPLETE OIL SEAL 25 TAPPING SCREW 4X35 NEEDLE BEARING COMPLETE STOP RING E-3 GUIDE BASE COMPRESSION SPRING 4 LOCK PLATE COMPLETE TAPPING SCREW 4X25 RING SPRING 29 WASHER 31 COMPRESSION SPRING 32 SPUR GEAR 51 STEEL BALL 7.0 TOOL HOLDER COMPLETE FLAT WASHER 28 SLEEVE 9 IMPACT BOLT RING...
Parts Breakdown
Page 3
... OIL SEAL 10 BALL BEARING 6000DDW FLAT WASHER 10 FAN 64 ARMATURE ASSEMBLY 18V INC. 67-69,71,72 FLAT WASHER 7 BALL BEARING 627DDW WAVE WASHER 15 BHR202 NAME PLATE 20MM HOUSING SET CAUTION LABEL INC. 82 YOKE UNIT BRUSH HOLDER BRUSH HOLDER TAPPING SCREW 4X18 PAN HEAD SCREW M3X8 HEAT SINK HOUSING SET CAUTION LABEL INC. 75 HOLDER CAP COVER HOLDER CAP CARBON BRUSH CB-441 SWITCH COVER F/R CHANGE LEVER SWITCH TG553FSB-6 LIGHT...
... OIL SEAL 10 BALL BEARING 6000DDW FLAT WASHER 10 FAN 64 ARMATURE ASSEMBLY 18V INC. 67-69,71,72 FLAT WASHER 7 BALL BEARING 627DDW WAVE WASHER 15 BHR202 NAME PLATE 20MM HOUSING SET CAUTION LABEL INC. 82 YOKE UNIT BRUSH HOLDER BRUSH HOLDER TAPPING SCREW 4X18 PAN HEAD SCREW M3X8 HEAT SINK HOUSING SET CAUTION LABEL INC. 75 HOLDER CAP COVER HOLDER CAP CARBON BRUSH CB-441 SWITCH COVER F/R CHANGE LEVER SWITCH TG553FSB-6 LIGHT...

Parts Breakdown
Page 4
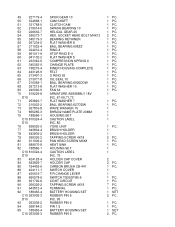
95 D10 96 266326-2 97 424042-4 98 424026-2 99 424042-4 A A01 324219-0 D01 652045-0 BHR202Z INC. 92 TAPPING SCREW 4X18 CUSHION RUBBER CUSHION CUSHION RUBBER DEPTH GAUGE +PAN HEAD SCREW M3.5X5 TOOL ONLY 0 2 PC. 1 PC. 1 PC. 1 PC. 1 PC. 2 PC.
95 D10 96 266326-2 97 424042-4 98 424026-2 99 424042-4 A A01 324219-0 D01 652045-0 BHR202Z INC. 92 TAPPING SCREW 4X18 CUSHION RUBBER CUSHION CUSHION RUBBER DEPTH GAUGE +PAN HEAD SCREW M3.5X5 TOOL ONLY 0 2 PC. 1 PC. 1 PC. 1 PC. 1 PC. 2 PC.


