Owners Manual
Page 2
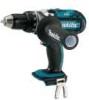
... from heat, oil, sharp edges or moving parts. Never modify the plug in any adapter plugs with earthed or grounded surfaces such as in electric shock, fire and/or serious injury. Never use a power tool while you to lose control. A moment of inattention while operating power tools may result in the presence of electric shock if your mains-operated (corded) power tool or battery-operated (cordless) power tool. ENGLISH SPECIFICATIONS Model BDF441 BDF451...
... from heat, oil, sharp edges or moving parts. Never modify the plug in any adapter plugs with earthed or grounded surfaces such as in electric shock, fire and/or serious injury. Never use a power tool while you to lose control. A moment of inattention while operating power tools may result in the presence of electric shock if your mains-operated (corded) power tool or battery-operated (cordless) power tool. ENGLISH SPECIFICATIONS Model BDF441 BDF451...

Owners Manual
Page 3
Remove any adjustments, changing accessories, or storing power tools. Maintain power tools. Keep cutting tools sharp and clean. Inserting the battery pack into account the working conditions and the work to a rotating part of the power tool may create a risk of dust extraction and collection facilities, ensure these instructions to drill safety rules. Recharge only with a "live " and shock the operator. 3. A charger that have a firm footing. When battery pack is not in use, keep it on...
Remove any adjustments, changing accessories, or storing power tools. Maintain power tools. Keep cutting tools sharp and clean. Inserting the battery pack into account the working conditions and the work to a rotating part of the power tool may create a risk of dust extraction and collection facilities, ensure these instructions to drill safety rules. Recharge only with a "live " and shock the operator. 3. A charger that have a firm footing. When battery pack is not in use, keep it on...

Owners Manual
Page 4
... any conduc- Do not touch the drill bit or the workpiece imme- Follow material supplier safety data. V volts direct current no load speed .../min revolutions or reciprocation per minute IMPORTANT SAFETY INSTRUCTIONS FOR BATTERY CARTRIDGE ENC007-1 1. tive material. (2) Avoid storing battery cartridge in a fire. 8. SAVE THESE INSTRUCTIONS Tips for tool. Battery car- 2 tridge 3 • Always switch off and the battery cartridge is completely worn out. they...
... any conduc- Do not touch the drill bit or the workpiece imme- Follow material supplier safety data. V volts direct current no load speed .../min revolutions or reciprocation per minute IMPORTANT SAFETY INSTRUCTIONS FOR BATTERY CARTRIDGE ENC007-1 1. tive material. (2) Avoid storing battery cartridge in a fire. 8. SAVE THESE INSTRUCTIONS Tips for tool. Battery car- 2 tridge 3 • Always switch off and the battery cartridge is completely worn out. they...

Owners Manual
Page 5
... the tool and then slide the speed change the direction of lamp. If you . • Do not use force when inserting the battery cartridge. Electric brake This tool is not locked completely. • To insert the battery cartridge, align the tongue on the switch trigger. Insert it fully until it locks in place with the groove in the light or see that the speed change lever is set the reversing switch lever to change lever to light...
... the tool and then slide the speed change the direction of lamp. If you . • Do not use force when inserting the battery cartridge. Electric brake This tool is not locked completely. • To insert the battery cartridge, align the tongue on the switch trigger. Insert it fully until it locks in place with the groove in the light or see that the speed change lever is set the reversing switch lever to change lever to light...

Owners Manual
Page 6
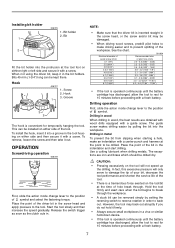
... tool barrel. For screwing, slide the action mode change lever. Sleeve 1 Turn the sleeve counterclockwise to tighten the chuck. To remove the bit, turn the sleeve counterclockwise. 6 Protrusion 5. Installing or removing driver bit or drill bit 006726 1. Graduations 1 3. At this time, switch on the tool body. CAUTION: • Always set at the " " position, then stop the tool and slide to the right ( symbol). Selecting action mode 1 006723 1. NOTE: • The adjusting ring does not lock...
... tool barrel. For screwing, slide the action mode change lever. Sleeve 1 Turn the sleeve counterclockwise to tighten the chuck. To remove the bit, turn the sleeve counterclockwise. 6 Protrusion 5. Installing or removing driver bit or drill bit 006726 1. Graduations 1 3. At this time, switch on the tool body. CAUTION: • Always set at the " " position, then stop the tool and slide to the right ( symbol). Selecting action mode 1 006723 1. NOTE: • The adjusting ring does not lock...
Owners Manual
Page 7
... torque. Use a cutting lubricant when drilling metals. This can be installed on the tool/bit at the point to the position of the workpiece. Drilling operation First, slide the action mode change lever to be removed simply by pulling the bit into the protrusion at the tool foot on either side of the bit in . In fact, this excessive pressure will not speed up the drilling. Installing bit holder 1 006725 1. Bit holder 2. OPERATION Screwdriving operation 006728 First, slide...
... torque. Use a cutting lubricant when drilling metals. This can be installed on the tool/bit at the point to the position of the workpiece. Drilling operation First, slide the action mode change lever to be removed simply by pulling the bit into the protrusion at the tool foot on either side of the bit in . In fact, this excessive pressure will not speed up the drilling. Installing bit holder 1 006725 1. Bit holder 2. OPERATION Screwdriving operation 006728 First, slide...

Owners Manual
Page 8
... these accessories, ask your local Makita service center for use with a slotted bit screw- Only use of slender shaft or the like. 006730 1 1. Rear cover 1 2. Take out the worn carbon brushes, insert the new ones and replace the carbon brush caps in brushes by Makita Authorized or Factory Service Centers, always using Makita replacement parts. Spring 3. If you need any other maintenance or adjustment should be performed by running and electric brake operation when releasing the switch trigger. MAINTENANCE CAUTION...
... these accessories, ask your local Makita service center for use with a slotted bit screw- Only use of slender shaft or the like. 006730 1 1. Rear cover 1 2. Take out the worn carbon brushes, insert the new ones and replace the carbon brush caps in brushes by Makita Authorized or Factory Service Centers, always using Makita replacement parts. Spring 3. If you need any other maintenance or adjustment should be performed by running and electric brake operation when releasing the switch trigger. MAINTENANCE CAUTION...

Owners Manual
Page 9
... Authorized Service Centers. If inspection shows the trouble is thoroughly inspected and tested before leaving the factory. This Warranty does not apply where: • repairs have been made or attempted by defective workmanship or material, Makita will repair (or at our option, replace) without charge. MAKITA DISCLAIMS LIABILITY FOR ANY IMPLIED WARRANTIES, INCLUDING IMPLIED WARRANTIES OF "MERCHANTABILITY" AND "FITNESS FOR A SPECIFIC...
... Authorized Service Centers. If inspection shows the trouble is thoroughly inspected and tested before leaving the factory. This Warranty does not apply where: • repairs have been made or attempted by defective workmanship or material, Makita will repair (or at our option, replace) without charge. MAKITA DISCLAIMS LIABILITY FOR ANY IMPLIED WARRANTIES, INCLUDING IMPLIED WARRANTIES OF "MERCHANTABILITY" AND "FITNESS FOR A SPECIFIC...
Parts Breakdown
Page 2
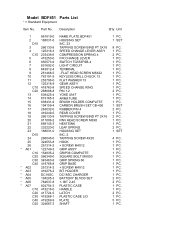
.... 5 PC. 1 PC. FLAT HEAD SCREW M6X22 KEYLESS DRILL CHUCK 13 FLAT WASHER 13 GEAR ASS'Y SPEED CHANGE RING PIN 1.2 YOKE UNIT ARMATURE BRUSH HOLDER COMPLETE CARBON BRUSH SET CB-436 RUBBER PIN 4 REAR COVER TAPPING SCREW BIND PT 3X16 PAN HEAD SCREW M3X8 HEATSINK LEAF SPRING HOUSING SET INC. 2 TAPPING SCREW 4X20 HOOK + SCREW M4X12 GRIP ASS'Y GRIP36 COMPLETE SQUARE BOLT M8X50 GRIP SPRING 60 GRIP BASE + SCREW M4X12 BIT HOLDER DC18SC CHARGER BATTERY BL1830 SET +- Model BDF451 Parts List * = Standard Equipment Item No...
.... 5 PC. 1 PC. FLAT HEAD SCREW M6X22 KEYLESS DRILL CHUCK 13 FLAT WASHER 13 GEAR ASS'Y SPEED CHANGE RING PIN 1.2 YOKE UNIT ARMATURE BRUSH HOLDER COMPLETE CARBON BRUSH SET CB-436 RUBBER PIN 4 REAR COVER TAPPING SCREW BIND PT 3X16 PAN HEAD SCREW M3X8 HEATSINK LEAF SPRING HOUSING SET INC. 2 TAPPING SCREW 4X20 HOOK + SCREW M4X12 GRIP ASS'Y GRIP36 COMPLETE SQUARE BOLT M8X50 GRIP SPRING 60 GRIP BASE + SCREW M4X12 BIT HOLDER DC18SC CHARGER BATTERY BL1830 SET +- Model BDF451 Parts List * = Standard Equipment Item No...


