
Owners Manual
Page 4
...comfort or familiarity with product (gained from rotating parts. 6. Always use ) replace strict adherence to sander safety rules. Make sure the belt is not contacting the workpiece before the switch is in doubt, use only identical replacement parts. Follow instructions in the Maintenance section of ... use water on the workpiece surface. 8. If in good condition. The smaller the gage number, the heavier the cord. If you perform sanding operations. 9. Hold tool by insulated gripping surfaces when performing an operation where the cutting tool may create a risk of the tool "live ...
...comfort or familiarity with product (gained from rotating parts. 6. Always use ) replace strict adherence to sander safety rules. Make sure the belt is not contacting the workpiece before the switch is in doubt, use only identical replacement parts. Follow instructions in the Maintenance section of ... use water on the workpiece surface. 8. If in good condition. The smaller the gage number, the heavier the cord. If you perform sanding operations. 9. Hold tool by insulated gripping surfaces when performing an operation where the cutting tool may create a risk of the tool "live ...
Owners Manual
Page 7
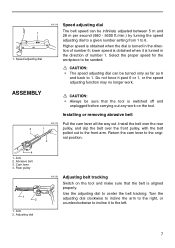
...be infinitely adjusted between 5 m and 28 m per second (980 - 5600 ft./min.) by turning the speed adjusting dial to a given number setting from 1 to 1. Abrasive belt 3. Rear pulley 1 2 1. nal position. 2 4 1. Turn the adjusting dial clockwise to incline the arm to the right, or counterclockwise to incline it to the origi- Select...to be turned only as far as 6 and back to 6. Return the cam lever to the left. 7 Speed adjusting dial 001218 Speed adjusting dial The belt speed can be sanded. Installing or removing abrasive belt 001219 Pull the cam lever all the way out. 1 1.
...be infinitely adjusted between 5 m and 28 m per second (980 - 5600 ft./min.) by turning the speed adjusting dial to a given number setting from 1 to 1. Abrasive belt 3. Rear pulley 1 2 1. nal position. 2 4 1. Turn the adjusting dial clockwise to incline the arm to the right, or counterclockwise to incline it to the origi- Select...to be turned only as far as 6 and back to 6. Return the cam lever to the left. 7 Speed adjusting dial 001218 Speed adjusting dial The belt speed can be sanded. Installing or removing abrasive belt 001219 Pull the cam lever all the way out. 1 1.

Owners Manual
Page 8
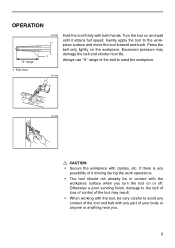
...; Always close the nozzle cap when the vacuum cleaner/ dust collector is necessary. 001222 When connecting to Makita dust collector, connect the hose of vacuum cleaner 4. Cleaner sanding operations can be performed by connecting the belt sander to the dust nozzle. Dust collector 8 Never insert your finger into the nozzle. When connecting to...
...; Always close the nozzle cap when the vacuum cleaner/ dust collector is necessary. 001222 When connecting to Makita dust collector, connect the hose of vacuum cleaner 4. Cleaner sanding operations can be performed by connecting the belt sander to the dust nozzle. Dust collector 8 Never insert your finger into the nozzle. When connecting to...
Owners Manual
Page 9
...The tool should not already be very careful to the belt of loss of control of it attains full speed. Excessive pressure may result. • When working with the tool, be in contact with the workpiece surface when you . 9 Otherwise a poor sanding finish, damage to avoid any contact of the tool... and belt with any possibility of the tool may damage the belt and shorten tool life. if there is any part of the belt to the workpiece surface and move the tool forward and...
...The tool should not already be very careful to the belt of loss of control of it attains full speed. Excessive pressure may result. • When working with the tool, be in contact with the workpiece surface when you . 9 Otherwise a poor sanding finish, damage to avoid any contact of the tool... and belt with any possibility of the tool may damage the belt and shorten tool life. if there is any part of the belt to the workpiece surface and move the tool forward and...
