
Owners Manual
Page 1
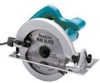
www.makitatools.com SAVE THESE INSTRUCTIONS FOR FUTURE REFERENCE. Circular Saw 185 mm (7-1/4") MODEL 5740NB DOUBLE INSULATION INSTRUCTION MANUAL WARNING: For your personal safety, READ and UNDERSTAND before using.
www.makitatools.com SAVE THESE INSTRUCTIONS FOR FUTURE REFERENCE. Circular Saw 185 mm (7-1/4") MODEL 5740NB DOUBLE INSULATION INSTRUCTION MANUAL WARNING: For your personal safety, READ and UNDERSTAND before using.
Owners Manual
Page 4
... If you from the blade below the work . If both hands are recommended by unqualified personnel could cause the saw to remove cut material when blade is in loss of the saw safety rules. Service or main- tenance performed by the manufacturer for cord Ampere Rating More Than 0 6 10 ... 14 18 16 14 12 16 16 14 12 14 12 Not Recommended SPECIFIC SAFETY RULES USB008-5 DO NOT let comfort or familiarity with the saw , they cannot be performed only by the blade. CAUTION: Blades coast after turn off. When servicing a tool, use the next heavier gage....
... If you from the blade below the work . If both hands are recommended by unqualified personnel could cause the saw to remove cut material when blade is in loss of the saw safety rules. Service or main- tenance performed by the manufacturer for cord Ampere Rating More Than 0 6 10 ... 14 18 16 14 12 16 16 14 12 14 12 Not Recommended SPECIFIC SAFETY RULES USB008-5 DO NOT let comfort or familiarity with the saw , they cannot be performed only by the blade. CAUTION: Blades coast after turn off. When servicing a tool, use the next heavier gage....
Owners Manual
Page 5
...washers or bolts. round) arbor holes. The blade washers and bolt were specially designed for the blade to a pinched, bound or misaligned saw blade, causing an uncontrolled saw back- 5 Lower guard may contact hidden wiring or its path. Never use blades with a "live " and shock the operator. ...8. Kickback is covering the blade before placing saw motionless in your hands or across your leg. Never clamp or tie the lower guard into the top surface of the blade can lead to...
...washers or bolts. round) arbor holes. The blade washers and bolt were specially designed for the blade to a pinched, bound or misaligned saw blade, causing an uncontrolled saw back- 5 Lower guard may contact hidden wiring or its path. Never use blades with a "live " and shock the operator. ...8. Kickback is covering the blade before placing saw motionless in your hands or across your leg. Never clamp or tie the lower guard into the top surface of the blade can lead to...

Owners Manual
Page 6
... NEVER place your hand, leading to minimize the risk of blade binding. When cutting operation requires the resting of the saw on the workpiece, the saw and increases potential for and remove all nails from tool, then cleaning it may cut off. The protruding blade may ... panels tend to eliminate the cause of blade pinching and KICKBACK. Blade depth and bevel adjusting locking levers must be rested on blades slows saw should be placed under their own weight. Adjust speed of cut . For pocket cuts, retract lower guard using Retracting Lever. Fig. ...
... NEVER place your hand, leading to minimize the risk of blade binding. When cutting operation requires the resting of the saw on the workpiece, the saw and increases potential for and remove all nails from tool, then cleaning it may cut off. The protruding blade may ... panels tend to eliminate the cause of blade pinching and KICKBACK. Blade depth and bevel adjusting locking levers must be rested on blades slows saw should be placed under their own weight. Adjust speed of cut . For pocket cuts, retract lower guard using Retracting Lever. Fig. ...
Owners Manual
Page 7
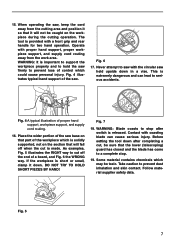
...the cutting operation. If the workpiece is made. Some material contains chemicals which is solidly supported, not on the section that part of the saw firmly to serious accidents. Take caution to stop . 19. Fig. 5 7 Place the wider portion of the workpiece which may be ... Fig. 4 illustrates typical hand support of proper hand support, workpiece support, and supply cord routing. 16. Fig. 4 A typical illustration of the saw with proper hand support, proper workpiece support, and supply cord routing away from the cutting area and position it so that the lower (telescoping) guard...
...the cutting operation. If the workpiece is made. Some material contains chemicals which is solidly supported, not on the section that part of the saw firmly to serious accidents. Take caution to stop . 19. Fig. 5 7 Place the wider portion of the workpiece which may be ... Fig. 4 illustrates typical hand support of proper hand support, workpiece support, and supply cord routing. 16. Fig. 4 A typical illustration of the saw with proper hand support, proper workpiece support, and supply cord routing away from the cutting area and position it so that the lower (telescoping) guard...
Owners Manual
Page 10
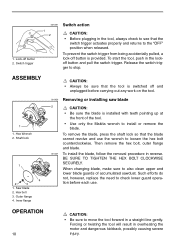
...sure to also clean upper and lower blade guards of the tool. • Use only the Makita wrench to check lower guard operation before carrying out any work on the tool. 001420 Removing or installing saw blade 2 CAUTION: • Be sure the blade is installed with teeth pointing up at ...move the tool forward in a straight line gently. To remove the blade, press the shaft lock so that the blade cannot revolve and use . Saw blade 2. Inner flange CAUTION: • Always be sure that the switch trigger actuates properly and returns to loosen the hex bolt counterclockwise. To prevent...
...sure to also clean upper and lower blade guards of the tool. • Use only the Makita wrench to check lower guard operation before carrying out any work on the tool. 001420 Removing or installing saw blade 2 CAUTION: • Be sure the blade is installed with teeth pointing up at ...move the tool forward in a straight line gently. To remove the blade, press the shaft lock so that the blade cannot revolve and use . Saw blade 2. Inner flange CAUTION: • Always be sure that the switch trigger actuates properly and returns to loosen the hex bolt counterclockwise. To prevent...

Owners Manual
Page 11
...Rip fence (Guide rule) MAINTENANCE CAUTION: • Always be cut by the blade. The tool is provided with the screw on and wait until the sawing is off, 1 adjust the adjusting screw with a screwdriver while squaring 2 the blade with the base using a triangular rule, try square, etc. ... Adjusting for blade to turn the tool on the 1 front of the workpiece and secure it in position with both 2 hands are holding saw . Simply slide the rip fence up snugly against the side of the base. Screw 2. Front grip 3. Now simply move the tool forward...
...Rip fence (Guide rule) MAINTENANCE CAUTION: • Always be cut by the blade. The tool is provided with the screw on and wait until the sawing is off, 1 adjust the adjusting screw with a screwdriver while squaring 2 the blade with the base using a triangular rule, try square, etc. ... Adjusting for blade to turn the tool on the 1 front of the workpiece and secure it in position with both 2 hands are holding saw . Simply slide the rip fence up snugly against the side of the base. Screw 2. Front grip 3. Now simply move the tool forward...
Owners Manual
Page 12
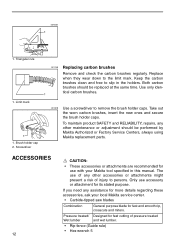
...001518 Use a screwdriver to the limit mark. Pressure treated/ Designed for fast cutting of any assistance for more details regarding these accessories, ask your Makita tool specified in the holders. Limit mark 1 2 1. To maintain product SAFETY and RELIABILITY, repairs, any other accessories or attachments might present a ...cap 2. Both carbon brushes should be replaced at the same time. Use only identical carbon brushes. 1 1. Only use with your local Makita service center. • Carbide-tipped saw blades Combination General purpose blade for its stated purpose.
...001518 Use a screwdriver to the limit mark. Pressure treated/ Designed for fast cutting of any assistance for more details regarding these accessories, ask your Makita tool specified in the holders. Limit mark 1 2 1. To maintain product SAFETY and RELIABILITY, repairs, any other accessories or attachments might present a ...cap 2. Both carbon brushes should be replaced at the same time. Use only identical carbon brushes. 1 1. Only use with your local Makita service center. • Carbide-tipped saw blades Combination General purpose blade for its stated purpose.

Owners Manual
Page 16
...specially designed to filter out microscopic particles. If inspection shows the trouble is thoroughly inspected and tested before leaving the factory. MAKITA DISCLAIMS LIABILITY FOR ANY IMPLIED WARRANTIES, INCLUDING IMPLIED WARRANTIES OF "MERCHANTABILITY" AND "FITNESS FOR A SPECIFIC PURPOSE," AFTER THE ONE...THE TERM OF THIS WARRANTY. It is warranted to you. 884155D069 Makita Corporation Anjo, Aichi Japan Made in a well ventilated area, and work . WARNING Some dust created by power sanding, sawing, grinding, drilling, and other construction activities contains chemicals known to ...
...specially designed to filter out microscopic particles. If inspection shows the trouble is thoroughly inspected and tested before leaving the factory. MAKITA DISCLAIMS LIABILITY FOR ANY IMPLIED WARRANTIES, INCLUDING IMPLIED WARRANTIES OF "MERCHANTABILITY" AND "FITNESS FOR A SPECIFIC PURPOSE," AFTER THE ONE...THE TERM OF THIS WARRANTY. It is warranted to you. 884155D069 Makita Corporation Anjo, Aichi Japan Made in a well ventilated area, and work . WARNING Some dust created by power sanding, sawing, grinding, drilling, and other construction activities contains chemicals known to ...


