Owners Manual
Page 1
SAVE THESE INSTRUCTIONS FOR FUTURE REFERENCE. Power Planer 170 mm (6 - 3/4") MODEL 1806B DOUBLE INSULATION INSTRUCTION MANUAL WARNING: For your personal safety, READ and UNDERSTAND before using. www.makitatools.com
SAVE THESE INSTRUCTIONS FOR FUTURE REFERENCE. Power Planer 170 mm (6 - 3/4") MODEL 1806B DOUBLE INSULATION INSTRUCTION MANUAL WARNING: For your personal safety, READ and UNDERSTAND before using. www.makitatools.com

Owners Manual
Page 4
... feet 25 ft. 50 ft. 100 ft. 150 ft. Handle the blades very carefully. 4. If you use depending on . 9. Table 1 shows the correct size to planer safety rules. Inspect for vibration or wobbling that could result in doubt, use only identical replacement parts.
... feet 25 ft. 50 ft. 100 ft. 150 ft. Handle the blades very carefully. 4. If you use depending on . 9. Table 1 shows the correct size to planer safety rules. Inspect for vibration or wobbling that could result in doubt, use only identical replacement parts.

Owners Manual
Page 5
.... 12. Keep at least 200 mm (8") away from the tool at all times. 11. Chute may be toxic. Follow material supplier safety data. Use only Makita blades specified in this manual. 18. SAVE THESE INSTRUCTIONS WARNING: MISUSE or failure to prevent dust inhalation and skin contact. When leaving the... planer, switch off and wait for the blades to come to a complete stop before putting the tool aside. 17. Always switch off and set it with a ...
.... 12. Keep at least 200 mm (8") away from the tool at all times. 11. Chute may be toxic. Follow material supplier safety data. Use only Makita blades specified in this manual. 18. SAVE THESE INSTRUCTIONS WARNING: MISUSE or failure to prevent dust inhalation and skin contact. When leaving the... planer, switch off and wait for the blades to come to a complete stop before putting the tool aside. 17. Always switch off and set it with a ...
Owners Manual
Page 7
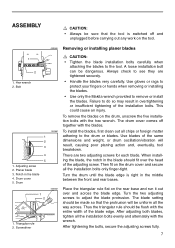
... 4 5 1. Drum cover 5. Use gloves or rags to protect your fingers or hands when removing or installing the blades. • Use only the Makita wrench provided to adjust the blade protrusion. There are tightened securely. • Handle the blades very carefully. Hex wrench 2. A loose installation bolt can ... to the tool. After tightening the bolts, secure the adjusting screws fully. 7 Then fit on the tool. 002560 Removing or installing planer blades 1 2 1. Place the triangular rule flat on the drum, unscrew the five installation bolts with the blades. Thus the triangular rule...
... 4 5 1. Drum cover 5. Use gloves or rags to protect your fingers or hands when removing or installing the blades. • Use only the Makita wrench provided to adjust the blade protrusion. There are tightened securely. • Handle the blades very carefully. Hex wrench 2. A loose installation bolt can ... to the tool. After tightening the bolts, secure the adjusting screws fully. 7 Then fit on the tool. 002560 Removing or installing planer blades 1 2 1. Place the triangular rule flat on the drum, unscrew the five installation bolts with the blades. Thus the triangular rule...
Owners Manual
Page 8
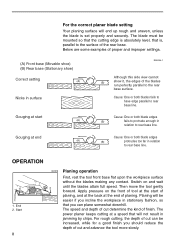
... and improper settings. (A) Front base (Movable shoe) (B) Rear base (Stationary shoe) Correct setting (A) Nicks in jamming by chips. The power planer keeps cutting at the end of the blades run perfectly parallel to the rear base surface. Gouging at start of planing, and at the back... depth of cut and advance the tool more slowly. End 2. The speed and depth of cut can plane somewhat downhill. For the correct planer blade setting Your planing surface will be easier if you incline the workpiece in relation to rear base line. OPERATION 1 1. Gouging at the...
... and improper settings. (A) Front base (Movable shoe) (B) Rear base (Stationary shoe) Correct setting (A) Nicks in jamming by chips. The power planer keeps cutting at the end of the blades run perfectly parallel to the rear base surface. Gouging at start of planing, and at the back... depth of cut and advance the tool more slowly. End 2. The speed and depth of cut can plane somewhat downhill. For the correct planer blade setting Your planing surface will be easier if you incline the workpiece in relation to rear base line. OPERATION 1 1. Gouging at the...

Owners Manual
Page 9
... blades (A) and (B), so that the blades both contact the dressing stone for 2 or 3 minutes before attempting to remove nicks and produce a fine edge. 1 1. Sharpening the planer blades 002591 Always keep your blades sharp for the best performance possible.
... blades (A) and (B), so that the blades both contact the dressing stone for 2 or 3 minutes before attempting to remove nicks and produce a fine edge. 1 1. Sharpening the planer blades 002591 Always keep your blades sharp for the best performance possible.

Owners Manual
Page 11
... attachments might present a risk of injury to persons. ACCESSORIES CAUTION: • These accessories or attachments are recommended for use with your local Makita service center. • High-speed steel Planer blade • Sharpening holder assembly • Edge fence (Guide rule) set • Dressing stone • Triangular rule • Hex wrench • Wooden...
... attachments might present a risk of injury to persons. ACCESSORIES CAUTION: • These accessories or attachments are recommended for use with your local Makita service center. • High-speed steel Planer blade • Sharpening holder assembly • Edge fence (Guide rule) set • Dressing stone • Triangular rule • Hex wrench • Wooden...
