

User manual, English (US)
Page 4
...conversations as on TV Ratings 18 Using the SmartLock Blocking Options 19 How to set them), Theatre, Music, or Voice with accessory devices such as Sports, Movies, Personal, Weak Signals, or Multi Media with Accessory Devices (Search Method) . . .30 Remote Control Codes 31-32 Remote VCR Related ...either English or Spanish) show helpful messages for various types of programs such as Personal (sound controls the way you set the picture's color, tint, contrast, etc., for direct connections of programming such as VCRs, DVD Players, Cable Boxes, and more. SmartSound™ allows ...
...conversations as on TV Ratings 18 Using the SmartLock Blocking Options 19 How to set them), Theatre, Music, or Voice with accessory devices such as Sports, Movies, Personal, Weak Signals, or Multi Media with Accessory Devices (Search Method) . . .30 Remote Control Codes 31-32 Remote VCR Related ...either English or Spanish) show helpful messages for various types of programs such as Personal (sound controls the way you set the picture's color, tint, contrast, etc., for direct connections of programming such as VCRs, DVD Players, Cable Boxes, and more. SmartSound™ allows ...

User manual, English (US)
Page 5
...;ᮤ buttons to remove the menu from the TV's screen. HOW TO USE THE PICTURE ADJUSTMENT CONTROLS T o adjust your TV picture controls, select a channel and follow the steps shown below: 1 Press the MENU button on the remote to display the on-screen menu. 2 Press the...ᮤᮤ button to adjust the selected control or to make the whites more red.) Main Picture Sound Features Install Brightness Color Picture Sharpness Tint More... 7 SLEEP A/CH STATUS/EXIT CC 2POWER CLOCK 1 TV RECORD 1 VCR 2 ACC 4TV/VCR 3 4 7 SMART 5 8 66 9 SMART 0 SOUND PICTURE MENU SURF 5 VOL...
...;ᮤ buttons to remove the menu from the TV's screen. HOW TO USE THE PICTURE ADJUSTMENT CONTROLS T o adjust your TV picture controls, select a channel and follow the steps shown below: 1 Press the MENU button on the remote to display the on-screen menu. 2 Press the...ᮤᮤ button to adjust the selected control or to make the whites more red.) Main Picture Sound Features Install Brightness Color Picture Sharpness Tint More... 7 SLEEP A/CH STATUS/EXIT CC 2POWER CLOCK 1 TV RECORD 1 VCR 2 ACC 4TV/VCR 3 4 7 SMART 5 8 66 9 SMART 0 SOUND PICTURE MENU SURF 5 VOL...

User manual, English (US)
Page 6
... Sound Features Install Brightness Color Picture Sharpness Tint More... 6 SLEEP POWER 1 A/CH STATUS/EXIT CC CLOCK TV RECORD TV/VCR 1 VCR ACC 4 4 2 3 56 7 SMART 8 0 29 SMART SOUND PICTURE MENU SURF Picture Brightness 50 Color Picture Sharpness Tint Color Temp. HOW TO USE...remote to display the on-screen menu. 2 Press the ᮣ or ■ button until the word PICTURE is highlighted. 3 Press the ᮣᮣ button to display the PICTURE menu features. 4 Press the ᮣ or ■ button to remove the menu from the TV's screen. Picture VOL CH MUTE 3 Color...
... Sound Features Install Brightness Color Picture Sharpness Tint More... 6 SLEEP POWER 1 A/CH STATUS/EXIT CC CLOCK TV RECORD TV/VCR 1 VCR ACC 4 4 2 3 56 7 SMART 8 0 29 SMART SOUND PICTURE MENU SURF Picture Brightness 50 Color Picture Sharpness Tint Color Temp. HOW TO USE...remote to display the on-screen menu. 2 Press the ᮣ or ■ button until the word PICTURE is highlighted. 3 Press the ᮣᮣ button to display the PICTURE menu features. 4 Press the ᮣ or ■ button to remove the menu from the TV's screen. Picture VOL CH MUTE 3 Color...

User manual, English (US)
Page 7
...remove the menu from the TV's screen. Picture Picture Sharpness Tint Color Temp. Contrast + Off 7 DNR Contrast + On VOL 2 4 MUTE CH 3 5 Picture Color Picture Sharpness Tint Color Temp. Contrast + On OR Picture Color Picture Sharpness Tint Color Temp. The black portions of... the picture become richer in darkness and the whites become brighter. 1 Press the MENU button on the remote to display the on...
...remove the menu from the TV's screen. Picture Picture Sharpness Tint Color Temp. Contrast + Off 7 DNR Contrast + On VOL 2 4 MUTE CH 3 5 Picture Color Picture Sharpness Tint Color Temp. Contrast + On OR Picture Color Picture Sharpness Tint Color Temp. The black portions of... the picture become richer in darkness and the whites become brighter. 1 Press the MENU button on the remote to display the on...

User manual, English (US)
Page 8
Main Picture Sound Features Install Brightness Color Picture Sharpness Tint More... 6 SLEEP POWER 1 A/CH STATUS/EXIT CC CLOCK TV RECORD 1 VCR 2 ACC 4TV/VCR 3 456 7 SMART 8 29 SMART 0 SOUND PICTURE MENU SURF 5 VOL 2 4 MUTE CH 3 5 Main Picture Sound Features Install Treble... sound controls. The BASS BOOST control affects the low frequency sounds coming from the TV, enhancing the highs. The BALANCE control adjusts the sound level being heard from each speaker. 1 Press the MENU button on the remote to display the on-screen menu. 2 Press the ᮣ or ■ ...
Main Picture Sound Features Install Brightness Color Picture Sharpness Tint More... 6 SLEEP POWER 1 A/CH STATUS/EXIT CC CLOCK TV RECORD 1 VCR 2 ACC 4TV/VCR 3 456 7 SMART 8 29 SMART 0 SOUND PICTURE MENU SURF 5 VOL 2 4 MUTE CH 3 5 Main Picture Sound Features Install Treble... sound controls. The BASS BOOST control affects the low frequency sounds coming from the TV, enhancing the highs. The BALANCE control adjusts the sound level being heard from each speaker. 1 Press the MENU button on the remote to display the on-screen menu. 2 Press the ᮣ or ■ ...

User manual, English (US)
Page 9
...USE THE AVL (AUTOMATIC VOLUME LEVELER) CONTROL In most cases, the volume levels coming from the TV's screen. Main Picture Sound Features Install Brightness Color Picture Sharpness Tint More... 6 SLEEP POWER 1 A/CH STATUS/EXIT CC CLOCK TV RECORD 1 VCR 2 ACC 4TV/VCR 3 456 7 SMART 8 29 SMART 0 SOUND PICTURE ... and valleys that occur during program changes or commercial breaks. To turn on AVL, follow these steps. 1 Press the MENU button on the remote to display the on-screen menu. 2 Press the ᮣ or ■ button until the word SOUND is highlighted. 3 Press the &#...
...USE THE AVL (AUTOMATIC VOLUME LEVELER) CONTROL In most cases, the volume levels coming from the TV's screen. Main Picture Sound Features Install Brightness Color Picture Sharpness Tint More... 6 SLEEP POWER 1 A/CH STATUS/EXIT CC CLOCK TV RECORD 1 VCR 2 ACC 4TV/VCR 3 456 7 SMART 8 29 SMART 0 SOUND PICTURE ... and valleys that occur during program changes or commercial breaks. To turn on AVL, follow these steps. 1 Press the MENU button on the remote to display the on-screen menu. 2 Press the ᮣ or ■ button until the word SOUND is highlighted. 3 Press the &#...

User manual, English (US)
Page 10
... RECEIVE STEREO PROGRAMMING You can receive broadcast stereo TV programs. The TV has both an amplifier and twin speakers through which the stereo sound can be heard. 1 Press the MENU button on the remote to display the on-screen menu. 2 Press the ᮣ or ■ button ...Remember, if stereo is highlighted. 5 Press the ᮣᮣ button to set to Mono. Main Picture Sound Features Install Brightness Color Picture Sharpness Tint More... 6 SLEEP POWER 1 A/CH STATUS/EXIT CC CLOCK TV RECORD 1 VCR 2 ACC 45 4TV/VCR 3 6 7 SMART 8 29 SMART 0 SOUND PICTURE MENU SURF VOL 2 4...
... RECEIVE STEREO PROGRAMMING You can receive broadcast stereo TV programs. The TV has both an amplifier and twin speakers through which the stereo sound can be heard. 1 Press the MENU button on the remote to display the on-screen menu. 2 Press the ᮣ or ■ button ...Remember, if stereo is highlighted. 5 Press the ᮣᮣ button to set to Mono. Main Picture Sound Features Install Brightness Color Picture Sharpness Tint More... 6 SLEEP POWER 1 A/CH STATUS/EXIT CC CLOCK TV RECORD 1 VCR 2 ACC 45 4TV/VCR 3 6 7 SMART 8 29 SMART 0 SOUND PICTURE MENU SURF VOL 2 4...

User manual, English (US)
Page 11
... to adjust the selected option. ACTIVATE: Set the Timer to turn itself on the remote. Timer Time Start Time Stop Time Channel Activate Display 10 :30 AM 4 SLEEP POWER 1 A/CH STATUS/EXIT CC CLOCK TV RECORD 1 VCR 2 ACC 45 TV/VCR 3 6 7 SMART 8 0 29 SMART SOUND PICTURE MENU SURF VOL CH MUTE 2 3 Timer Time... PM. HOW TO USE THE TIMER CONTROLS Let's Look Inside! Use the ᮣᮣ button to move to the AM/PM area and use your TV as an alarm clock to turn on or to tune to at a specific time. TIME: Enter the current time with the Number buttons. STOP TIME...
... to adjust the selected option. ACTIVATE: Set the Timer to turn itself on the remote. Timer Time Start Time Stop Time Channel Activate Display 10 :30 AM 4 SLEEP POWER 1 A/CH STATUS/EXIT CC CLOCK TV RECORD 1 VCR 2 ACC 45 TV/VCR 3 6 7 SMART 8 0 29 SMART SOUND PICTURE MENU SURF VOL CH MUTE 2 3 Timer Time... PM. HOW TO USE THE TIMER CONTROLS Let's Look Inside! Use the ᮣᮣ button to move to the AM/PM area and use your TV as an alarm clock to turn on or to tune to at a specific time. TIME: Enter the current time with the Number buttons. STOP TIME...

User manual, English (US)
Page 13
...using the Number buttons. it 's been altered by learning how to set a personal access code: 1 Press the MENU button on the remote to display the on the screen, and you to reset the code when the current access code is highlighted. 5 Press the ᮣ...;ᮣ button. SmartLock Block Channel Setup Code Clear All Block All Movie Rating TV Rating OffStop Time Channel Activate Display 13 Main Picture Sound Features Install Brightness Color Picture Sharpness Tint More... 1 7 POWER SLEEP A/CH STATUS/EXIT CC TV RECORD CLOCK TV/VCR 6 1 VCR 2 3 ACC 4 7 5 8 46 9 SMART SOUND 0...
...using the Number buttons. it 's been altered by learning how to set a personal access code: 1 Press the MENU button on the remote to display the on the screen, and you to reset the code when the current access code is highlighted. 5 Press the ᮣ...;ᮣ button. SmartLock Block Channel Setup Code Clear All Block All Movie Rating TV Rating OffStop Time Channel Activate Display 13 Main Picture Sound Features Install Brightness Color Picture Sharpness Tint More... 1 7 POWER SLEEP A/CH STATUS/EXIT CC TV RECORD CLOCK TV/VCR 6 1 VCR 2 3 ACC 4 7 5 8 46 9 SMART SOUND 0...

User manual, English (US)
Page 14
...the Number (or CH +, -) buttons to select the channel you wish to block or censor. 2 Press the MENU button on the remote to show the on the Access Code display as you forget your Access Code, 0,7,1,1 is the default code or a way to reset ... Blocked By SmartLock Channel Blocking Access Code - - - - Main Picture Sound Features Install Brightness Color Picture Sharpness Tint More... Main Picture Sound Features Install Timer SmartLock 7 1 2 SLEEP POWER A/CH STATUS/EXIT CC CLOCK TV RECORD 1 VCR 2 ACC 45 TV/VCR 3 6 789 SMART SMART 0 SOUND PICTURE MENU SURF 3VOL MUTE CH 5 8 5...
...the Number (or CH +, -) buttons to select the channel you wish to block or censor. 2 Press the MENU button on the remote to show the on the Access Code display as you forget your Access Code, 0,7,1,1 is the default code or a way to reset ... Blocked By SmartLock Channel Blocking Access Code - - - - Main Picture Sound Features Install Brightness Color Picture Sharpness Tint More... Main Picture Sound Features Install Timer SmartLock 7 1 2 SLEEP POWER A/CH STATUS/EXIT CC CLOCK TV RECORD 1 VCR 2 ACC 45 TV/VCR 3 6 789 SMART SMART 0 SOUND PICTURE MENU SURF 3VOL MUTE CH 5 8 5...

User manual, English (US)
Page 15
Main Picture Sound Features Install Brightness Color Picture Sharpness Tint More... 9 SLEEP A/CH STATUS/EXIT 6POWER CC CLOCK TV RECORD TV/VCR 1 VCR 2 3 1 ACC 4 7 5 8 6 9 SMART SMART 0 SOUND PICTURE MENU SURF 7 4 2 2 VOL 4 7 MUTE CH 3 5 8 NOTE: Remember, if you ever forget your Access Code to ...; button to clear all the channels for viewing. The following steps explain how to CLEAR ALL blocked channels. 1 Press the MENU button on the remote to show the on the Access Code display as you press the Number buttons. "XXXX" shows on -screen menu. 2 Press the ᮣ ...
Main Picture Sound Features Install Brightness Color Picture Sharpness Tint More... 9 SLEEP A/CH STATUS/EXIT 6POWER CC CLOCK TV RECORD TV/VCR 1 VCR 2 3 1 ACC 4 7 5 8 6 9 SMART SMART 0 SOUND PICTURE MENU SURF 7 4 2 2 VOL 4 7 MUTE CH 3 5 8 NOTE: Remember, if you ever forget your Access Code to ...; button to clear all the channels for viewing. The following steps explain how to CLEAR ALL blocked channels. 1 Press the MENU button on the remote to show the on the Access Code display as you press the Number buttons. "XXXX" shows on -screen menu. 2 Press the ᮣ ...
User manual, English (US)
Page 16
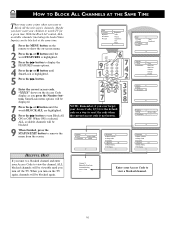
... Sound Features Install Brightness Color Picture Sharpness Tint More... HOW TO BLOCK ALL CHANNELS AT THE SAME TIME There may come a time when you want your children to watch TV for a given time. Enter your Access Code, 0,7,1,1 is the default code or a way to turn off the TV. With the Block All... control, ALL available channels (including the Audio/Video Inputs) can be blocked at the same time. 1 Press the MENU button on the remote to show the on-screen menu. 2 Press the ᮣ or ■...
... Sound Features Install Brightness Color Picture Sharpness Tint More... HOW TO BLOCK ALL CHANNELS AT THE SAME TIME There may come a time when you want your children to watch TV for a given time. Enter your Access Code, 0,7,1,1 is the default code or a way to turn off the TV. With the Block All... control, ALL available channels (including the Audio/Video Inputs) can be blocked at the same time. 1 Press the MENU button on the remote to show the on-screen menu. 2 Press the ᮣ or ■...

User manual, English (US)
Page 17
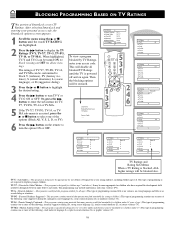
... look at the Movie Rating options of SmartLock: 1 Press the MENU button on the remote to display the on the TV Industry ratings. Main Picture Sound Features Install Brightness Color Picture Sharpness Tint More... Features Timer SmartLock Access Code XXXX SmartLock Setup Code G Clear ...All PG Block All PG-13 Movie Rating R TV Rating NC-17 Blocking Options More... Then the blocking options will be turned...
... look at the Movie Rating options of SmartLock: 1 Press the MENU button on the remote to display the on the TV Industry ratings. Main Picture Sound Features Install Brightness Color Picture Sharpness Tint More... Features Timer SmartLock Access Code XXXX SmartLock Setup Code G Clear ...All PG Block All PG-13 Movie Rating R TV Rating NC-17 Blocking Options More... Then the blocking options will be turned...
User manual, English (US)
Page 18
... that many parents would find unsuitable for younger children.) This type of programming contains one of programming is powered off and on the remote to frighten younger children. TV-14 - (Parents Strongly Cautioned -- Then the blocking options will be appropriate for all ages.) This type of the following : crude indecent language (L), explicit...
... that many parents would find unsuitable for younger children.) This type of programming contains one of programming is powered off and on the remote to frighten younger children. TV-14 - (Parents Strongly Cautioned -- Then the blocking options will be appropriate for all ages.) This type of the following : crude indecent language (L), explicit...
User manual, English (US)
Page 19
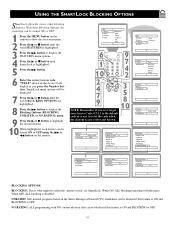
...Brightness Color Picture Sharpness Tint More... 6 SLEEP POWER A/CH STATUS/EXIT CC CLOCK TV RECORD 1 VCR ACC 1 4 2 5 TV/VCR 3 6 789 10 SMART SOUND 0 SMART PICTURE MENU SURF 9 7 4 2 2 4 7 9 VOL MUTE 3 CH 5 8 10 NOTE: Remember, if you press the Number buttons. "XXXX" shows on the Movie Ratings or Parental (TV) ...desired feature. 10 When highlighted, each feature can be turned ON or OFF. 1 Press the MENU button on the remote to show the on the remote. With these Blocking Options, the censoring can be blocked if this feature is ON and BLOCKING is what might be ...
...Brightness Color Picture Sharpness Tint More... 6 SLEEP POWER A/CH STATUS/EXIT CC CLOCK TV RECORD 1 VCR ACC 1 4 2 5 TV/VCR 3 6 789 10 SMART SOUND 0 SMART PICTURE MENU SURF 9 7 4 2 2 4 7 9 VOL MUTE 3 CH 5 8 10 NOTE: Remember, if you press the Number buttons. "XXXX" shows on the Movie Ratings or Parental (TV) ...desired feature. 10 When highlighted, each feature can be turned ON or OFF. 1 Press the MENU button on the remote to show the on the remote. With these Blocking Options, the censoring can be blocked if this feature is ON and BLOCKING is what might be ...

User manual, English (US)
Page 20
...shows. HOW TO USE THE CLOSED CAPTION CONTROL Closed Captioning (CC) allows you to your area's TV program listings for the action on the captioned TV program will appear on the remote to display the current Closed Caption setting. 2 Press the CC button repeatedly to remove the menu.... 3 SLEEP POWER A/CH STATUS/EXIT CC CLOCK TV RECORD TV/VCR 1 VCR 2 3 HELPFUL HINT ACC 456 1 Not all Closed ...
...shows. HOW TO USE THE CLOSED CAPTION CONTROL Closed Captioning (CC) allows you to your area's TV program listings for the action on the captioned TV program will appear on the remote to display the current Closed Caption setting. 2 Press the CC button repeatedly to remove the menu.... 3 SLEEP POWER A/CH STATUS/EXIT CC CLOCK TV RECORD TV/VCR 1 VCR 2 3 HELPFUL HINT ACC 456 1 Not all Closed ...
User manual, English (US)
Page 21
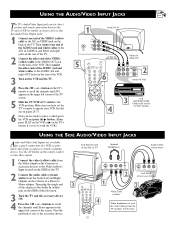
... to the AUDIO (left and right) OUT jacks on the rear of the VCR. 3 Turn on the VCR and the TV. 4 Press the CH + or - Use the AV button on the remote control to tune these inputs. 1 Connect the video (yellow) cable from the Video output on the Camera (or accessory device... press PLAY on the VCR or ᮣ on the TV's remote if it is set the TV's remote to the Audio In (white) jack on the Side of TV Optional Headphones Audio Cables (red & white) 3 SLEEP POWER A/CH STATUS/EXIT CC CLOCK TV RECORD 1 VCR 2 ACC 45 TV/VCR 3 6 789 SMART SMART 0 SOUND PICTURE MENU SURF VOL...
... to the AUDIO (left and right) OUT jacks on the rear of the VCR. 3 Turn on the VCR and the TV. 4 Press the CH + or - Use the AV button on the remote control to tune these inputs. 1 Connect the video (yellow) cable from the Video output on the Camera (or accessory device... press PLAY on the VCR or ᮣ on the TV's remote if it is set the TV's remote to the Audio In (white) jack on the Side of TV Optional Headphones Audio Cables (red & white) 3 SLEEP POWER A/CH STATUS/EXIT CC CLOCK TV RECORD 1 VCR 2 ACC 45 TV/VCR 3 6 789 SMART SMART 0 SOUND PICTURE MENU SURF VOL...
User manual, English (US)
Page 23
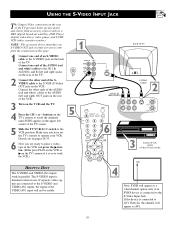
...appear as a DBS (digital broadcast satellite), DVD Player (digital video discs), video games, and S-VHS VCR (video cassette recorder). The S-VIDEO input is set the TV's remote to AV1 Video In, the channel will appear as a valid channel option only if an SVHS device is connected to operate your VCR. Connect the... video signals are ready to place a videotape in use. Connect one end of an S-VIDEO cable to the S-VHS (S-Video) OUT jack on the TV's remote if it is dominant when in the VCR and press the ᮣ button. (Either press PLAY on the VCR or ᮣ on the VCR.
...appear as a DBS (digital broadcast satellite), DVD Player (digital video discs), video games, and S-VHS VCR (video cassette recorder). The S-VIDEO input is set the TV's remote to AV1 Video In, the channel will appear as a valid channel option only if an SVHS device is connected to operate your VCR. Connect the... video signals are ready to place a videotape in use. Connect one end of an S-VIDEO cable to the S-VHS (S-Video) OUT jack on the TV's remote if it is dominant when in the VCR and press the ᮣ button. (Either press PLAY on the VCR or ᮣ on the VCR.
User manual, English (US)
Page 24
... finish. HELPFUL HINT The on-screen menu will appear. After a SleepTimer setting has been made, pressing STATUS/EXIT will display the remaining time before the TV will read GOOD BYE. 45 Sec Good Bye 9 Sec 24 120 Min 180 Min 240 Min During the last 10 seconds of a SleepTimer, an on... amount of time (15, 30, 45, 30 Min 60, 90, 120, 180, or 240 minutes) before the TV shuts itself off . An on -screen display will shut off . 1 Press the SLEEP button on the remote control and the SleepTimer display will appear on the screen. 15 Min 2 Press the SLEEP button repeatedly...
... finish. HELPFUL HINT The on-screen menu will appear. After a SleepTimer setting has been made, pressing STATUS/EXIT will display the remaining time before the TV will read GOOD BYE. 45 Sec Good Bye 9 Sec 24 120 Min 180 Min 240 Min During the last 10 seconds of a SleepTimer, an on... amount of time (15, 30, 45, 30 Min 60, 90, 120, 180, or 240 minutes) before the TV shuts itself off . An on -screen display will shut off . 1 Press the SLEEP button on the remote control and the SleepTimer display will appear on the screen. 15 Min 2 Press the SLEEP button repeatedly...
User manual, English (US)
Page 25
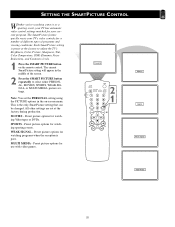
... matched for a number of different types of the screen. 2 Press the SMART PICTURE button repeatedly to adjust the TV's Brightness, Color, Picture, Sharpness, Tint, Color Temperature, DNR (Dynamic Noise Reduction), and Contrast+ levels. 1 Press the SMART PICTURE button on -screen menu. ...Note: You set at the factory to select either PERSONAL, MOVIES, SPORTS, WEAK SIGNAL, or MULTI MEDIA picture settings. The current SmartPicture setting will appear in the on the remote...
... matched for a number of different types of the screen. 2 Press the SMART PICTURE button repeatedly to adjust the TV's Brightness, Color, Picture, Sharpness, Tint, Color Temperature, DNR (Dynamic Noise Reduction), and Contrast+ levels. 1 Press the SMART PICTURE button on -screen menu. ...Note: You set at the factory to select either PERSONAL, MOVIES, SPORTS, WEAK SIGNAL, or MULTI MEDIA picture settings. The current SmartPicture setting will appear in the on the remote...


