

Owners Manual
Page 7
... 81 Switching Audio Soundtrack 81 Switching Camera Angles 82 Reducing Block Noise 82 Editing INFORMATION ON EDITING. . . . . . 83 Guide to a Title List 83 Edit Menu 84 How to Access the Edit Menu 84 EDITING 85 Deleting a Title 85 Deleting Selected Titles 87 Putting Names on Titles 88 Chapter Marks (Add 89 Chapter Marks (Delete 90 Chapter Marks (Delete All...
... 81 Switching Audio Soundtrack 81 Switching Camera Angles 82 Reducing Block Noise 82 Editing INFORMATION ON EDITING. . . . . . 83 Guide to a Title List 83 Edit Menu 84 How to Access the Edit Menu 84 EDITING 85 Deleting a Title 85 Deleting Selected Titles 87 Putting Names on Titles 88 Chapter Marks (Add 89 Chapter Marks (Delete 90 Chapter Marks (Delete All...

Owners Manual
Page 8
...mode to "Auto", the recording mode will automatically be increased by 30 minutes up to 36 programs within a one -touch recording) 1 TB hard disk(MDR537H): This unit is copy protection technology that . This unit supports HDCP. The following cases, the unit will fit nicely in this unit automatically records the... making: The unit makes a title list with SLP mode). If the disc does not have enough space to Standard Definition, when recording on the HDD or DVD. Even if you to record on HDD or DVD and edit them after finishing all timer recordings or at the end of the ...
...mode to "Auto", the recording mode will automatically be increased by 30 minutes up to 36 programs within a one -touch recording) 1 TB hard disk(MDR537H): This unit is copy protection technology that . This unit supports HDCP. The following cases, the unit will fit nicely in this unit automatically records the... making: The unit makes a title list with SLP mode). If the disc does not have enough space to Standard Definition, when recording on the HDD or DVD. Even if you to record on HDD or DVD and edit them after finishing all timer recordings or at the end of the ...
Owners Manual
Page 9
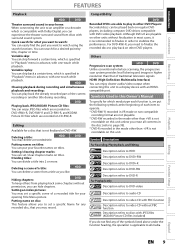
... surround sound in your favorite names on titles. Quick search for your opening Title Menu picture. Editing Available for any of traditional television signals. HDD DVD Putting names on titles: You can put the following symbols at the beginning of a recorded title for what you may delete a recorded title. Deleting a scene of the current recording or...
... surround sound in your favorite names on titles. Quick search for your opening Title Menu picture. Editing Available for any of traditional television signals. HDD DVD Putting names on titles: You can put the following symbols at the beginning of a recorded title for what you may delete a recorded title. Deleting a scene of the current recording or...
Owners Manual
Page 13
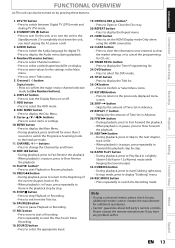
...additional assistances. • Cannot guarantee about 3rd party's remote controls. Number/Character buttons • Press to select Channel numbers. • Press to select a title/chapter/track/file on display. • Press to turn the Display Menu on by [the Number buttons]. 6. Note • If using the HDMI connection....than 3 seconds to switch the Progressive Scanning mode to display the Repeat menu. 21. SKIP button • Skips by step. 32. Playback Editing Function Setup Others Español EN 13 REPEAT button • Press to the Interlace mode. 11.
...additional assistances. • Cannot guarantee about 3rd party's remote controls. Number/Character buttons • Press to select Channel numbers. • Press to select a title/chapter/track/file on display. • Press to turn the Display Menu on by [the Number buttons]. 6. Note • If using the HDMI connection....than 3 seconds to switch the Progressive Scanning mode to display the Repeat menu. 21. SKIP button • Skips by step. 32. Playback Editing Function Setup Others Español EN 13 REPEAT button • Press to the Interlace mode. 11.

Owners Manual
Page 23
...you the information on the screen is available with JPEG/KODAK Picture CD files is in playback) HDMI Information (only for playing back, recording, or editing to scroll. • No description is displayed when the program guide data is shown. DTV 11.1 KABC 6 7 8 9 2:59:44 /...EN 23 Others Español Program Guide (Max. 4 lines displayed) 5. In such case, check the closed caption function of your preference. Program Title(1 line displayed) 2. The menus allow you press [DISPLAY]. Broadcast station Note • When the program guide is displayed in playback) or File ...
...you the information on the screen is available with JPEG/KODAK Picture CD files is in playback) HDMI Information (only for playing back, recording, or editing to scroll. • No description is displayed when the program guide data is shown. DTV 11.1 KABC 6 7 8 9 2:59:44 /...EN 23 Others Español Program Guide (Max. 4 lines displayed) 5. In such case, check the closed caption function of your preference. Program Title(1 line displayed) 2. The menus allow you press [DISPLAY]. Broadcast station Note • When the program guide is displayed in playback) or File ...

Owners Manual
Page 25
...Recording: To set up the video setting. (Refer to discs as you prefer. 2. Then use [K / L] to select a menu and press [OK] to general setting menu. 2. Title List: To call up the screen as you need. 6. Playback: To set up the HDD setting. 6. Video: To set up the clock of the HDD... Variable Skip / Replay 1. Introduction Connections Basic Setup BEFORE YOU START Main Menu Press [MENU] to all main settings. Menu 1 General Setting 2 Timer Programming 3 Title List 4 Disc Edit 45 HDD Menu 46 Dubbing 47 DISC Playback Mode 1. DISC Playback Mode: To set up the...
...Recording: To set up the video setting. (Refer to discs as you prefer. 2. Then use [K / L] to select a menu and press [OK] to general setting menu. 2. Title List: To call up the screen as you need. 6. Playback: To set up the HDD setting. 6. Video: To set up the clock of the HDD... Variable Skip / Replay 1. Introduction Connections Basic Setup BEFORE YOU START Main Menu Press [MENU] to all main settings. Menu 1 General Setting 2 Timer Programming 3 Title List 4 Disc Edit 45 HDD Menu 46 Dubbing 47 DISC Playback Mode 1. DISC Playback Mode: To set up the...

Owners Manual
Page 26
... PBC (Video CD only) 4 DISC Playback Mode Photo 25 28 Random Play Slide Show HDD Menu 19 Delete All Unprotected Titles 120 Delete All Titles Dubbing 111 HDD DVD 122 DVD HDD 1. Edit Disc Name: Allows you to rename the disc. 2. Finalize: (DVD+R/DVD-RW/-R only) Allows you to finalize a disc containing recorded...
... PBC (Video CD only) 4 DISC Playback Mode Photo 25 28 Random Play Slide Show HDD Menu 19 Delete All Unprotected Titles 120 Delete All Titles Dubbing 111 HDD DVD 122 DVD HDD 1. Edit Disc Name: Allows you to rename the disc. 2. Finalize: (DVD+R/DVD-RW/-R only) Allows you to finalize a disc containing recorded...

Owners Manual
Page 27
... Device may take a while to open the disc tray. 2) Place the disc on the disc, the title list is displayed. HDD button DVD button HDD button DVD button Basic Setup Recording Playback Editing Function Setup How to Insert a Disc 1) Press [OPEN/CLOSE A] to open the disc tray, then remove... the disc before attempting to format. • If titles have been recorded on the disc tray with its label side ...
... Device may take a while to open the disc tray. 2) Place the disc on the disc, the title list is displayed. HDD button DVD button HDD button DVD button Basic Setup Recording Playback Editing Function Setup How to Insert a Disc 1) Press [OPEN/CLOSE A] to open the disc tray, then remove... the disc before attempting to format. • If titles have been recorded on the disc tray with its label side ...

Owners Manual
Page 41
...proven to and erased many times. max. However, if you have added or deleted chapters, or made chapters hidden, you must perform "Make Edits Compatible" before being able to DVD+RW, DVD+R, DVD-RW and DVD-R. Introduction Connections Basic Setup INFORMATION ON RECORDING Before you make a recording...8x/16x DVD+R 4x/8x/16x, DVD+RW 4x DVD+R 4x/8x/16x Performance of title / chapters HDD : 999 titles 99 chapters per title DVD : 49 titles per disc 254 chapters per disc 99 chapters per title DVD-RW DVD-R • The following information. Recordable Discs This unit can play back ...
...proven to and erased many times. max. However, if you have added or deleted chapters, or made chapters hidden, you must perform "Make Edits Compatible" before being able to DVD+RW, DVD+R, DVD-RW and DVD-R. Introduction Connections Basic Setup INFORMATION ON RECORDING Before you make a recording...8x/16x DVD+R 4x/8x/16x, DVD+RW 4x DVD+R 4x/8x/16x Performance of title / chapters HDD : 999 titles 99 chapters per title DVD : 49 titles per disc 254 chapters per disc 99 chapters per title DVD-RW DVD-R • The following information. Recordable Discs This unit can play back ...

Owners Manual
Page 46
By using this function, you can pause or go back the TV program you are recording the contents of the autostart recording become a recording title in "Disc Edit" or "HDD Menu" - Start recording - Using any functions in the HDD while the unit continues to record the current content of the TV... program even at the middle of the channel. 3 Press [STOP C] twice to current content of the channel while the recording continues. 46 EN Editing titles or goes into editing menu - Refer to page 23. 2:59:44 / 3:31:31 7:10AM 10:10AM 10:42AM The autostart recording will be SP. • ...
By using this function, you can pause or go back the TV program you are recording the contents of the autostart recording become a recording title in "Disc Edit" or "HDD Menu" - Start recording - Using any functions in the HDD while the unit continues to record the current content of the TV... program even at the middle of the channel. 3 Press [STOP C] twice to current content of the channel while the recording continues. 46 EN Editing titles or goes into editing menu - Refer to page 23. 2:59:44 / 3:31:31 7:10AM 10:10AM 10:42AM The autostart recording will be SP. • ...

Owners Manual
Page 49
...press [B] or [ • ] to decide the channels. TV 125), the channel will be displayed on the left side of "Guide to Edit Title Name" on the Remote control. 2) Confirmation message will appear. To stop the Timer Recording in the timer program list), you only can decide the... Timer program: 1 Use [K / L] to select the program you need to press [B] or [ • ] to decide the channels. Program Change Delete Edit Title Name A window for the Timer Recording Analog TV For channel number 2-6 press, press [B] or [ • ] to decide the channels. Instructions continue on the unit...
...press [B] or [ • ] to decide the channels. TV 125), the channel will be displayed on the left side of "Guide to Edit Title Name" on the Remote control. 2) Confirmation message will appear. To stop the Timer Recording in the timer program list), you only can decide the... Timer program: 1 Use [K / L] to select the program you need to press [B] or [ • ] to decide the channels. Program Change Delete Edit Title Name A window for the Timer Recording Analog TV For channel number 2-6 press, press [B] or [ • ] to decide the channels. Instructions continue on the unit...

Owners Manual
Page 63
... dubbing: • Insert a recordable DVD. EN 63 Editing Function Setup Others Español Preparing for 2 seconds on the front panel. Introduction Connections Basic Setup Recording Playback DUBBING One Title Dubbing (HDD to select "Dubbing", then press [OK]. Resume Playback Play From Start Edit Title Delete Delete Multiple Titles Dubbing 4 Use [K / L] to select "Yes", then...
... dubbing: • Insert a recordable DVD. EN 63 Editing Function Setup Others Español Preparing for 2 seconds on the front panel. Introduction Connections Basic Setup Recording Playback DUBBING One Title Dubbing (HDD to select "Dubbing", then press [OK]. Resume Playback Play From Start Edit Title Delete Delete Multiple Titles Dubbing 4 Use [K / L] to select "Yes", then...

Owners Manual
Page 83
... Basic Setup Recording INFORMATION ON EDITING Guide to a Title List Title list allows you to play back from the recorded content is displayed. Title list: List of each title in which the title was started, duration of the selected title. Press [STOP C] to exit the title list. Title name (editable): Recording date, time, channel... CH13 EP MON NOV/26/12 0:10:33 3 EMPTY SPACE 1:37:52 SP (2Hr) 34 54 11 7 10 e.g.) DVD Edit 2 Title Delete Edit Title Name Chapter Mark Hide Chapter Index Picture Title Dividing NOV/26/12 11:35AM CH13 EP 1 : 05 : 00 16 15 14 13 12 1.
... Basic Setup Recording INFORMATION ON EDITING Guide to a Title List Title list allows you to play back from the recorded content is displayed. Title list: List of each title in which the title was started, duration of the selected title. Press [STOP C] to exit the title list. Title name (editable): Recording date, time, channel... CH13 EP MON NOV/26/12 0:10:33 3 EMPTY SPACE 1:37:52 SP (2Hr) 34 54 11 7 10 e.g.) DVD Edit 2 Title Delete Edit Title Name Chapter Mark Hide Chapter Index Picture Title Dividing NOV/26/12 11:35AM CH13 EP 1 : 05 : 00 16 15 14 13 12 1.

Owners Manual
Page 84
...discs only How to Access the Edit Menu HDD Press [HDD] first. 1) Press [TITLE]. 2)Use [K / L / { / B] to select "Edit", then press [OK]. Resume Playback Play From Start Edit Title Delete Delete Multiple Titles Dubbing 3)Use [K / L] to select a desired title, then press [OK]. Play Edit Overwrite 1 SP(2Hr) NOV/25...33 3 EMPTY SPACE 1:37:52 SP (2Hr) Edit 1 Scene Delete Edit Title Name Chapter Mark Title Dividing Protect JAN/ 9/12 12:00AM CH10 SP 1 : 05 : 00 84 EN Edit 1 Title Delete Edit Title Name Chapter Mark Hide Chapter Index Picture Title Dividing NOV/25/12 11:00AM CH12 SP 1...
...discs only How to Access the Edit Menu HDD Press [HDD] first. 1) Press [TITLE]. 2)Use [K / L / { / B] to select "Edit", then press [OK]. Resume Playback Play From Start Edit Title Delete Delete Multiple Titles Dubbing 3)Use [K / L] to select a desired title, then press [OK]. Play Edit Overwrite 1 SP(2Hr) NOV/25...33 3 EMPTY SPACE 1:37:52 SP (2Hr) Edit 1 Scene Delete Edit Title Name Chapter Mark Title Dividing Protect JAN/ 9/12 12:00AM CH10 SP 1 : 05 : 00 84 EN Edit 1 Title Delete Edit Title Name Chapter Mark Hide Chapter Index Picture Title Dividing NOV/25/12 11:00AM CH12 SP 1...

Owners Manual
Page 86
.../26/12 0:10:33 3 EMPTY SPACE 1:37:52 SP (2Hr) 86 EN HDD mode Resume Playback Play From Start Edit Title Delete Delete Multiple Titles Dubbing DVD mode Edit 1 Title Delete Edit Title Name Chapter Mark Hide Chapter Index Picture Title Dividing NOV/25/12 11:00AM CH12 SP 1 : 05 : 00 Confirmation message will appear. 5 Use [K / L] to select...
.../26/12 0:10:33 3 EMPTY SPACE 1:37:52 SP (2Hr) 86 EN HDD mode Resume Playback Play From Start Edit Title Delete Delete Multiple Titles Dubbing DVD mode Edit 1 Title Delete Edit Title Name Chapter Mark Hide Chapter Index Picture Title Dividing NOV/25/12 11:00AM CH12 SP 1 : 05 : 00 Confirmation message will appear. 5 Use [K / L] to select...

Owners Manual
Page 87
... 'CLEAR' to confirm. 1 / 1 1 Press [HDD], then press [TITLE]. 2 Use [K / L / { / B] to select "Delete Multiple Titles", then press [OK]. Introduction Connections Basic Setup Recording Deleting Selected Titles EDITING You can delete titles which you want to delete. Resume Playback Play From Start Edit Title Delete Delete Multiple Titles Dubbing 6 Press [CLEAR]. Title List Title 1 12:00AM (1:00:00) MON JAN/ 9/12 CH10...
... 'CLEAR' to confirm. 1 / 1 1 Press [HDD], then press [TITLE]. 2 Use [K / L / { / B] to select "Delete Multiple Titles", then press [OK]. Introduction Connections Basic Setup Recording Deleting Selected Titles EDITING You can delete titles which you want to delete. Resume Playback Play From Start Edit Title Delete Delete Multiple Titles Dubbing 6 Press [CLEAR]. Title List Title 1 12:00AM (1:00:00) MON JAN/ 9/12 CH10...

Owners Manual
Page 88
... the letter "C". 88 EN e.g.) DVD Edit 1 Title Delete Edit Title Name Chapter Mark Hide Chapter Index Picture Title Dividing NOV/25/12 11:00AM CH12 SP 1 : 05 : 00 3 To enter a title name, follow the steps of "Guide to Edit Title Name" on page 84 to display "Edit" menu. 2 Use [K / L] to select "Edit Title Name", then press [OK]. Edit Title Name 1 ABC abc 123...
... the letter "C". 88 EN e.g.) DVD Edit 1 Title Delete Edit Title Name Chapter Mark Hide Chapter Index Picture Title Dividing NOV/25/12 11:00AM CH12 SP 1 : 05 : 00 3 To enter a title name, follow the steps of "Guide to Edit Title Name" on page 84 to display "Edit" menu. 2 Use [K / L] to select "Edit Title Name", then press [OK]. Edit Title Name 1 ABC abc 123...

Owners Manual
Page 93
..."Scene Delete", then press [OK]. Deleting a Scene of a Title EDITING Introduction Connections Basic Setup You can also use the special playback functions such as [G], [D] etc. To set an end point, then press [OK]. Edit - Edit 1 Scene Delete Edit Title Name Chapter Mark Title Dividing Protect JAN/ 9/12 12:00AM CH10 LP 1 : 05 ...: 00 3 Play back the title up to the point where you want to resume playback from the ...
..."Scene Delete", then press [OK]. Deleting a Scene of a Title EDITING Introduction Connections Basic Setup You can also use the special playback functions such as [G], [D] etc. To set an end point, then press [OK]. Edit - Edit 1 Scene Delete Edit Title Name Chapter Mark Title Dividing Protect JAN/ 9/12 12:00AM CH10 LP 1 : 05 ...: 00 3 Play back the title up to the point where you want to resume playback from the ...

Owners Manual
Page 95
... Press [OK], to release the title from protection. • The protected title will appear instead. Edit 1 Scene Delete Edit Title Name Chapter Mark Title Dividing Protect JAN/ 6/12 12:00AM CH10 LP 1 : 30 : 00 3 With "OFF [OK]. Introduction Connections Basic Setup Protecting a Title EDITING To prevent the accidental editing, or erasing of the titles, you can protect them using the...
... Press [OK], to release the title from protection. • The protected title will appear instead. Edit 1 Scene Delete Edit Title Name Chapter Mark Title Dividing Protect JAN/ 6/12 12:00AM CH10 LP 1 : 30 : 00 3 With "OFF [OK]. Introduction Connections Basic Setup Protecting a Title EDITING To prevent the accidental editing, or erasing of the titles, you can protect them using the...

Owners Manual
Page 98
... will be completed. The disc name is now updated. 98 EN Note • You cannot select "Disc Edit" when finalized DVD+R or DVD-R is inserted. This operation may take a while to Edit Title Name" on the disc and change it from this menu. When you are playing back a disc. 1 Press [MENU]. 2... Use [K / L] to select "Disc Edit", then press [OK]. 3 Use [K / L] to select "Yes", then press [OK]. Putting Name on Disc EDITING You can put a name on...
... will be completed. The disc name is now updated. 98 EN Note • You cannot select "Disc Edit" when finalized DVD+R or DVD-R is inserted. This operation may take a while to Edit Title Name" on the disc and change it from this menu. When you are playing back a disc. 1 Press [MENU]. 2... Use [K / L] to select "Disc Edit", then press [OK]. 3 Use [K / L] to select "Yes", then press [OK]. Putting Name on Disc EDITING You can put a name on...


