
Owners Manual
Page 6
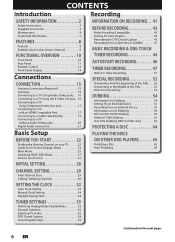
... Setting for an External Device 55 Recording from an External Device 57 Information on DV Dubbing 58 DVC to HDD / DVD Dubbing 59 Selected Title Dubbing 61 One Title Dubbing (HDD to DVD only 63 PROTECTING A DISC 64 PLAYING THE DISCS ON OTHER DVD PLAYERS 65 Finalizing a Disc 65 Auto Finalizing 66 CHANNEL SETTING...
... Setting for an External Device 55 Recording from an External Device 57 Information on DV Dubbing 58 DVC to HDD / DVD Dubbing 59 Selected Title Dubbing 61 One Title Dubbing (HDD to DVD only 63 PROTECTING A DISC 64 PLAYING THE DISCS ON OTHER DVD PLAYERS 65 Finalizing a Disc 65 Auto Finalizing 66 CHANNEL SETTING...

Owners Manual
Page 8
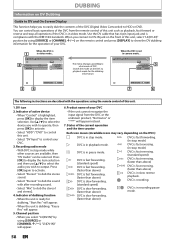
... even at the maximum. Copyright protection system To play back the digital video images of the disc space if you to complete the recording - Dubbing With this function, you prefer. Automatic title list making: The unit makes a title list with timer recording. (6 hours when one -touch recording... amplifier) for 12 hours maximum at a time with the index automatically. You can choose any one -touch recording) 500 GB hard disk(MDR535H): This unit is necessary that both the player and the display device (or an AV amplifier) support a copyright protection system called HDCP (...
... even at the maximum. Copyright protection system To play back the digital video images of the disc space if you to complete the recording - Dubbing With this function, you prefer. Automatic title list making: The unit makes a title list with timer recording. (6 hours when one -touch recording... amplifier) for 12 hours maximum at a time with the index automatically. You can choose any one -touch recording) 500 GB hard disk(MDR535H): This unit is necessary that both the player and the display device (or an AV amplifier) support a copyright protection system called HDCP (...
Owners Manual
Page 13
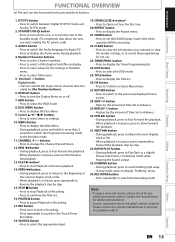
... • Press to select the DVD mode. 25. DVD button • Press to Open or Close the Disc tray. 20. DUBBING button • During playback, press to start Dubbing right away. • In stop Playback or Recording. • Press to exit from the Title list. 16.PAUSE F button &#...seconds to switch the Progressive Scanning mode to display the Audio menu during playback. 4. Decimal ( • ) button Digital mode: • Press to display "Dubbing" menu. 34. MENU button • Press to display the Main Menu. • During playback, press and hold for digital TV. • Press to ...
... • Press to select the DVD mode. 25. DVD button • Press to Open or Close the Disc tray. 20. DUBBING button • During playback, press to start Dubbing right away. • In stop Playback or Recording. • Press to exit from the Title list. 16.PAUSE F button &#...seconds to switch the Progressive Scanning mode to display the Audio menu during playback. 4. Decimal ( • ) button Digital mode: • Press to display "Dubbing" menu. 34. MENU button • Press to display the Main Menu. • During playback, press and hold for digital TV. • Press to ...

Owners Manual
Page 14
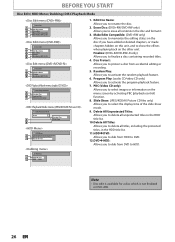
... is in HDD mode. Appears when the disc tray is loaded on a disc. Appears when a disc is opening. Current status of some error. : Appears during dubbing. 5. Displays the following • Elapsed playback time • Current title / chapter / track /file number • Recording time / remaining time • Clock • Channel number •...
... is in HDD mode. Appears when the disc tray is loaded on a disc. Appears when a disc is opening. Current status of some error. : Appears during dubbing. 5. Displays the following • Elapsed playback time • Current title / chapter / track /file number • Recording time / remaining time • Clock • Channel number •...

Owners Manual
Page 25
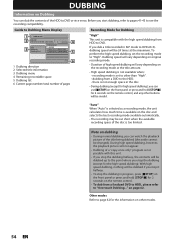
... is available only when, an audio CD, a video CD and a disc with JPEG / KODAK Picture CD files is loaded. 7. Dubbing: • To dub the content of the unit as you need. 6. DISC Playback Mode: To set up the HDMI connection setting. Video: To set up...prefer. 3. These menus provides entries to general setting menu. 2. Menu 1 General Setting 2 Timer Programming 3 Title List 4 Disc Edit 45 HDD Menu 46 Dubbing 47 DISC Playback Mode 1. Recording: To set up the title list. 4. Timer Programming: To program a timer recording. 3. General Setting Menu 1 General ...
... is available only when, an audio CD, a video CD and a disc with JPEG / KODAK Picture CD files is loaded. 7. Dubbing: • To dub the content of the unit as you need. 6. DISC Playback Mode: To set up the HDMI connection setting. Video: To set up...prefer. 3. These menus provides entries to general setting menu. 2. Menu 1 General Setting 2 Timer Programming 3 Title List 4 Disc Edit 45 HDD Menu 46 Dubbing 47 DISC Playback Mode 1. Recording: To set up the title list. 4. Timer Programming: To program a timer recording. 3. General Setting Menu 1 General ...
Owners Manual
Page 26
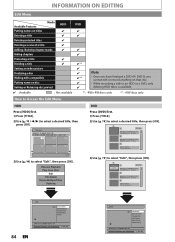
...-RW only) Allows you to erase all titles, including the protected titles, in the disc and format it. 3. BEFORE YOU START Disc Edit / HDD Menu / Dubbing / DISC Playback Mode Disc Edit 1 2 Edit Disc Name Erase Disc 3 Make Edits Compatible 4 Disc Protect OFF ON Disc Edit 1 2 Edit Disc Name Erase ...CD only) 4 DISC Playback Mode Photo 25 28 Random Play Slide Show HDD Menu 19 Delete All Unprotected Titles 120 Delete All Titles Dubbing 111 HDD DVD 122 DVD HDD 1. Program Play: (audio CD/video CD only) Allows you to activate the program playback feature. 7.
...-RW only) Allows you to erase all titles, including the protected titles, in the disc and format it. 3. BEFORE YOU START Disc Edit / HDD Menu / Dubbing / DISC Playback Mode Disc Edit 1 2 Edit Disc Name Erase Disc 3 Make Edits Compatible 4 Disc Protect OFF ON Disc Edit 1 2 Edit Disc Name Erase ...CD only) 4 DISC Playback Mode Photo 25 28 Random Play Slide Show HDD Menu 19 Delete All Unprotected Titles 120 Delete All Titles Dubbing 111 HDD DVD 122 DVD HDD 1. Program Play: (audio CD/video CD only) Allows you to activate the program playback feature. 7.

Owners Manual
Page 42
...; The audio and video quality gets poorer as follows. If you watch the programs once, edit them, or dub them to a DVD. When an HDD fails, recovery of recorded content (data) may differ from the actual ...software used to use as this unit. (Copy-protected signal is suited for type of a failing HDD, promptly dub the data to a DVD. Be sure to create the disc. (Check with the HDD, grinding or other...LP 154 hrs 185 hrs EP 247 hrs SLP 371 hrs (good) HQ 100 hrs (best) SP 201 hrs MDR535H SPP HDD (500 GB) (Internal) LP EP 251 hrs 302 hrs 403 hrs SLP 604 hrs (good) ...
...; The audio and video quality gets poorer as follows. If you watch the programs once, edit them, or dub them to a DVD. When an HDD fails, recovery of recorded content (data) may differ from the actual ...software used to use as this unit. (Copy-protected signal is suited for type of a failing HDD, promptly dub the data to a DVD. Be sure to create the disc. (Check with the HDD, grinding or other...LP 154 hrs 185 hrs EP 247 hrs SLP 371 hrs (good) HQ 100 hrs (best) SP 201 hrs MDR535H SPP HDD (500 GB) (Internal) LP EP 251 hrs 302 hrs 403 hrs SLP 604 hrs (good) ...
Owners Manual
Page 46
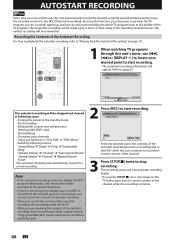
...:34 I HDD HDD SP 1h53m From the selected point, the contents of the autostart recording become a recording title in "Disc Edit" or "HDD Menu" - Start dubbing - Deleting titles (DVD only) - AUTOSTART RECORDING Every time you turn on HDD to record from the selected point to current point, you cannot record the...
...:34 I HDD HDD SP 1h53m From the selected point, the contents of the autostart recording become a recording title in "Disc Edit" or "HDD Menu" - Start dubbing - Deleting titles (DVD only) - AUTOSTART RECORDING Every time you turn on HDD to record from the selected point to current point, you cannot record the...
Owners Manual
Page 54
... to the HDD. - on other than "High". - If you can use [CSTOP] on the front panel or press and hold [STOP C] for the high speed dubbing). recording mode is set the recording mode to other modes. 54 EN there is not enough space in SLP mode to DVD or vice versa.... To perform the high speed dubbing, set to "High". "Auto" When "Auto" is selected as a recording mode, the unit calculates how much time is available on the disc and selects the...
... to the HDD. - on other than "High". - If you can use [CSTOP] on the front panel or press and hold [STOP C] for the high speed dubbing). recording mode is set the recording mode to other modes. 54 EN there is not enough space in SLP mode to DVD or vice versa.... To perform the high speed dubbing, set to "High". "Auto" When "Auto" is selected as a recording mode, the unit calculates how much time is available on the disc and selects the...
Owners Manual
Page 55
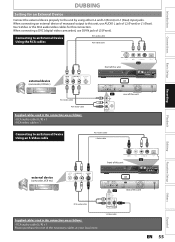
... an external device of monaural output to the unit by using either L2 and L3 (Front) or L1 (Rear) input jacks. Introduction Connections Basic Setup DUBBING Setting for this connection are as follows: • RCA audio cable (L/R) x 1 Please purchase the rest of this unit RCA audio cable R IN AUDIO IN (L1...
... an external device of monaural output to the unit by using either L2 and L3 (Front) or L1 (Rear) input jacks. Introduction Connections Basic Setup DUBBING Setting for this connection are as follows: • RCA audio cable (L/R) x 1 Please purchase the rest of this unit RCA audio cable R IN AUDIO IN (L1...
Owners Manual
Page 56
... want to use S-VIDEO IN, select "S-Video In". If you have any problem with it. 56 EN Connecting to an External Device Using a DV cable DUBBING DV cable (4-pin) RCA audio cable L3 external device (camcorder, VCR etc.) S-VIDEO VIDEO OUT OUT AUDIO OUT L R DV-OUT front of this unit Supplied...
... want to use S-VIDEO IN, select "S-Video In". If you have any problem with it. 56 EN Connecting to an External Device Using a DV cable DUBBING DV cable (4-pin) RCA audio cable L3 external device (camcorder, VCR etc.) S-VIDEO VIDEO OUT OUT AUDIO OUT L R DV-OUT front of this unit Supplied...
Owners Manual
Page 57
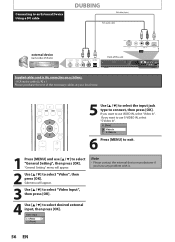
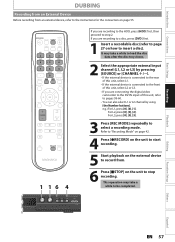
Introduction Connections Basic Setup Recording DUBBING Recording from an External Device Before recording from . 6 Press [CSTOP] on the unit to pages 58-60. • You can also select L1 or L2 ...
Introduction Connections Basic Setup Recording DUBBING Recording from an External Device Before recording from . 6 Press [CSTOP] on the unit to pages 58-60. • You can also select L1 or L2 ...
Owners Manual
Page 58
...the unit is compliance with the IEEE1394 standards. Press [OK] to display the item selection and then use [K / L] to select the audio you to easily dub the contents of this unit such as playback, fast forward or reverse and stop mode) DVC is fast reversing. (standard speed) DVC is fast reversing... operation of your DVC • If the unit cannot recognize the input signal from the remote control of this unit. • Select "DV Input" to dub the stereo1 and stereo2. 4. When the DVC is in camera mode... 1/ 1 1/ 1 +RW L3 (DV-IN) 5 AB-1234 0:12:34 DVD SP(2Hr) 1h00m 34...
...the unit is compliance with the IEEE1394 standards. Press [OK] to display the item selection and then use [K / L] to select the audio you to easily dub the contents of this unit such as playback, fast forward or reverse and stop mode) DVC is fast reversing. (standard speed) DVC is fast reversing... operation of your DVC • If the unit cannot recognize the input signal from the remote control of this unit. • Select "DV Input" to dub the stereo1 and stereo2. 4. When the DVC is in camera mode... 1/ 1 1/ 1 +RW L3 (DV-IN) 5 AB-1234 0:12:34 DVD SP(2Hr) 1h00m 34...

Owners Manual
Page 59
... Español Instructions continue on the next page. EN 59 Then, press [STOP C] where you are recording to HDD / DVD Dubbing Before recording from DVC, see page 55 for DV dubbing (DVC to DVD): • Insert a recordable DVD. • Make sure your DVC is in video mode. L3 (DV-IN)... AB-1234 0:00:00 2 Press [REC MODE] repeatedly to select a recording mode. (Refer to page 42.) 3 Press [DISPLAY]. 4 Press [OK] to start dubbing. Use [K / L] to select "DV Input", then press [OK]. 1/ 1 1/ 1 DVD DV Input +RW L3 (DV-IN) AB-1234 0:12:34 DVD HQ(1Hr) 1h00m 5 Press ...
... Español Instructions continue on the next page. EN 59 Then, press [STOP C] where you are recording to HDD / DVD Dubbing Before recording from DVC, see page 55 for DV dubbing (DVC to DVD): • Insert a recordable DVD. • Make sure your DVC is in video mode. L3 (DV-IN)... AB-1234 0:00:00 2 Press [REC MODE] repeatedly to select a recording mode. (Refer to page 42.) 3 Press [DISPLAY]. 4 Press [OK] to start dubbing. Use [K / L] to select "DV Input", then press [OK]. 1/ 1 1/ 1 DVD DV Input +RW L3 (DV-IN) AB-1234 0:12:34 DVD HQ(1Hr) 1h00m 5 Press ...
Owners Manual
Page 60
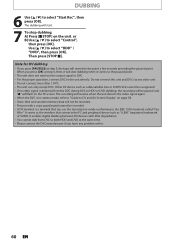
... [OK]. Do not connect this unit and DVC via any problem with a copy-guard signal cannot be paused and "I" will flash on the TV screen. DUBBING 6 Use [K / L] to select "Control", then press [OK]. Use [K / L] to the point a few seconds preceding the paused point. When you press [OK] at ..." / "DVD", then press [OK]. A) Press [CSTOP] on page 58. • Date / time and cassette memory data will start . 7 To stop dubbing; Note for DV dubbing • If you have any other unit. • Do not connect more than 1 DVC. • The unit can use the transmission mode conforming to...
... [OK]. Do not connect this unit and DVC via any problem with a copy-guard signal cannot be paused and "I" will flash on the TV screen. DUBBING 6 Use [K / L] to select "Control", then press [OK]. Use [K / L] to the point a few seconds preceding the paused point. When you press [OK] at ..." / "DVD", then press [OK]. A) Press [CSTOP] on page 58. • Date / time and cassette memory data will start . 7 To stop dubbing; Note for DV dubbing • If you have any other unit. • Do not connect more than 1 DVC. • The unit can use the transmission mode conforming to...
Owners Manual
Page 61
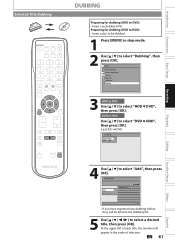
...OK]. At the upper left of each title, the number will be dubbed. 1 Press [MENU] in the order of selection . Introduction Connections Basic Setup Selected Title Dubbing DUBBING Preparing for dubbing (DVD to HDD): • Insert a disc to be listed in the dubbing list. 5 Use [K / L / s / B] to select ... General Setting Timer Programming Title List Disc Edit HDD Menu Dubbing 3 HDD to DVD Use [K / L] to select "Add", then press [OK]. HDD DVD Add Delete All Dubbing Start Dubbing List 3000 MB 1/1 • If you have registered any dubbing before, they will appear in stop mode. 2 Use ...
...OK]. At the upper left of each title, the number will be dubbed. 1 Press [MENU] in the order of selection . Introduction Connections Basic Setup Selected Title Dubbing DUBBING Preparing for dubbing (DVD to HDD): • Insert a disc to be listed in the dubbing list. 5 Use [K / L / s / B] to select ... General Setting Timer Programming Title List Disc Edit HDD Menu Dubbing 3 HDD to DVD Use [K / L] to select "Add", then press [OK]. HDD DVD Add Delete All Dubbing Start Dubbing List 3000 MB 1/1 • If you have registered any dubbing before, they will appear in stop mode. 2 Use ...
Owners Manual
Page 62
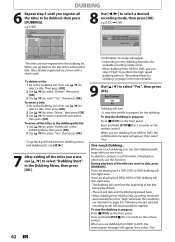
...High" to perform the high speed dubbing (refer to "Recording Mode for Dubbing" on other unit, use [K / L] to select "Dubbing Start" in the Dubbing Menu, then press [OK]. To move a title: 1 Go to the Dubbing List, then use [K / L] to select a title. Start Dubbing? To dub the contents in a DVD which ...set to select "Yes", then press [OK]. To erase all the titles to DVD, recording mode will appear, then select "Yes". Confirmation message will start dubbing right away with a check mark. Press and hold [STOP C] for 2 seconds on the remote control. Then press [OK]. 2 Use [K / L] to...
...High" to perform the high speed dubbing (refer to "Recording Mode for Dubbing" on other unit, use [K / L] to select "Dubbing Start" in the Dubbing Menu, then press [OK]. To move a title: 1 Go to the Dubbing List, then use [K / L] to select a title. Start Dubbing? To dub the contents in a DVD which ...set to select "Yes", then press [OK]. To erase all the titles to DVD, recording mode will appear, then select "Yes". Confirmation message will start dubbing right away with a check mark. Press and hold [STOP C] for 2 seconds on the remote control. Then press [OK]. 2 Use [K / L] to...
Owners Manual
Page 63
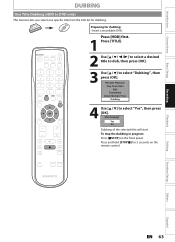
Introduction Connections Basic Setup Recording Playback DUBBING One Title Dubbing (HDD to select "Dubbing", then press [OK]. Start Dubbing? Press and hold [STOP C] for dubbing: • Insert a recordable DVD. Press [HDD] first. 1 Press [TITLE]. 2 Use [K / L / s / B] to select a desired title to dub, then press [OK]. 3 ...Use [K / L] to DVD only) This function lets you select one specific title from the title list for dubbing. EN 63 Editing Function Setup Others Español Preparing for 2 seconds on the...
Introduction Connections Basic Setup Recording Playback DUBBING One Title Dubbing (HDD to select "Dubbing", then press [OK]. Start Dubbing? Press and hold [STOP C] for dubbing: • Insert a recordable DVD. Press [HDD] first. 1 Press [TITLE]. 2 Use [K / L / s / B] to select a desired title to dub, then press [OK]. 3 ...Use [K / L] to DVD only) This function lets you select one specific title from the title list for dubbing. EN 63 Editing Function Setup Others Español Preparing for 2 seconds on the...
Owners Manual
Page 84
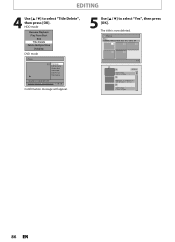
... Menu HDD Press [HDD] first. 1) Press [TITLE]. 2)Use [K / L / { / B] to select "Edit", then press [OK]. Resume Playback Play From Start Edit Title Delete Delete Multiple Titles Dubbing 3)Use [K / L] to select a desired title, then press [OK]. Title List JAN/ 9/12 12:00AM CH10 SP 12:00AM (1:00:00) MON JAN/ 9/12 CH10 SP...
... Menu HDD Press [HDD] first. 1) Press [TITLE]. 2)Use [K / L / { / B] to select "Edit", then press [OK]. Resume Playback Play From Start Edit Title Delete Delete Multiple Titles Dubbing 3)Use [K / L] to select a desired title, then press [OK]. Title List JAN/ 9/12 12:00AM CH10 SP 12:00AM (1:00:00) MON JAN/ 9/12 CH10 SP...
Owners Manual
Page 86
.../26/12 0:10:33 3 EMPTY SPACE 1:37:52 SP (2Hr) 86 EN HDD mode Resume Playback Play From Start Edit Title Delete Delete Multiple Titles Dubbing DVD mode Edit 1 Title Delete Edit Title Name Chapter Mark Hide Chapter Index Picture Title Dividing NOV/25/12 11:00AM CH12 SP 1 : 05 : 00...
.../26/12 0:10:33 3 EMPTY SPACE 1:37:52 SP (2Hr) 86 EN HDD mode Resume Playback Play From Start Edit Title Delete Delete Multiple Titles Dubbing DVD mode Edit 1 Title Delete Edit Title Name Chapter Mark Hide Chapter Index Picture Title Dividing NOV/25/12 11:00AM CH12 SP 1 : 05 : 00...


