User manual, English (US)
Page 1
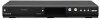
... Co., Ltd. READ YOUR QUICK GUIDE AND/OR OWNER'S MANUAL FIRST FOR QUICK TIPS THAT MAKE USING YOUR MAGNAVOX PRODUCT MORE ENJOYABLE. Editing Function Setup Others Español Introduction Connections Basic Setup Recording Playback Owner's Manual MDR515H / F7 HDD & DVD PLAYER / RECORDER WITH DIGITAL TUNER... THANK YOU FOR CHOOSING MAGNAVOX. IF YOU HAVE READ YOUR INSTRUCTIONS AND STILL NEED ASSISTANCE, YOU MAY ACCESS OUR ONLINE HELP AT WWW.MAGNAVOX.COM/SUPPORT OR WWW.FUNAISERVICE.COM...
... Co., Ltd. READ YOUR QUICK GUIDE AND/OR OWNER'S MANUAL FIRST FOR QUICK TIPS THAT MAKE USING YOUR MAGNAVOX PRODUCT MORE ENJOYABLE. Editing Function Setup Others Español Introduction Connections Basic Setup Recording Playback Owner's Manual MDR515H / F7 HDD & DVD PLAYER / RECORDER WITH DIGITAL TUNER... THANK YOU FOR CHOOSING MAGNAVOX. IF YOU HAVE READ YOUR INSTRUCTIONS AND STILL NEED ASSISTANCE, YOU MAY ACCESS OUR ONLINE HELP AT WWW.MAGNAVOX.COM/SUPPORT OR WWW.FUNAISERVICE.COM...

User manual, English (US)
Page 2
... pinched particularly at plugs, convenience receptacles, and the point where they exit from tip-over. 13. Install in a particular installation. Servicing is used in the manual. RADIO-TV INTERFERENCE This equipment has been tested and found on , the user is encouraged to try to provide reasonable protection against harmful interference in...
... pinched particularly at plugs, convenience receptacles, and the point where they exit from tip-over. 13. Install in a particular installation. Servicing is used in the manual. RADIO-TV INTERFERENCE This equipment has been tested and found on , the user is encouraged to try to provide reasonable protection against harmful interference in...

User manual, English (US)
Page 4
... the problem by yourself. Such chemicals may be dirty. RF coaxial cable (WPZ0901TM002 / WPZ0901TM005) RCA audio/video cables (WPZ0102TM018/WPZ0102LTE01) Owner's Manual (EN/FR) (1VMN29896/1VMN29897) Owner's Manual Quick Start Guide (EN) (1VMN29898) Maintenance Servicing • Please refer to relevant topics on "TROUBLESHOOTING" on the front page to strong impact... while the HDD is working. 4 EN It will help line mentioned on pages 115-119 before returning the product. • If this owner's manual, the laser optical pickup unit may discolor the surface or damage the unit.
... the problem by yourself. Such chemicals may be dirty. RF coaxial cable (WPZ0901TM002 / WPZ0901TM005) RCA audio/video cables (WPZ0102TM018/WPZ0102LTE01) Owner's Manual (EN/FR) (1VMN29896/1VMN29897) Owner's Manual Quick Start Guide (EN) (1VMN29898) Maintenance Servicing • Please refer to relevant topics on "TROUBLESHOOTING" on the front page to strong impact... while the HDD is working. 4 EN It will help line mentioned on pages 115-119 before returning the product. • If this owner's manual, the laser optical pickup unit may discolor the surface or damage the unit.

User manual, English (US)
Page 5
... symbol are trademarks of the law. Basic Setup Recording Playback Editing Function Setup Others All rights reserved. Nothing contained in this manual may not be construed as granting, by implication or otherwise, any license or right to use any other content in any ...form or for higher video resolution or extended recording time on all DVDVideo players." Furthermore, any unauthorized commercial distribution of this manual or any purpose without the express prior written consent of Funai. with the design is strictly prohibited. Introduction Connections SAFETY INFORMATION...
... symbol are trademarks of the law. Basic Setup Recording Playback Editing Function Setup Others All rights reserved. Nothing contained in this manual may not be construed as granting, by implication or otherwise, any license or right to use any other content in any ...form or for higher video resolution or extended recording time on all DVDVideo players." Furthermore, any unauthorized commercial distribution of this manual or any purpose without the express prior written consent of Funai. with the design is strictly prohibited. Introduction Connections SAFETY INFORMATION...

User manual, English (US)
Page 6
... INFORMATION 2 Safety Instructions 2 Supplied Accessories 4 Maintenance 4 Trademark Information 5 FEATURES 8 Features 8 Symbols Used in this Owner's Manual 9 FUNCTIONAL OVERVIEW 10 Front Panel 10 Rear Panel 11 Remote Control 12 Front Panel Display 14 Connections CONNECTION 15 Antenna Connection ... INITIAL SETTING 28 CHANNEL SETTING 29 Auto Channel Scan 29 Adding / Deleting Channels 30 SETTING THE CLOCK 32 Auto Clock Setting 32 Manual Clock Setting 34 Daylight Saving Time 34 TUNER SETTINGS 35 Switching Analog Mode / Digital Mode 35 Channel Selection 35 Selecting TV Audio...
... INFORMATION 2 Safety Instructions 2 Supplied Accessories 4 Maintenance 4 Trademark Information 5 FEATURES 8 Features 8 Symbols Used in this Owner's Manual 9 FUNCTIONAL OVERVIEW 10 Front Panel 10 Rear Panel 11 Remote Control 12 Front Panel Display 14 Connections CONNECTION 15 Antenna Connection ... INITIAL SETTING 28 CHANNEL SETTING 29 Auto Channel Scan 29 Adding / Deleting Channels 30 SETTING THE CLOCK 32 Auto Clock Setting 32 Manual Clock Setting 34 Daylight Saving Time 34 TUNER SETTINGS 35 Switching Analog Mode / Digital Mode 35 Channel Selection 35 Selecting TV Audio...

User manual, English (US)
Page 9
... disc: You can put your favorite names on titles. HDMI (High-Definition Multimedia Interface) You can enjoy clearer audio/video output when connecting this Owner's Manual To specify for which you do not find any of each function is, we put your favorite disc name. Symbols Used in this unit to...
... disc: You can put your favorite names on titles. HDMI (High-Definition Multimedia Interface) You can enjoy clearer audio/video output when connecting this Owner's Manual To specify for which you do not find any of each function is, we put your favorite disc name. Symbols Used in this unit to...

User manual, English (US)
Page 22
... to your TV's user manual for details. • If more than 10 minutes have passed since you have made all the connections, you must find the viewing channel (external input channel) on your TV. 1 After you have turned on the unit, you see the MAGNAVOX screen saver instead of the...switched off or in "INITIAL SETTING" on page 28. It may be labeled "SOURCE", "AV", or "SELECT". In such case, press it is successful. MAGNAVOX screen saver: 22 EN 4 Proceed to step 2 in standby mode before proceeding. 3 Press "2" on the TV's remote control, then press channel down button repeatedly...
... to your TV's user manual for details. • If more than 10 minutes have passed since you have made all the connections, you must find the viewing channel (external input channel) on your TV. 1 After you have turned on the unit, you see the MAGNAVOX screen saver instead of the...switched off or in "INITIAL SETTING" on page 28. It may be labeled "SOURCE", "AV", or "SELECT". In such case, press it is successful. MAGNAVOX screen saver: 22 EN 4 Proceed to step 2 in standby mode before proceeding. 3 Press "2" on the TV's remote control, then press channel down button repeatedly...

User manual, English (US)
Page 28
... a while to complete. Antenna: (When using basic cable) The channels broadcasted in analog Cable TV are automatically scanned and memorized. Then proceed to step 5 in "Manual Clock Setting" on page 22 to display "Initial Setup" menu. 2 Use [K / L] to select your area. Cable (Analog): (When using antenna) The channels broadcasted in analog...
... a while to complete. Antenna: (When using basic cable) The channels broadcasted in analog Cable TV are automatically scanned and memorized. Then proceed to step 5 in "Manual Clock Setting" on page 22 to display "Initial Setup" menu. 2 Use [K / L] to select your area. Cable (Analog): (When using antenna) The channels broadcasted in analog...

User manual, English (US)
Page 30
...", then press [OK]. Adding a channel is only available for the analog TV channels. "General Setting" menu will appear. 4 Use [K / L] to select "Manual Channel Preset", then press [OK]. Auto Channel Preset Manual Channel Preset TV Audio Select • If you are deleting digital TV/Cable channels, go to ANALOG to select "Channel", then...
...", then press [OK]. Adding a channel is only available for the analog TV channels. "General Setting" menu will appear. 4 Use [K / L] to select "Manual Channel Preset", then press [OK]. Auto Channel Preset Manual Channel Preset TV Audio Select • If you are deleting digital TV/Cable channels, go to ANALOG to select "Channel", then...

User manual, English (US)
Page 31
...Function Setup Others Español EN 31 DIGITAL 5 Select the channel number to delete. • Only the major channel is displayed in "Manual Channel Preset" menu. (The channel number displayed in the parenthesis is a virtual channel number) • Use [CHANNEL / ] to cycle ...is selected "Delete" is checked and highlighted as a default. 6 Use [K / L] to activate "Manual Channel Preset". Manual Channel Preset CH 2 Add Delete Your setting will be activated and it will be activated. Manual Channel Preset DTV 2 (CH - - - ) Add Delete Your setting will automatically switch to the ...
...Function Setup Others Español EN 31 DIGITAL 5 Select the channel number to delete. • Only the major channel is displayed in "Manual Channel Preset" menu. (The channel number displayed in the parenthesis is a virtual channel number) • Use [CHANNEL / ] to cycle ...is selected "Delete" is checked and highlighted as a default. 6 Use [K / L] to activate "Manual Channel Preset". Manual Channel Preset CH 2 Add Delete Your setting will be activated and it will be activated. Manual Channel Preset DTV 2 (CH - - - ) Add Delete Your setting will automatically switch to the ...
User manual, English (US)
Page 32
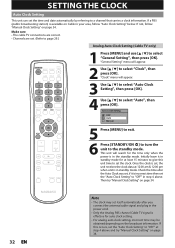
... select "General Setting", then press [OK]. This unit will appear. 2 Use [K / L] to a channel that carries a clock information. Then try "Manual Clock Setting" on the broadcast information. "General Setting" menu will search for auto clock setting. • For analog auto clock setting, incorrect time may set... "Auto Clock Setting", then press [OK]. 4 Use [K / L] to the standby mode. If this unit time to "OFF" in step 4 above and try "Manual Clock Setting" on page 34. SETTING THE CLOCK Auto Clock Setting This unit can set , the unit receives the clock data at 12:00 am...
... select "General Setting", then press [OK]. This unit will appear. 2 Use [K / L] to a channel that carries a clock information. Then try "Manual Clock Setting" on the broadcast information. "General Setting" menu will search for auto clock setting. • For analog auto clock setting, incorrect time may set... "Auto Clock Setting", then press [OK]. 4 Use [K / L] to the standby mode. If this unit time to "OFF" in step 4 above and try "Manual Clock Setting" on page 34. SETTING THE CLOCK Auto Clock Setting This unit can set , the unit receives the clock data at 12:00 am...

User manual, English (US)
Page 33
...for auto clock setting • The clock may be available except via Cable TV. Analog auto clock setting will search for at step 4 and try "Manual Clock Setting" on page 34. This unit will no longer be obtained depending on page 32, then press [OK]. 7 Use [K / L] to select... ) - 9 hours Hawaii GMT (Greenwich Mean Time ) - 10 hours 6 Use [the Number buttons] or [K / L] to enter the desired major channel number to select "Manual", then press [OK]. Set Channel No. Once the clock is set the clock. "General Setting" menu will appear. 3 Use [K / L] to select "Auto Clock Setting", ...
...for auto clock setting • The clock may be available except via Cable TV. Analog auto clock setting will search for at step 4 and try "Manual Clock Setting" on page 34. This unit will no longer be obtained depending on page 32, then press [OK]. 7 Use [K / L] to select... ) - 9 hours Hawaii GMT (Greenwich Mean Time ) - 10 hours 6 Use [the Number buttons] or [K / L] to enter the desired major channel number to select "Manual", then press [OK]. Set Channel No. Once the clock is set the clock. "General Setting" menu will appear. 3 Use [K / L] to select "Auto Clock Setting", ...

User manual, English (US)
Page 34
... clock setting will automatically adjust the time in calendar from the year 2009 up to select calendar or time, then press [OK]. SETTING THE CLOCK Manual Clock Setting 1 Press [MENU] and use [K / L] to select "General Setting", then press [OK]. "General Setting" menu will appear. 3 Use [K / L] to select "Clock ... in March and move back one hour on the last Sunday in November. Note • Your setting will be canceled if you set the clock manually. • For setting the day, year, hour, and minute, [the Number buttons] can also be used. • You can set , and use [K / L]...
... clock setting will automatically adjust the time in calendar from the year 2009 up to select calendar or time, then press [OK]. SETTING THE CLOCK Manual Clock Setting 1 Press [MENU] and use [K / L] to select "General Setting", then press [OK]. "General Setting" menu will appear. 3 Use [K / L] to select "Clock ... in March and move back one hour on the last Sunday in November. Note • Your setting will be canceled if you set the clock manually. • For setting the day, year, hour, and minute, [the Number buttons] can also be used. • You can set , and use [K / L]...

User manual, English (US)
Page 35
Press [DTV/TV] on remote control. [CHANNEL / ] Use [CHANNEL / ] to change manually by using [CHANNEL / ] or [the Number buttons] Note • It may take up to 5 to 7 seconds to switch the digital TV channels. • In digital ...
Press [DTV/TV] on remote control. [CHANNEL / ] Use [CHANNEL / ] to change manually by using [CHANNEL / ] or [the Number buttons] Note • It may take up to 5 to 7 seconds to switch the digital TV channels. • In digital ...

User manual, English (US)
Page 46
... in following menus: "General Setting" ➔ "Display" ➔ "V-Chip" ➔ "Downloadable Rating" "General Setting" ➔ "Channel" ➔ "Auto Channel Preset" "General Setting" ➔ "Channel" ➔ "Manual Channel Preset" • The autostart recording will automatically resume for new recording Note • In the autostart recording, when you display the DTV program information...
... in following menus: "General Setting" ➔ "Display" ➔ "V-Chip" ➔ "Downloadable Rating" "General Setting" ➔ "Channel" ➔ "Auto Channel Preset" "General Setting" ➔ "Channel" ➔ "Manual Channel Preset" • The autostart recording will automatically resume for new recording Note • In the autostart recording, when you display the DTV program information...

User manual, English (US)
Page 48
... Note • If you select the recording mode. e.g.) external input mode Auto recording mode select... Your program setting is available only for one program in "Manual Clock Setting" on page 49 for the timer programming. • You cannot make a program whose recording time exceeds 12 hours. 48 EN TIMER RECORDING 5 Use...
... Note • If you select the recording mode. e.g.) external input mode Auto recording mode select... Your program setting is available only for one program in "Manual Clock Setting" on page 49 for the timer programming. • You cannot make a program whose recording time exceeds 12 hours. 48 EN TIMER RECORDING 5 Use...

User manual, English (US)
Page 103
... of Timer Rec ON OFF Make Recording Compatible ON page 43 OFF Clock Setting Auto Clock Setting Daylight Saving Time OFF Auto Manual ON(MAR-NOV) Auto Channel Preset Manual Channel Preset TV Audio Select page 37 Format HDMI Audio ON(APR-OCT) OFF Antenna Cable (Analog) Cable (Analog / ...minutes 10 minutes 15 minutes 30 minutes 60 minutes ON OFF End of your TV. Set the clock for output and recording. Tune the channels manually. Playback Editing Function Setup Others Español EN 103 Clear the downloadable rating information and its setting. Insert chapter marks at a preset ...
... of Timer Rec ON OFF Make Recording Compatible ON page 43 OFF Clock Setting Auto Clock Setting Daylight Saving Time OFF Auto Manual ON(MAR-NOV) Auto Channel Preset Manual Channel Preset TV Audio Select page 37 Format HDMI Audio ON(APR-OCT) OFF Antenna Cable (Analog) Cable (Analog / ...minutes 10 minutes 15 minutes 30 minutes 60 minutes ON OFF End of your TV. Set the clock for output and recording. Tune the channels manually. Playback Editing Function Setup Others Español EN 103 Clear the downloadable rating information and its setting. Insert chapter marks at a preset ...
User manual, English (US)
Page 115
...; DVC control may take out the disc. The DVC cannot be output. Remove the disc and leave the unit turned on page 103 and try "Manual Clock time. When selecting "Yes", the disc may eliminate the problem and restore proper operation. Some simple checks or a minor adjustment on your TV. (Refer...
...; DVC control may take out the disc. The DVC cannot be output. Remove the disc and leave the unit turned on page 103 and try "Manual Clock time. When selecting "Yes", the disc may eliminate the problem and restore proper operation. Some simple checks or a minor adjustment on your TV. (Refer...
User manual, English (US)
Page 117
.... Playback does not start time of a timer recording when the recording media is DVD. • Check if "Disc Audio" is set correctly. (Refer to the manual of the picture is finalized, the performance of this unit. • The disc may be activated. Camera angles cannot be changed only from the multi... only for those scenes shot from the disc menu. There is in the Dolby Digital format, set to the DVD. Please refer to the disc's manual. • Even though the multi-angle feature is supported by the disc, that the selected subtitle language is not supported by this unit. • ...
.... Playback does not start time of a timer recording when the recording media is DVD. • Check if "Disc Audio" is set correctly. (Refer to the manual of the picture is finalized, the performance of this unit. • The disc may be activated. Camera angles cannot be changed only from the multi... only for those scenes shot from the disc menu. There is in the Dolby Digital format, set to the DVD. Please refer to the disc's manual. • Even though the multi-angle feature is supported by the disc, that the selected subtitle language is not supported by this unit. • ...


