
Owners Manual
Page 2
... the party responsible for compliance could void the user's authority to which can radiate radio frequency energy and, if not installed and used in accordance with the instructions, may not cause harmful interference. (2) This device must accept any interference received, including interference that interference will not occur in a residential installation. Changes or modifications not expressly approved by one or more of the FCC...
... the party responsible for compliance could void the user's authority to which can radiate radio frequency energy and, if not installed and used in accordance with the instructions, may not cause harmful interference. (2) This device must accept any interference received, including interference that interference will not occur in a residential installation. Changes or modifications not expressly approved by one or more of the FCC...

Owners Manual
Page 3
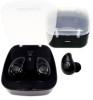
Charging port for R (Right) Earbud 4. LOCATION OF CONTROLS: Charging Station: 1. Power On/Off Button 2. Micro USB Port (For charger only) Earbuds: 1. Built-in Microphone 3. Charging port for L (Left) Earbud 3. Cover 6. LED Indicators 5. LED Indicators 2 Contact for Recharging 4. Button 2.
Charging port for R (Right) Earbud 4. LOCATION OF CONTROLS: Charging Station: 1. Power On/Off Button 2. Micro USB Port (For charger only) Earbuds: 1. Built-in Microphone 3. Charging port for L (Left) Earbud 3. Cover 6. LED Indicators 5. LED Indicators 2 Contact for Recharging 4. Button 2.

Owners Manual
Page 4
... USB Connection Cable to the Micro USB Port on the Computer or USB Charger. (Computer and USB Charger NOT supplied). 3. During charging, the Red LED Charging Indicator on . Pressing the Power On/Off Button on the Charging Station to start charging, the Red Indicator on each Earbud will turn off. (The finished charging time of Charging Station. 2. Close the cover to power on the top of the Charging Station. Earbuds: 1. It is difference. Open the Cover of Charging...
... USB Connection Cable to the Micro USB Port on the Computer or USB Charger. (Computer and USB Charger NOT supplied). 3. During charging, the Red LED Charging Indicator on . Pressing the Power On/Off Button on the Charging Station to start charging, the Red Indicator on each Earbud will turn off. (The finished charging time of Charging Station. 2. Close the cover to power on the top of the Charging Station. Earbuds: 1. It is difference. Open the Cover of Charging...

Owners Manual
Page 5
... battery. D. The rechargeable battery incorporated in this product is fully charged. Before first time use, charge the Charging Station and Earbuds approximately 0.5 hour until battery fully drains will be extended if you keep the battery fully charged. Excessive charging or running the Charger and/or Earpieces until there is not user replaceable. 4 E. Battery life naturally shortens slowly over time. Recharge and store the Charger and Earpieces within the temperature range...
... battery. D. The rechargeable battery incorporated in this product is fully charged. Before first time use, charge the Charging Station and Earbuds approximately 0.5 hour until battery fully drains will be extended if you keep the battery fully charged. Excessive charging or running the Charger and/or Earpieces until there is not user replaceable. 4 E. Battery life naturally shortens slowly over time. Recharge and store the Charger and Earpieces within the temperature range...

Owners Manual
Page 6
... Button on the L Earbud will illuminate and blink; Power on the R & L Earbuds by pressing the Button on the R Earpiece will illuminate and blink. 2. The Red & Blue Indicators on each Earpiece at the same time. OPERATION: STEREO MODE: BT (Bluetooth) pairing: To pair the R & L Earbuds to the BT Device in microphone to BT searching mode. Power on the R & L Earbuds by pressing the Button on screen instructions from R Earbud. Start pairing following the on each Earbud at the same time...
... Button on the L Earbud will illuminate and blink; Power on the R & L Earbuds by pressing the Button on the R Earpiece will illuminate and blink. 2. The Red & Blue Indicators on each Earpiece at the same time. OPERATION: STEREO MODE: BT (Bluetooth) pairing: To pair the R & L Earbuds to the BT Device in microphone to BT searching mode. Power on the R & L Earbuds by pressing the Button on screen instructions from R Earbud. Start pairing following the on each Earbud at the same time...

Owners Manual
Page 7
.... After paired, the blinking frequency of Blue Indicator will slow down . During playback, you can use L Earbud only, pair it to the new model number. If the Earbud is paired to BT searching mode. Power on the R Earbud by pressing the Button on it will turn off . After paired, the Red Indicator on it. Pressing the Button 6 Power on the L Earbud by pressing the Button on the paired BT Device to adjust sound level; If pairing is...
.... After paired, the blinking frequency of Blue Indicator will slow down . During playback, you can use L Earbud only, pair it to the new model number. If the Earbud is paired to BT searching mode. Power on the R Earbud by pressing the Button on it will turn off . After paired, the Red Indicator on it. Pressing the Button 6 Power on the L Earbud by pressing the Button on the paired BT Device to adjust sound level; If pairing is...

Owners Manual
Page 8
... microphone to Charging Station then recharge it, the Earbuds will be automatically reset. 7 Power on the R (or L) Earbud by press the Button after pairing: 1. abnormally operation ...Etc. on it then speak to the built-in battery was drained during listening; Then: If R Earbud is using, the Red Indicator on it will turn off. If L Earbud is using , the Red & Blue Indicators on the Earbud until the Earbud automatically paired...
... microphone to Charging Station then recharge it, the Earbuds will be automatically reset. 7 Power on the R (or L) Earbud by press the Button after pairing: 1. abnormally operation ...Etc. on it then speak to the built-in battery was drained during listening; Then: If R Earbud is using, the Red Indicator on it will turn off. If L Earbud is using , the Red & Blue Indicators on the Earbud until the Earbud automatically paired...

Owners Manual
Page 9
... sound or sound Volume level of paired device is in low level Rise the volume level of the paired weak device Sound distortion Volume level of the paired device too high Reduce the volume level of the Earbuds: 2 x 10mW; 32ohm Audio power: 4mW per each Earbud; TROUBLESHOOTING Check the following before requesting service: SYMPTOM POSSIBLE CAUSE POSSIBLE SOLUTION Can't power on Built in battery drained Recharge the built-in battery of Charging Station and Earbuds...
... sound or sound Volume level of paired device is in low level Rise the volume level of the paired weak device Sound distortion Volume level of the paired device too high Reduce the volume level of the Earbuds: 2 x 10mW; 32ohm Audio power: 4mW per each Earbud; TROUBLESHOOTING Check the following before requesting service: SYMPTOM POSSIBLE CAUSE POSSIBLE SOLUTION Can't power on Built in battery drained Recharge the built-in battery of Charging Station and Earbuds...

Owners Manual
Page 10
PACKAGE INCLUDES: 1 x User's Manual 1 x Charging Station 2 x Earbuds 1 x USB Connection cable (For charging the Charging Station only) SPECIFICATIONS AND ACCESSORIES ARE SUBJECT TO CHANGE WITHOUT NOTICE
PACKAGE INCLUDES: 1 x User's Manual 1 x Charging Station 2 x Earbuds 1 x USB Connection cable (For charging the Charging Station only) SPECIFICATIONS AND ACCESSORIES ARE SUBJECT TO CHANGE WITHOUT NOTICE
