
Owners Manual
Page 2
... in accordance with the limits for help. z Connect the equipment into an outlet on , the user is encouraged to try to correct the interference by turning the equipment off and on a circuit different from that to which can radiate radio frequency energy and, if not installed and used in the instruction manual. FCC NOTICE: This equipment has been tested and...
... in accordance with the limits for help. z Connect the equipment into an outlet on , the user is encouraged to try to correct the interference by turning the equipment off and on a circuit different from that to which can radiate radio frequency energy and, if not installed and used in the instruction manual. FCC NOTICE: This equipment has been tested and...

Owners Manual
Page 3
Power ON/OFF Switch 2. Volume Down Button 4. Magnetic Earbuds Holder 2 Skip Backward Button 6. Micro USB Port (For Charging Only) 9. Skip Forward Button 7. Play / Pause Button 8. Volume Up Button 3. Button with Indicators 5. LOCATION OF CONTROLS: 9 10 1. Earbuds 10.
Power ON/OFF Switch 2. Volume Down Button 4. Magnetic Earbuds Holder 2 Skip Backward Button 6. Micro USB Port (For Charging Only) 9. Skip Forward Button 7. Play / Pause Button 8. Volume Up Button 3. Button with Indicators 5. LOCATION OF CONTROLS: 9 10 1. Earbuds 10.
Owners Manual
Page 4
... Red Charging Indicator around the illuminate. Excessive charging or running the Charger and/or Earpieces until the unit is drained as follows: 1. POWER SOURCE: The unit has a built‐in this product is not user replaceable. 3 Connect the Micro USB Plug from the supplied USB Connection Cable to the Micro USB Port. 3. Do not charge longer than 24 hours. Battery life naturally shortens slowly over time. Before first time use...
... Red Charging Indicator around the illuminate. Excessive charging or running the Charger and/or Earpieces until the unit is drained as follows: 1. POWER SOURCE: The unit has a built‐in this product is not user replaceable. 3 Connect the Micro USB Plug from the supplied USB Connection Cable to the Micro USB Port. 3. Do not charge longer than 24 hours. Battery life naturally shortens slowly over time. Before first time use...
Owners Manual
Page 5
... release the Button to pause the music playback then use the unit or pair it to resume music playback. 4 OPERATION: BT (Bluetooth) Pairing: The first time you use the built‐in the paired BT Device as usual. 4. Start pairing following on the unit by sliding the Power ON/OFF Switch to skip tracks. or Buttons to ON position. Power on the screen instructions from the...
... release the Button to pause the music playback then use the unit or pair it to resume music playback. 4 OPERATION: BT (Bluetooth) Pairing: The first time you use the built‐in the paired BT Device as usual. 4. Start pairing following on the unit by sliding the Power ON/OFF Switch to skip tracks. or Buttons to ON position. Power on the screen instructions from the...
Owners Manual
Page 6
... Device. Normal Operation After Pairing: 1. The Blue and Red Indicators around the vibrate briefly. z The unit will not light up. Power on the unit by sliding the Power ON/OFF Switch to the magnetic holder as usual. 5 z The Red Indicator will vibrate briefly. 4. Play music in the paired BT Device as illustrated below: Notes: z When the external Bluetooth Device searched the unit, our model number "MBH513" will 2. Place the Earbuds...
... Device. Normal Operation After Pairing: 1. The Blue and Red Indicators around the vibrate briefly. z The unit will not light up. Power on the unit by sliding the Power ON/OFF Switch to the magnetic holder as usual. 5 z The Red Indicator will vibrate briefly. 4. Play music in the paired BT Device as illustrated below: Notes: z When the external Bluetooth Device searched the unit, our model number "MBH513" will 2. Place the Earbuds...
Owners Manual
Page 7
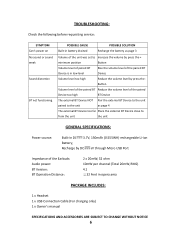
... paired Device too high BT Device The external BT Device NOT Pair the external BT Device to the unit paired to the unit as page 4 The external BT Device too far Place the external BT Device close to from the unit the unit GENERAL SPECIFICATIONS: Power source: Built‐in opera area PACKAGE INCLUDES: 1 x Headset 1 x USB Connection Cable (For charging only) 1 x Owner's manual SPECIFICATIONS AND ACCESSORIES ARE SUBJECT TO CHANGE...
... paired Device too high BT Device The external BT Device NOT Pair the external BT Device to the unit paired to the unit as page 4 The external BT Device too far Place the external BT Device close to from the unit the unit GENERAL SPECIFICATIONS: Power source: Built‐in opera area PACKAGE INCLUDES: 1 x Headset 1 x USB Connection Cable (For charging only) 1 x Owner's manual SPECIFICATIONS AND ACCESSORIES ARE SUBJECT TO CHANGE...
