
Owner's Manual - English
Page 1
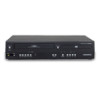
... access our online help at www.magnavox.com/support or call 1-800-605-8610 while with Video Cassette Recorder Read your Owner's Manual first for quick tips that make using your product (and Model / Serial number) RECORDING OPTIONAL SETTINGS TROUBLESHOOTING STANDBY-ON POWER ON VIDEO AUDIO REC TIMER REC IR REW F.FWD STOP/EJECT PLAY RECORD OPEN/CLOSE TRACKING VCR DVD DISC IN PLAY SOURCE PREV STOP PLAY NEXT © 2011 Funai Electric Co., Ltd. PRECAUTIONS PREPARATION BASIC OPERATIONS ADVANCED PLAYBACK Owner's Manual CDV220MW9/F7 DVD / CD Player...
... access our online help at www.magnavox.com/support or call 1-800-605-8610 while with Video Cassette Recorder Read your Owner's Manual first for quick tips that make using your product (and Model / Serial number) RECORDING OPTIONAL SETTINGS TROUBLESHOOTING STANDBY-ON POWER ON VIDEO AUDIO REC TIMER REC IR REW F.FWD STOP/EJECT PLAY RECORD OPEN/CLOSE TRACKING VCR DVD DISC IN PLAY SOURCE PREV STOP PLAY NEXT © 2011 Funai Electric Co., Ltd. PRECAUTIONS PREPARATION BASIC OPERATIONS ADVANCED PLAYBACK Owner's Manual CDV220MW9/F7 DVD / CD Player...
Owner's Manual - English
Page 4
... 16 Stereo Sound Mode 16 Title, Chapter, Track, Folder or File Search 16 Index Search 17 Time Search 17 Repeat Playback 17 Repeat A-B Playback 17 Auto Repeat Playback 17 Programmed Playback 18 Random Playback 18 Settings 18 Black Level Setting 18 Virtual Surround 19 Subtitle Language and Audio Language 19 On-Screen Display 19 RECORDING Recording & OTR (One-touch Timer Recording 20 Timer Recording 21 Note for Timer Recording & OTR 21 Satellite Link 22 Dubbing a Cassette Tape 22 OPTIONAL SETTINGS Changing the DVD Settings...
... 16 Stereo Sound Mode 16 Title, Chapter, Track, Folder or File Search 16 Index Search 17 Time Search 17 Repeat Playback 17 Repeat A-B Playback 17 Auto Repeat Playback 17 Programmed Playback 18 Random Playback 18 Settings 18 Black Level Setting 18 Virtual Surround 19 Subtitle Language and Audio Language 19 On-Screen Display 19 RECORDING Recording & OTR (One-touch Timer Recording 20 Timer Recording 21 Note for Timer Recording & OTR 21 Satellite Link 22 Dubbing a Cassette Tape 22 OPTIONAL SETTINGS Changing the DVD Settings...
Owner's Manual - English
Page 5
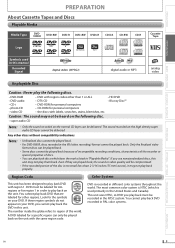
...; DVD-audio • CD-i • DVD with region codes other than 2-3/16 inches (55 mm) across), it may not play back the DVD in this manual Recorded Signal DVD-Video AudioCD MMPP33 digital audio or MP3 VHS analog video Unplayable Disc Caution: Never play the following disc. • super audio CD Note: • Only the sound recorded on the normal CD layer can be delivered. PRECAUTIONS PREPARATION BASIC OPERATIONS ADVANCED PLAYBACK PREPARATION About Cassette Tapes...
...; DVD-audio • CD-i • DVD with region codes other than 2-3/16 inches (55 mm) across), it may not play back the DVD in this manual Recorded Signal DVD-Video AudioCD MMPP33 digital audio or MP3 VHS analog video Unplayable Disc Caution: Never play the following disc. • super audio CD Note: • Only the sound recorded on the normal CD layer can be delivered. PRECAUTIONS PREPARATION BASIC OPERATIONS ADVANCED PLAYBACK PREPARATION About Cassette Tapes...

Owner's Manual - English
Page 6
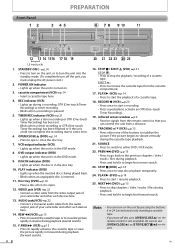
... must unplug the AC power cord.) 4. Press [D]to begin slow forward playback in this manual rest primarily on the front panel of the unit). 1 2 3 4 5 6 7 8 9 11 10 12 13 15 14 16 17 STANDBY-ON OPEN/CLOSE SPEED TIMER SET 123 TRACKING 456 789 CLEAR 0 INPUT +10 DISPLAY VCR DVD MODE PLAY STOP RECORD PREV NEXT PAUSE TITLE SEARCH AUDIO DISC MENU OK SETUP ZOOM RETURN SUBTITLE ANGLE REPEAT A-B 18 19 20...
... must unplug the AC power cord.) 4. Press [D]to begin slow forward playback in this manual rest primarily on the front panel of the unit). 1 2 3 4 5 6 7 8 9 11 10 12 13 15 14 16 17 STANDBY-ON OPEN/CLOSE SPEED TIMER SET 123 TRACKING 456 789 CLEAR 0 INPUT +10 DISPLAY VCR DVD MODE PLAY STOP RECORD PREV NEXT PAUSE TITLE SEARCH AUDIO DISC MENU OK SETUP ZOOM RETURN SUBTITLE ANGLE REPEAT A-B 18 19 20...

Owner's Manual - English
Page 7
... a time. 21. VCR mode: • Press to vibrate vertically during clock and timer programming. PAUSE F p.15 DVD mode: • Press to pause disc playback. • Press to advance the playback one frame at a time. (DVD) VCR mode: • Press to pause the playback / recording of the buttons to stabilize the picture manually if the picture begins to stop disc playback. EN 7 OPTIONAL SETTINGS TROUBLESHOOTING INFORMATION K / L / s / B p.16 DVD mode: • Press to the next VCR menu. 31...
... a time. 21. VCR mode: • Press to vibrate vertically during clock and timer programming. PAUSE F p.15 DVD mode: • Press to pause disc playback. • Press to advance the playback one frame at a time. (DVD) VCR mode: • Press to pause the playback / recording of the buttons to stabilize the picture manually if the picture begins to stop disc playback. EN 7 OPTIONAL SETTINGS TROUBLESHOOTING INFORMATION K / L / s / B p.16 DVD mode: • Press to the next VCR menu. 31...
Owner's Manual - English
Page 8
... some error. 6. VIDEO jack (VCR) p.22 • Connect a video cable from the audio output jack of the buttons to stabilize the picture if the picture begins to open . 12. SOURCE • Press to switch to turn the unit into the standby mode. (To completely turn on . 3. PLAY B (DVD) p.14 • Press to start / resume playback. 25. TIMER REC indicator (VCR) p.21 • Lights up when the unit is turned on the unit...
... some error. 6. VIDEO jack (VCR) p.22 • Connect a video cable from the audio output jack of the buttons to stabilize the picture if the picture begins to open . 12. SOURCE • Press to switch to turn the unit into the standby mode. (To completely turn on . 3. PLAY B (DVD) p.14 • Press to start / resume playback. 25. TIMER REC indicator (VCR) p.21 • Lights up when the unit is turned on the unit...

Owner's Manual - English
Page 9
... 9 OPTIONAL SETTINGS TROUBLESHOOTING INFORMATION DVD/VCR AUDIO OUT jack p.10 • Connect an audio cable from here to the audio input jack of used batteries, please comply with an S-video cable, component video cables, or a digital audio coaxial cable. VCR VIDEO IN jack p.22 • Connect a video cable from battery compartment, when the remote is not going to the video output jack of a decoder or audio receiver. 4. Line of center - DIGITAL AUDIO OUT COAXIAL* jack p.12 • Connect a digital audio coaxial cable from...
... 9 OPTIONAL SETTINGS TROUBLESHOOTING INFORMATION DVD/VCR AUDIO OUT jack p.10 • Connect an audio cable from here to the audio input jack of used batteries, please comply with an S-video cable, component video cables, or a digital audio coaxial cable. VCR VIDEO IN jack p.22 • Connect a video cable from battery compartment, when the remote is not going to the video output jack of a decoder or audio receiver. 4. Line of center - DIGITAL AUDIO OUT COAXIAL* jack p.12 • Connect a digital audio coaxial cable from...

Owner's Manual - English
Page 11
... COMPONENT VIDEO IN Y CB CR or (Green) (Blue) (Red) DIGITAL AUDIO OUT DVD AUDIO S-VIDEO OU(TGreen)OUT COMPONENT VIDEO OUT Y DVD/VCR AUDIO OUT L VCR component video cable L (Blue) COAXIAL R(Red) AUDIO IN CB R VIDEO OUT VIDEO IN CR RECORDING OPTIONAL SETTINGS TROUBLESHOOTING INFORMATION Supplied cables used in this connection are inputs for details. EN 11 PRECAUTIONS PREPARATION BASIC OPERATIONS ADVANCED PLAYBACK PREPARATION After connecting to your TV: You will need to switch to your TV's owner's manual for common brand name...
... COMPONENT VIDEO IN Y CB CR or (Green) (Blue) (Red) DIGITAL AUDIO OUT DVD AUDIO S-VIDEO OU(TGreen)OUT COMPONENT VIDEO OUT Y DVD/VCR AUDIO OUT L VCR component video cable L (Blue) COAXIAL R(Red) AUDIO IN CB R VIDEO OUT VIDEO IN CR RECORDING OPTIONAL SETTINGS TROUBLESHOOTING INFORMATION Supplied cables used in this connection are inputs for details. EN 11 PRECAUTIONS PREPARATION BASIC OPERATIONS ADVANCED PLAYBACK PREPARATION After connecting to your TV: You will need to switch to your TV's owner's manual for common brand name...
Owner's Manual - English
Page 13
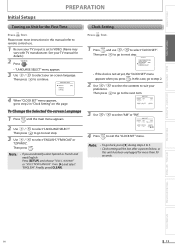
... Press . • "LANGUAGE SELECT" menu appears. 3 Use / to select your to go to the next item. Then press to go to continue. RECORDING OPTIONAL SETTINGS TROUBLESHOOTING INFORMATION EN 13 Please note: most instructions in "Clock Setting" on Unit for the First Time VCR Press first. PRECAUTIONS PREPARATION BASIC OPERATIONS ADVANCED PLAYBACK PREPARATION Initial Setups Turning on this case, go to step 2. 2 Use / preference. Then press to next...
... Press . • "LANGUAGE SELECT" menu appears. 3 Use / to select your to go to the next item. Then press to go to continue. RECORDING OPTIONAL SETTINGS TROUBLESHOOTING INFORMATION EN 13 Please note: most instructions in "Clock Setting" on Unit for the First Time VCR Press first. PRECAUTIONS PREPARATION BASIC OPERATIONS ADVANCED PLAYBACK PREPARATION Initial Setups Turning on this case, go to step 2. 2 Use / preference. Then press to next...

Owner's Manual - English
Page 14
... to the VCR mode. REMEMBER DVD • You need to press first every time you operate any of the side you operate any of VCR features. • When using DVD AUDIO OUT jack, DIGITAL AUDIO OUT COAXIAL jack, COMPONENT VIDEO OUT jack and S-VIDEO OUT jack, no VCR audio / video will be output. 3Press PLAY playback. BBAASSIICCOOPERRAATTIIOONNSS BASIC PLAYBACK Before: Turn on the unit. For VCR Playback 1Insert a cassette tape so that the unit will be turned on both sides, make sure...
... to the VCR mode. REMEMBER DVD • You need to press first every time you operate any of the side you operate any of VCR features. • When using DVD AUDIO OUT jack, DIGITAL AUDIO OUT COAXIAL jack, COMPONENT VIDEO OUT jack and S-VIDEO OUT jack, no VCR audio / video will be output. 3Press PLAY playback. BBAASSIICCOOPERRAATTIIOONNSS BASIC PLAYBACK Before: Turn on the unit. For VCR Playback 1Insert a cassette tape so that the unit will be turned on both sides, make sure...

Owner's Manual - English
Page 16
... the file list. During playback, press [AUDIO ]. For the chapter search, press [B] to select a sound mode during CD playback. Resume Playback DVD-Video AudioCD MMPP33 DVD Press first. 1. Resume message will not appear. ( page 23.) DVD-Video Press DVD first. 1. To exit zoom mode, press [ZOOM] repeatedly. STEREO (right and left side in the unit. Note: • Menu operations may not display the actual elapsed time. Use [K / L] to be played back. •...
... the file list. During playback, press [AUDIO ]. For the chapter search, press [B] to select a sound mode during CD playback. Resume Playback DVD-Video AudioCD MMPP33 DVD Press first. 1. Resume message will not appear. ( page 23.) DVD-Video Press DVD first. 1. To exit zoom mode, press [ZOOM] repeatedly. STEREO (right and left side in the unit. Note: • Menu operations may not display the actual elapsed time. Use [K / L] to be played back. •...

Owner's Manual - English
Page 17
... [OK]. Use [the Number buttons] to select a desired index number. 3. During playback, press [REPEAT]. • Each time you select "AUTO REPEAT" to play time 0:15:00) press [1],[5],[0],[0] of the cassette tape. DVD-Video OFF (repeat off) CHAPTER (current chapter repeat) Audio CD TITLE OFF (current title repeat) (repeat off) TRACK (current track repeat) ALL (entire disc repeat) MMPP33 OFF (repeat off the unit. Press [A-B] to "ON" or "OFF" by pressing [REPEAT] on the remote control. • To cancel auto repeat, follow...
... [OK]. Use [the Number buttons] to select a desired index number. 3. During playback, press [REPEAT]. • Each time you select "AUTO REPEAT" to play time 0:15:00) press [1],[5],[0],[0] of the cassette tape. DVD-Video OFF (repeat off) CHAPTER (current chapter repeat) Audio CD TITLE OFF (current title repeat) (repeat off) TRACK (current track repeat) ALL (entire disc repeat) MMPP33 OFF (repeat off the unit. Press [A-B] to "ON" or "OFF" by pressing [REPEAT] on the remote control. • To cancel auto repeat, follow...

Owner's Manual - English
Page 18
... Press [RETURN ] to adjust the black level. DVD-PROGRAM MAX 4 Total 0 TITL E CHA P TE R P L AY A L L CL E A R 03 011 --- 6. Use [K/ L/ s / B] to enter desired chapter number (DVD) or file number (MP3). During playback, press [MODE] once. 2. OFF: shows the original picture as recorded. 3. DVD-Video AudioCD MMPP33 DVD Press first. 1. Press [OK], then use [the Number buttons] to select desired track input field. 4. For audio CD: 3. During playback, press [MODE] three times when operating DVD. 2. Pressing [NEXT...
... Press [RETURN ] to adjust the black level. DVD-PROGRAM MAX 4 Total 0 TITL E CHA P TE R P L AY A L L CL E A R 03 011 --- 6. Use [K/ L/ s / B] to enter desired chapter number (DVD) or file number (MP3). During playback, press [MODE] once. 2. OFF: shows the original picture as recorded. 3. DVD-Video AudioCD MMPP33 DVD Press first. 1. Press [OK], then use [the Number buttons] to select desired track input field. 4. For audio CD: 3. During playback, press [MODE] three times when operating DVD. 2. Pressing [NEXT...

Owner's Manual - English
Page 20
... TV broadcasts without external tuner or such devices. STANDBY-ON REC TIMER REC IR STOP/EJECT PLAY RECORD OPEN/CLOSE TRACKING VCR SOU • If the erase-protection tab has been 2 removed, cover the hole with adhesive tape. REMEMBER VCR • You need to the L1 (rear panel) jacks of VCR features. 3Press INPUT until desired duration recording REC time is displayed on the unit. Connect camcorders and other such devices...
... TV broadcasts without external tuner or such devices. STANDBY-ON REC TIMER REC IR STOP/EJECT PLAY RECORD OPEN/CLOSE TRACKING VCR SOU • If the erase-protection tab has been 2 removed, cover the hole with adhesive tape. REMEMBER VCR • You need to the L1 (rear panel) jacks of VCR features. 3Press INPUT until desired duration recording REC time is displayed on the unit. Connect camcorders and other such devices...

Owner's Manual - English
Page 21
... a Timer Recording Has Been Set, This Unit Operates as well. 5 Use / to select recording speed. The [TIMER REC] indicator on this unit or [TIMER SET] on the TV screen. Press [TIMER SET], and then press [VCR ] on the unit, then press [VCR ] to activate the VCR function again. All the DVD functions are no cassette tape in this manual. 21 INFORMATION OPTIONAL SETTINGS TROUBLESHOOTING RECORDING BASIC OPERATIONS ADVANCED PLAYBACK PREPARATION REC SPEED - - 3 Use / to select an empty program number. CLEAR ONE TIME PROGRAM PROGRAM NUMBER 1 DATE 1 0 / 0 6 THU START TIME...
... a Timer Recording Has Been Set, This Unit Operates as well. 5 Use / to select recording speed. The [TIMER REC] indicator on this unit or [TIMER SET] on the TV screen. Press [TIMER SET], and then press [VCR ] on the unit, then press [VCR ] to activate the VCR function again. All the DVD functions are no cassette tape in this manual. 21 INFORMATION OPTIONAL SETTINGS TROUBLESHOOTING RECORDING BASIC OPERATIONS ADVANCED PLAYBACK PREPARATION REC SPEED - - 3 Use / to select an empty program number. CLEAR ONE TIME PROGRAM PROGRAM NUMBER 1 DATE 1 0 / 0 6 THU START TIME...

Owner's Manual - English
Page 22
... playback of copyrighted cassette tapes may be selected from the external tuner. VCR VHS Press first. 1. Press [RECORD] on this unit. 5. Note: • For best results during satellite link. • When the timer recording and the satellite link are recorded as well. Preparing for satellite link to set satellite link standby mode. When the external tuner signal is being detected during dubbing, use a video disc player, cable/satellite box...
... playback of copyrighted cassette tapes may be selected from the external tuner. VCR VHS Press first. 1. Press [RECORD] on this unit. 5. Note: • For best results during satellite link. • When the timer recording and the satellite link are recorded as well. Preparing for satellite link to set satellite link standby mode. When the external tuner signal is being detected during dubbing, use a video disc player, cable/satellite box...

Owner's Manual - English
Page 23
...; "AUTO" automatically selects the best resolution setting ("FRAME" or "FIELD") based on -screen display). and loud sounds. OTHERS PARENTAL PASSWORD NO YES Enter the password. OOPPTTIIOONNAL SSEETTTTININGGSS PRECAUTIONS Changing the DVD Settings (in the setup menu) In the setup menu, you can customize the various kinds of settings as "FIELD". • If you select "FIELD", the picture in the still mode will be selected. • "LANGUAGE" setting for "AUDIO" and...
...; "AUTO" automatically selects the best resolution setting ("FRAME" or "FIELD") based on -screen display). and loud sounds. OTHERS PARENTAL PASSWORD NO YES Enter the password. OOPPTTIIOONNAL SSEETTTTININGGSS PRECAUTIONS Changing the DVD Settings (in the setup menu) In the setup menu, you can customize the various kinds of settings as "FIELD". • If you select "FIELD", the picture in the still mode will be selected. • "LANGUAGE" setting for "AUDIO" and...

Owner's Manual - English
Page 24
... enter the current 4-digit password. When you use the unit for the first time, use [the Number buttons] to select "LEVEL", then press . PASSWORD LEVEL CHANGE PARENTAL_CHANGE PASSWORD LEVEL CHANGE 5 / OK . Playback will prevent your children from viewing inappropriate materials (password protected). to select the desired level, then press PASSWORD LEVEL CHANGE 8 [ADULT] 6 SETUP Press to exit. 3 [the Number buttons] to enter the 4-digit number for your new password. PASSWORD Enter password NO YES ---- •...
... enter the current 4-digit password. When you use the unit for the first time, use [the Number buttons] to select "LEVEL", then press . PASSWORD LEVEL CHANGE PARENTAL_CHANGE PASSWORD LEVEL CHANGE 5 / OK . Playback will prevent your children from viewing inappropriate materials (password protected). to select the desired level, then press PASSWORD LEVEL CHANGE 8 [ADULT] 6 SETUP Press to exit. 3 [the Number buttons] to enter the 4-digit number for your new password. PASSWORD Enter password NO YES ---- •...
Owner's Manual - English
Page 26
... specific modes, but the audio • Head cleaning may stop for audio or subtitles on page 22. No sound. Change the position and direction of a cassette tape. If not, press [TIMER SET]. • Make sure the VCR clock is set correctly. • Make sure [TIMER REC] indicator on this unit lights up . • Cancel the parental lock or change the control levels. • Handle a disc with audio/video output jacks or an external tuner to record TV programs. Refer to "Recording...
... specific modes, but the audio • Head cleaning may stop for audio or subtitles on page 22. No sound. Change the position and direction of a cassette tape. If not, press [TIMER SET]. • Make sure the VCR clock is set correctly. • Make sure [TIMER REC] indicator on this unit lights up . • Cancel the parental lock or change the control levels. • Handle a disc with audio/video output jacks or an external tuner to record TV programs. Refer to "Recording...

Owner's Manual - English
Page 27
... before use solvents such as you insert or remove a cassette tape, so you can test if the remote control is showing clear, the dirt may have referred to the relevant sections and to the "Troubleshooting Guide" in camera of this manual, the laser optical pickup unit may need to be English. 27 Consult your dealer or an authorized service center for analog records. Auto Head Cleaning • Automatically cleans video heads...
... before use solvents such as you insert or remove a cassette tape, so you can test if the remote control is showing clear, the dirt may have referred to the relevant sections and to the "Troubleshooting Guide" in camera of this manual, the laser optical pickup unit may need to be English. 27 Consult your dealer or an authorized service center for analog records. Auto Head Cleaning • Automatically cleans video heads...


