User manual, English (US)
Page 4
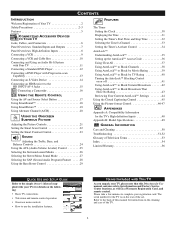
...video or RGB (high-resolution) jacks are ready to connect to the back of the TV. to 75-ohm adapter, which is a...51-52 Glossary of Television Terms 53 Index 54 Limited Warranty 56 QUICK USE AND SETUP GUIDE Refer to the simple Owner's Manual (supplied with your TV) for details on the rear of the TV. A VGA (DB15) cable makes a VGA connection to the HD... INPUT-AV 5 jack on the following: • Basic TV connections • Television and remote-control operation • Onscreen menu controls...
...video or RGB (high-resolution) jacks are ready to connect to the back of the TV. to 75-ohm adapter, which is a...51-52 Glossary of Television Terms 53 Index 54 Limited Warranty 56 QUICK USE AND SETUP GUIDE Refer to the simple Owner's Manual (supplied with your TV) for details on the rear of the TV. A VGA (DB15) cable makes a VGA connection to the HD... INPUT-AV 5 jack on the following: • Basic TV connections • Television and remote-control operation • Onscreen menu controls...
User manual, English (US)
Page 5
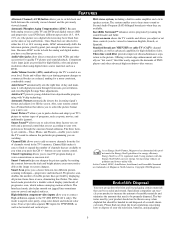
... lines sometimes seen on your remote control. End-of-life Disposal Your new projection television and its packaging contain materials that can recycle your TV's picture to switch back and... of reusable materials and minimize the amounts that you set provides separate HD inputs for quality TV picture and sound playback. Progressive scan doubles the number of as small...and angled surfaces. Three-line comb filter provides improved chroma/luminance separation to dispose of Magnavox North America. Offering vertical-edge enhancement and virtually no "dot crawl," this product meets...
... lines sometimes seen on your remote control. End-of-life Disposal Your new projection television and its packaging contain materials that can recycle your TV's picture to switch back and... of reusable materials and minimize the amounts that you set provides separate HD inputs for quality TV picture and sound playback. Progressive scan doubles the number of as small...and angled surfaces. Three-line comb filter provides improved chroma/luminance separation to dispose of Magnavox North America. Offering vertical-edge enhancement and virtually no "dot crawl," this product meets...

User manual, English (US)
Page 9
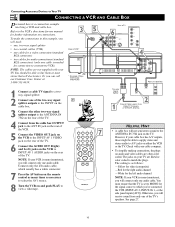
...the left audio cable, which usually has a white connector. 5 Press the AV button on the remote control as many times as VCRs, DVD players, and others that sell electronics. You must ensure that the TV is as follows: • Yellow for video (composite) • Red for the right audio ... accessory devices such as necessary to select the AV1 source. 6 Turn the VCR on the TV. 3 ANTENNA IN 75Ω INPUT-AV 1 VIDEO L AUDIO R Rear of TV 4OUTPUT INPUT-AV 2 Y VIDEO S-VIDEO Pb L L Pr AUDIO R HD INPUT-AV 4 G/Y R/Pr B/Pb V L SYNC AUDIO H R Coaxial Cable Lead-in this example, ...
...the left audio cable, which usually has a white connector. 5 Press the AV button on the remote control as many times as VCRs, DVD players, and others that sell electronics. You must ensure that the TV is as follows: • Yellow for video (composite) • Red for the right audio ... accessory devices such as necessary to select the AV1 source. 6 Turn the VCR on the TV. 3 ANTENNA IN 75Ω INPUT-AV 1 VIDEO L AUDIO R Rear of TV 4OUTPUT INPUT-AV 2 Y VIDEO S-VIDEO Pb L L Pr AUDIO R HD INPUT-AV 4 G/Y R/Pr B/Pb V L SYNC AUDIO H R Coaxial Cable Lead-in this example, ...
User manual, English (US)
Page 10
...-531-0039. 3 Rear of VCR* * (Example: Philips VCR model VR674CAT) 5 ANTENNA IN 75Ω INPUT-AV 1 VIDEO L AUDIO R Rear of TV 6OUTPUT INPUT-AV 2 Y VIDEO S-VIDEO Pb L L Pr AUDIO R HD INPUT-AV 4 G/Y R/Pr B/Pb V L SYNC AUDIO H R 4 AUDIO L OUT IN R VIDEO ANT IN OUT OUT IN CH3 CH4 Rear of ... to the ANTENNA IN 75Ω jack on the rear of the TV's speakers. Refer to the VCR's directions-for-use manual for the signal source to which usually has a white connector. 7 Press the AV button on the remote control as many times as follows: -Yellow for video (composite) -Red ...
...-531-0039. 3 Rear of VCR* * (Example: Philips VCR model VR674CAT) 5 ANTENNA IN 75Ω INPUT-AV 1 VIDEO L AUDIO R Rear of TV 6OUTPUT INPUT-AV 2 Y VIDEO S-VIDEO Pb L L Pr AUDIO R HD INPUT-AV 4 G/Y R/Pr B/Pb V L SYNC AUDIO H R 4 AUDIO L OUT IN R VIDEO ANT IN OUT OUT IN CH3 CH4 Rear of ... to the ANTENNA IN 75Ω jack on the rear of the TV's speakers. Refer to the VCR's directions-for-use manual for the signal source to which usually has a white connector. 7 Press the AV button on the remote control as many times as follows: -Yellow for video (composite) -Red ...
User manual, English (US)
Page 12
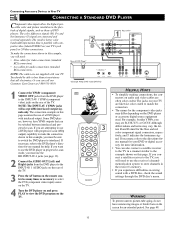
...the INPUT-AV 1 AUDIO jacks on the rear of the TV. 3 Press the AV button on the remote control as many times as those of the TV. If necessary, refer to the DVD player's directions-for help. nectors on your TV. The jacks on audio and video cables are likewise color coded... for more information. • You can call our Customer Care Center at most stores that sell electronics. If you are attempting to use the HD INPUT-AV 4 jacks (see R-Y/B-Y/Y; You should be switched between interlaced and progressive scan. NOTE: The cables are connected and received separately. Connecting ...
...the INPUT-AV 1 AUDIO jacks on the rear of the TV. 3 Press the AV button on the remote control as many times as those of the TV. If necessary, refer to the DVD player's directions-for help. nectors on your TV. The jacks on audio and video cables are likewise color coded... for more information. • You can call our Customer Care Center at most stores that sell electronics. If you are attempting to use the HD INPUT-AV 4 jacks (see R-Y/B-Y/Y; You should be switched between interlaced and progressive scan. NOTE: The cables are connected and received separately. Connecting ...
User manual, English (US)
Page 13
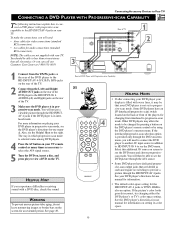
...video connections (standard RCA connectors) • two cables for an extended period. See page 49. Select this additional AV source on the DVD player's remote control or by pressing a button on screen to see the DVD menu. See your DVD player's directions-for changing from the L(eft) and R(ight)... WARNING To prevent uneven picture-tube aging, do not leave nonmoving images or border bars on your TV remote control as many times as such and require no switching to provide a picture through the HD INPUTAV 4 jacks if the DVD player is selected varies among DVD players. 4 Press the AV ...
...video connections (standard RCA connectors) • two cables for an extended period. See page 49. Select this additional AV source on the DVD player's remote control or by pressing a button on screen to see the DVD menu. See your DVD player's directions-for changing from the L(eft) and R(ight)... WARNING To prevent uneven picture-tube aging, do not leave nonmoving images or border bars on your TV remote control as many times as such and require no switching to provide a picture through the HD INPUTAV 4 jacks if the DVD player is selected varies among DVD players. 4 Press the AV ...
User manual, English (US)
Page 14
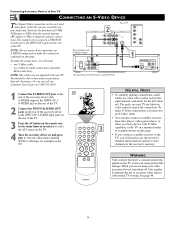
... the right channel, and white for the left channel. To make the connection explained on the TV. Rear of TV ANTENNA IN 75Ω 2 INPUT-AV 1 OUTPUT Y VIDEO Pb L AUDIO Pr R INPUT-AV 2 VIDEO S-VIDEO L L AUDIO R HD INPUT-AV 4 G/Y R/Pr B/Pb V L SYNC AUDIO H R Rear of Device with S-VIDEO Output*...Cb S-VIDEO OPTICAL COAXIAL OUT 1 Connect the S-VIDEO OUT jack on the rear of the TV. 3 Press the AV button on the remote control as many times as necessary to select the AV2 source on the TV. 4 Turn the accessory device on and press play to view the video source material (...
... the right channel, and white for the left channel. To make the connection explained on the TV. Rear of TV ANTENNA IN 75Ω 2 INPUT-AV 1 OUTPUT Y VIDEO Pb L AUDIO Pr R INPUT-AV 2 VIDEO S-VIDEO L L AUDIO R HD INPUT-AV 4 G/Y R/Pr B/Pb V L SYNC AUDIO H R Rear of Device with S-VIDEO Output*...Cb S-VIDEO OPTICAL COAXIAL OUT 1 Connect the S-VIDEO OUT jack on the rear of the TV. 3 Press the AV button on the remote control as many times as necessary to select the AV2 source on the TV. 4 Turn the accessory device on and press play to view the video source material (...

User manual, English (US)
Page 16
...; two cables for audio connections (standard RCA connectors). The jacks on your TV as necessary to select the AV3 source on the TV. 4 Turn the camcorder on, insert a videotape, and press PLAY to view the tape on the remote control as many times as AV3. Typical Camcorder 1 INPUT-AV-3 VIDEO L AUDIO... R 2 DV VIDEO AUDIO LEFT RIGHT 1 Connect from the AUDIO outputs on the camcorder to the side panel AUDIO L(eft) and R(ight) inputs. 3 Press the AV button on the TV. To make S-...
...; two cables for audio connections (standard RCA connectors). The jacks on your TV as necessary to select the AV3 source on the TV. 4 Turn the camcorder on, insert a videotape, and press PLAY to view the tape on the remote control as many times as AV3. Typical Camcorder 1 INPUT-AV-3 VIDEO L AUDIO... R 2 DV VIDEO AUDIO LEFT RIGHT 1 Connect from the AUDIO outputs on the camcorder to the side panel AUDIO L(eft) and R(ight) inputs. 3 Press the AV button on the TV. To make S-...
User manual, English (US)
Page 17
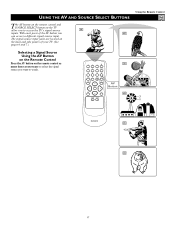
... signal-source input jacks are located on the remote control as CVI many times as necessary to select the signal source you AV1 can access a different signal-source input. Using the Remote Control POWER TV SWAP VCR PIP CH ACC ACTIVE CONTROL FREEZE DN UP SOUND PICTURE AV Button AV2 ...AV3 AV4 17 With each press of your TV. (See pages 6 and 7.) Selecting a Signal Source Using the AV ...
... signal-source input jacks are located on the remote control as CVI many times as necessary to select the signal source you AV1 can access a different signal-source input. Using the Remote Control POWER TV SWAP VCR PIP CH ACC ACTIVE CONTROL FREEZE DN UP SOUND PICTURE AV Button AV2 ...AV3 AV4 17 With each press of your TV. (See pages 6 and 7.) Selecting a Signal Source Using the AV ...
User manual, English (US)
Page 18
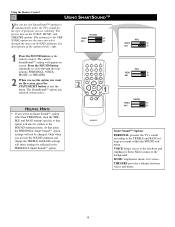
..., press the STATUS/EXIT button to exit the 2 menu. Using the Remote Control POWER TV SWAP VCR PIP CH ACC ACTIVE CONTROL FREEZE DN UP SOUND PICTURE USING SMARTSOUND™ You can use the SmartSound™ options to automatically tailor the TV's sound for the PERSONAL option are watching. The settings for the type... other than PERSONAL, then the TREBLE and BASS settings specific to that point, the PERSONAL Smart Sound™ option settings will appear on the remote control. See descriptions of program you selected is then active. MUSIC emphasizes music over voices.
..., press the STATUS/EXIT button to exit the 2 menu. Using the Remote Control POWER TV SWAP VCR PIP CH ACC ACTIVE CONTROL FREEZE DN UP SOUND PICTURE USING SMARTSOUND™ You can use the SmartSound™ options to automatically tailor the TV's sound for the PERSONAL option are watching. The settings for the type... other than PERSONAL, then the TREBLE and BASS settings specific to that point, the PERSONAL Smart Sound™ option settings will appear on the remote control. See descriptions of program you selected is then active. MUSIC emphasizes music over voices.
User manual, English (US)
Page 19
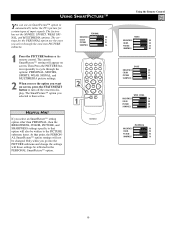
...reflected in the PERSONAL SmartPicture™ option. PERSONAL BRIGHTNESS 48 COLOR 41 PICTURE 81 SHARPNESS 46 1 Press the PICTURE button on the remote control. Only when you go into the PICTURE submenu and change the settings will appear on screen. The factory has set the MOVIES,...button to turn off the onscreen dis- play. The settings for certain types of input signals. Using the Remote Control POWER TV SWAP VCR PIP CH ACC ACTIVE CONTROL FREEZE DN UP SOUND PICTURE MOVIES BRIGHTNESS 50 COLOR 50 PICTURE 50 SHARPNESS 84 SPORTS BRIGHTNESS 50 COLOR 55 ...
...reflected in the PERSONAL SmartPicture™ option. PERSONAL BRIGHTNESS 48 COLOR 41 PICTURE 81 SHARPNESS 46 1 Press the PICTURE button on the remote control. Only when you go into the PICTURE submenu and change the settings will appear on screen. The factory has set the MOVIES,...button to turn off the onscreen dis- play. The settings for certain types of input signals. Using the Remote Control POWER TV SWAP VCR PIP CH ACC ACTIVE CONTROL FREEZE DN UP SOUND PICTURE MOVIES BRIGHTNESS 50 COLOR 50 PICTURE 50 SHARPNESS 84 SPORTS BRIGHTNESS 50 COLOR 55 ...
User manual, English (US)
Page 20
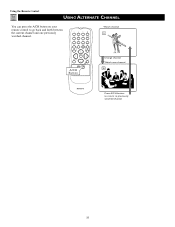
Using the Remote Control POWER TV SWAP VCR PIP CH ACC ACTIVE CONTROL FREEZE DN UP SOUND PICTURE USING ALTERNATE CHANNEL You can press the A/CH button on your remote control to previously watched channel 20 Watch channel 5 A/CH Button Change channel Watch new channel 10 Press A/CH button to return to go back and forth between the current channel and one previously watched channel.
Using the Remote Control POWER TV SWAP VCR PIP CH ACC ACTIVE CONTROL FREEZE DN UP SOUND PICTURE USING ALTERNATE CHANNEL You can press the A/CH button on your remote control to previously watched channel 20 Watch channel 5 A/CH Button Change channel Watch new channel 10 Press A/CH button to return to go back and forth between the current channel and one previously watched channel.

User manual, English (US)
Page 21
... the detail in the picture. See descriptions of the picture-adjustment options below. 1 Press the MENU/SELECT button on the remote control to adjust the BRIGHTNESS level of the picture. BRIGHTNESS will be highlighted and an adjustment bar will be shown to the right...CURSOR BUTTON RIGHT. COLOR adds or eliminates color. NORMAL keeps whites, white. Using the Onscreen Submenus: Picture ADJUSTING THE PICTURE CONTROLS T o adjust your TV picture controls, select a channel and follow these steps. COOL makes whites, bluish. PICTURE SOUND FEATURES INSTALL BRIGHTNESS COLOR PICTURE SHARPNESS TINT...
... the detail in the picture. See descriptions of the picture-adjustment options below. 1 Press the MENU/SELECT button on the remote control to adjust the BRIGHTNESS level of the picture. BRIGHTNESS will be highlighted and an adjustment bar will be shown to the right...CURSOR BUTTON RIGHT. COLOR adds or eliminates color. NORMAL keeps whites, white. Using the Onscreen Submenus: Picture ADJUSTING THE PICTURE CONTROLS T o adjust your TV picture controls, select a channel and follow these steps. COOL makes whites, bluish. PICTURE SOUND FEATURES INSTALL BRIGHTNESS COLOR PICTURE SHARPNESS TINT...
User manual, English (US)
Page 23
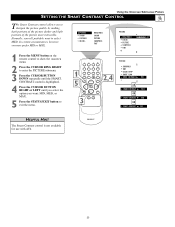
... until the SMART. PICTURE SOUND FEATURES INSTALL BRIGHTNESS COLOR PICTURE SHARPNESS TINT PICTURE BRIGHTNESS 30 COLOR PICTURE SHARPNESS TINT 1 Press the MENU button on the remote control to show the onscreen menu. 2 Press the CURSOR RING RIGHT to exit the menu. 1 5 3 2,4 PICTURE SHARPNESS TINT COLOR TEMP SMART SCAN ...ON SMART CONTRAST MIN OR SMART CONTRAST MED OR SMART CONTRAST MAX OR SMART CONTRAST OFF HELPFUL HINT The Smart Contrast control is not available for use with AV4. 23 Normally, you want to sharpen the picture quality by making dark portions of the ...
... until the SMART. PICTURE SOUND FEATURES INSTALL BRIGHTNESS COLOR PICTURE SHARPNESS TINT PICTURE BRIGHTNESS 30 COLOR PICTURE SHARPNESS TINT 1 Press the MENU button on the remote control to show the onscreen menu. 2 Press the CURSOR RING RIGHT to exit the menu. 1 5 3 2,4 PICTURE SHARPNESS TINT COLOR TEMP SMART SCAN ...ON SMART CONTRAST MIN OR SMART CONTRAST MED OR SMART CONTRAST MAX OR SMART CONTRAST OFF HELPFUL HINT The Smart Contrast control is not available for use with AV4. 23 Normally, you want to sharpen the picture quality by making dark portions of the ...
User manual, English (US)
Page 24
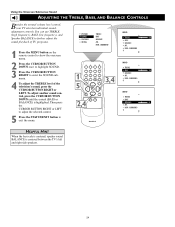
... the STATUS/EXIT button to enter the SOUND submenu. 4 To adjust the TREBLE level of TV programs. 1 Press the MENU button on the remote control to show the onscreen menu. 2 Press the CURSOR BUTTON DOWN once to highlight SOUND. 3 Press the CURSOR BUTTON RIGHT to ...SOUND TREBLE 30 BASS BALANCE AVL INCR . Using the Onscreen Submenus: Sound ADJUSTING THE TREBLE, BASS, AND BALANCE CONTROLS Besides the normal volume level control, your TV also has individual soundadjustment controls. You can use TREBLE (high frequency), BASS (low frequency), and Speaker BALANCE to further adjust the sound ...
... the STATUS/EXIT button to enter the SOUND submenu. 4 To adjust the TREBLE level of TV programs. 1 Press the MENU button on the remote control to show the onscreen menu. 2 Press the CURSOR BUTTON DOWN once to highlight SOUND. 3 Press the CURSOR BUTTON RIGHT to ...SOUND TREBLE 30 BASS BALANCE AVL INCR . Using the Onscreen Submenus: Sound ADJUSTING THE TREBLE, BASS, AND BALANCE CONTROLS Besides the normal volume level control, your TV also has individual soundadjustment controls. You can use TREBLE (high frequency), BASS (low frequency), and Speaker BALANCE to further adjust the sound ...
User manual, English (US)
Page 25
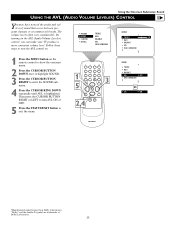
... BALANCE AVL INCR . Then press the CURSOR BUTTON RIGHT or LEFT to turn the AVL control on. PICTURE SOUND FEATURES INSTALL TREBLE BASS BALANCE AVL INCR . By turning on the remote control to show the onscreen menu. 2 Press the CURSOR BUTTON DOWN once to highlight SOUND. ... the CURSOR RING DOWN repeatedly until AVL is highlighted. SURROUND 1 Press the MENU button on the AVL (Audio Volume Leveler) control, you can make your TV produce a more consistent volume level. The volume levels often vary considerably. SURROUND OR AVL ON *Manufactured under license from Dolby ...
... BALANCE AVL INCR . Then press the CURSOR BUTTON RIGHT or LEFT to turn the AVL control on. PICTURE SOUND FEATURES INSTALL TREBLE BASS BALANCE AVL INCR . By turning on the remote control to show the onscreen menu. 2 Press the CURSOR BUTTON DOWN once to highlight SOUND. ... the CURSOR RING DOWN repeatedly until AVL is highlighted. SURROUND 1 Press the MENU button on the AVL (Audio Volume Leveler) control, you can make your TV produce a more consistent volume level. The volume levels often vary considerably. SURROUND OR AVL ON *Manufactured under license from Dolby ...
User manual, English (US)
Page 26
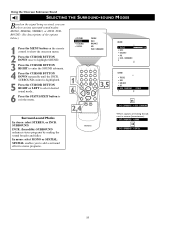
... desired sound mode.. 6 Press the STATUS/EXIT button to exit the menu. Using the Onscreen Submenus: Sound SELECTING THE SURROUND-SOUND MODES Based on the remote control to show the onscreen menu. 2 Press the CURSOR BUTTON DOWN once to highlight SOUND. 3 Press the CURSOR BUTTON RIGHT to mono programs. TREBLE BASS BALANCE...
... desired sound mode.. 6 Press the STATUS/EXIT button to exit the menu. Using the Onscreen Submenus: Sound SELECTING THE SURROUND-SOUND MODES Based on the remote control to show the onscreen menu. 2 Press the CURSOR BUTTON DOWN once to highlight SOUND. 3 Press the CURSOR BUTTON RIGHT to mono programs. TREBLE BASS BALANCE...

User manual, English (US)
Page 27
... TV. SURROUND STEREO SAP MONO OR STEREO STEREO 27 PICTURE SOUND FEATURES INSTALL TREBLE BASS BALANCE AVL INCR . SURROUND SOUND TREBLE 30 BASS BALANCE AVL INCR . It has both an amplifier and twin speakers through which stereo sound can enjoy stereo programs on the remote control ...to show the onscreen menu. 2 Press the CURSOR BUTTON DOWN once to highlight SOUND. 3 Press the CURSOR BUTTON RIGHT to enter the SOUND submenu. 4 Press the CURSOR BUTTON DOWN repeatedly until the STEREO control is highlighted. 5 Press the CURSOR...
... TV. SURROUND STEREO SAP MONO OR STEREO STEREO 27 PICTURE SOUND FEATURES INSTALL TREBLE BASS BALANCE AVL INCR . SURROUND SOUND TREBLE 30 BASS BALANCE AVL INCR . It has both an amplifier and twin speakers through which stereo sound can enjoy stereo programs on the remote control ...to show the onscreen menu. 2 Press the CURSOR BUTTON DOWN once to highlight SOUND. 3 Press the CURSOR BUTTON RIGHT to enter the SOUND submenu. 4 Press the CURSOR BUTTON DOWN repeatedly until the STEREO control is highlighted. 5 Press the CURSOR...

User manual, English (US)
Page 28
...30 BASS BALANCE AVL INCR . NOTE: SAP must be broadcast with a selected program, the SAP option cannot be heard apart from the current TV program sound. PICTURE SOUND FEATURES INSTALL TREBLE BASS BALANCE AVL INCR . Using the Onscreen Submenus: Sound SELECTING THE SAP (SECOND AUDIO PROGRAM) FEATURE SAP,...for any number of purposes, such as a third audio channel, an SAP can be selected. TV stations are watching for you to be able to select the feature. 1 Press MENU button on the remote control to show the onscreen menu. 2 Press the CURSOR RING DOWN once to highlight SOUND. 3 Press...
...30 BASS BALANCE AVL INCR . NOTE: SAP must be broadcast with a selected program, the SAP option cannot be heard apart from the current TV program sound. PICTURE SOUND FEATURES INSTALL TREBLE BASS BALANCE AVL INCR . Using the Onscreen Submenus: Sound SELECTING THE SAP (SECOND AUDIO PROGRAM) FEATURE SAP,...for any number of purposes, such as a third audio channel, an SAP can be selected. TV stations are watching for you to be able to select the feature. 1 Press MENU button on the remote control to show the onscreen menu. 2 Press the CURSOR RING DOWN once to highlight SOUND. 3 Press...
User manual, English (US)
Page 29
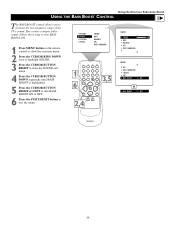
...BALANCE AVL INCR . SURROUND 1 6 2,4 3,5 SOUND AVL INCR . This creates a deeper, fuller sound. Follow these steps to turn BASS BOOST ON. 1 Press MENU button on the remote control to show the onscreen menu. 2 Press the CURSOR RING DOWN once to highlight SOUND. 3 Press the CURSOR BUTTON RIGHT to enter the SOUND submenu. 4 Press...CURSOR BUTTON RIGHT or LEFT to turn BASS BOOST ON or OFF. 6 Press the STATUS/EXIT button to increase the low-frequency range of the TV's sound. SURROUND STEREO SAP BASS BOOST ON OR BASS BOOST OFF 29 Using the Onscreen Submenus: Sound USING THE BASS BOOST...
...BALANCE AVL INCR . SURROUND 1 6 2,4 3,5 SOUND AVL INCR . This creates a deeper, fuller sound. Follow these steps to turn BASS BOOST ON. 1 Press MENU button on the remote control to show the onscreen menu. 2 Press the CURSOR RING DOWN once to highlight SOUND. 3 Press the CURSOR BUTTON RIGHT to enter the SOUND submenu. 4 Press...CURSOR BUTTON RIGHT or LEFT to turn BASS BOOST ON or OFF. 6 Press the STATUS/EXIT button to increase the low-frequency range of the TV's sound. SURROUND STEREO SAP BASS BOOST ON OR BASS BOOST OFF 29 Using the Onscreen Submenus: Sound USING THE BASS BOOST...


