
User Manual
Page 5
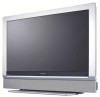
... at the back of attention to producing environmentally-friendly in product. Content Welcome/registration of your TV 2 IMPORTANT SAFETY INSTRUCTIONS 3 Precaution 4 Content 5 Preparation 6 Use of the remote control 9 Buttons on the packaging, ready, before calling the Magnavox helpline 1-800-705-2000 Model: 42MF431D/531D/521D Serial No Care of the screen See Tips...
... at the back of attention to producing environmentally-friendly in product. Content Welcome/registration of your TV 2 IMPORTANT SAFETY INSTRUCTIONS 3 Precaution 4 Content 5 Preparation 6 Use of the remote control 9 Buttons on the packaging, ready, before calling the Magnavox helpline 1-800-705-2000 Model: 42MF431D/531D/521D Serial No Care of the screen See Tips...

User Manual
Page 7
...coaxial cable (not supplied) to a connector on the signal splitter and to the CABLE/ANTENNA 75 jack on the TV. • Connect another coaxial cable (not supplied) to a connector on the signal splitter and to the cable...jack at the bottom of a cable box. Cable box with RF IN/OUT • Connect the incoming cable TV signal to the cable IN jack on the back of the cable box. • Connect a coaxial cable (...not supplied) from your cable box, first press the AV button on the remote control. • Press the cursor down or up buttons until the AV2 signal source is that don't require...
...coaxial cable (not supplied) to a connector on the signal splitter and to the CABLE/ANTENNA 75 jack on the TV. • Connect another coaxial cable (not supplied) to a connector on the signal splitter and to the cable...jack at the bottom of a cable box. Cable box with RF IN/OUT • Connect the incoming cable TV signal to the cable IN jack on the back of the cable box. • Connect a coaxial cable (...not supplied) from your cable box, first press the AV button on the remote control. • Press the cursor down or up buttons until the AV2 signal source is that don't require...

User Manual
Page 8
...regulations when disposing of depleted batteries. 6 Turn the TV on the front of the (AC) cord. See page 14 for details on the market in your digital TV set for the correct operation voltage. Never place the TV on the remote control. 8 ANTENNA CABLE CABLE OR ANTENNA 75 ANTENNA... CABLE HDMI 1 HDCMAI 2BLE OR ANTENNA 75 TO TV OUTPUT 2 IN OUT 3 Cable box - Broadcasters are ...
...regulations when disposing of depleted batteries. 6 Turn the TV on the front of the (AC) cord. See page 14 for details on the market in your digital TV set for the correct operation voltage. Never place the TV on the remote control. 8 ANTENNA CABLE CABLE OR ANTENNA 75 ANTENNA... CABLE HDMI 1 HDCMAI 2BLE OR ANTENNA 75 TO TV OUTPUT 2 IN OUT 3 Cable box - Broadcasters are ...

User Manual
Page 9
.... AV Press this button repeatedly to select AV1, AV2, AV3, HDMI1, SIDE or TV when in the Settings menu, see p. 12. To add or remove a channel in the list. Use of the remote control Note: Pressing most buttons once will be removed automatically after six seconds or press ...OK to remove immediately. MUTE Interrupt the sound or restore it is physically unplugged. Type the dot for and stored the available TV channels. OK - Color buttons When...
.... AV Press this button repeatedly to select AV1, AV2, AV3, HDMI1, SIDE or TV when in the Settings menu, see p. 12. To add or remove a channel in the list. Use of the remote control Note: Pressing most buttons once will be removed automatically after six seconds or press ...OK to remove immediately. MUTE Interrupt the sound or restore it is physically unplugged. Type the dot for and stored the available TV channels. OK - Color buttons When...
User Manual
Page 11
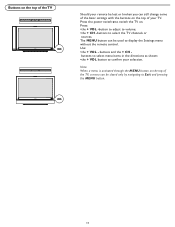
Buttons on the top of the TV Should your remote be lost or broken you can still change some of the basic settings with the buttons on the top of the TV, a menu can be closed only by navigating to Exit and pressing the MENU button. 11 Use: •the + VOL - The MENU button... or sources. Press: •the + VOL -button to adjust to volume; •the + CH -buttons to switch the TV on the top of your selection. buttons and the + CH buttons to select menu items in the directions as shown; •the + VOL button to display the Settings menu without the remote control.
Buttons on the top of the TV Should your remote be lost or broken you can still change some of the basic settings with the buttons on the top of the TV, a menu can be closed only by navigating to Exit and pressing the MENU button. 11 Use: •the + VOL - The MENU button... or sources. Press: •the + VOL -button to adjust to volume; •the + CH -buttons to switch the TV on the top of your selection. buttons and the + CH buttons to select menu items in the directions as shown; •the + VOL button to display the Settings menu without the remote control.
User Manual
Page 12
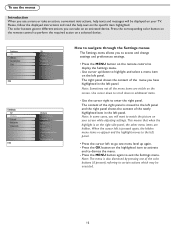
Press the corresponding color button on the remote control to exit the Settings menu. Please, follow the displayed instructions and read the help texts and messages will want to watch the picture on your TV. This means that when the highlight is on the speci...may be displayed on the remote control to enter the right panel. Settings TV Setup Installation Exit Settings TV Setup Installation Info Exit Settings TV Picture Info Sound Features Channels Settings TV Picture Sound Features Info Channels Info TV Picture Sound Features Channels TV Picture Sound Features Channels ...
Press the corresponding color button on the remote control to exit the Settings menu. Please, follow the displayed instructions and read the help texts and messages will want to watch the picture on your TV. This means that when the highlight is on the speci...may be displayed on the remote control to enter the right panel. Settings TV Setup Installation Exit Settings TV Setup Installation Info Exit Settings TV Picture Info Sound Features Channels Settings TV Picture Sound Features Info Channels Info TV Picture Sound Features Channels TV Picture Sound Features Channels ...

User Manual
Page 13
... Previous Next Select the menu language 1 Press the MENU button on the remote control. 2 Use the cursor down and press the OK button to confirm you selection. 6 Proceed with the Installation menu. When Antenna is selected, the TV will detect antenna signals and will search for the available Antenna as...
... Previous Next Select the menu language 1 Press the MENU button on the remote control. 2 Use the cursor down and press the OK button to confirm you selection. 6 Proceed with the Installation menu. When Antenna is selected, the TV will detect antenna signals and will search for the available Antenna as...
User Manual
Page 14
... is not yet in the Installation menu between Antenna or Cable whether you want to initiate an upgrade procedure from the displayed list of the TV channels is not available. Note: Digital Channel selection delay Due to the tuning complexity of a signal splitter do not forget to upload a new... software version on the remote control. How to put the switch in the channel list by red button on the www.usasupport.magnavox.com website. If the channel is not acquired, a message will attempt to tune to the ...
... is not yet in the Installation menu between Antenna or Cable whether you want to initiate an upgrade procedure from the displayed list of the TV channels is not available. Note: Digital Channel selection delay Due to the tuning complexity of a signal splitter do not forget to upload a new... software version on the remote control. How to put the switch in the channel list by red button on the www.usasupport.magnavox.com website. If the channel is not acquired, a message will attempt to tune to the ...

User Manual
Page 20
... you cycle through the various smart picture modes to find the one that Natural is the correct choice. 2 You can select. Note: This Magnavox TV has been set at the factory to select either Personal, Rich, Natural, Soft, Multimedia or Eco picture settings. Note: When you can press the ... cursor right key again to display the Settings menu. Contrast This will find that best suits your personal preference. 20 Note: Depending on the remote control to enter the Picture menu. 3 Select the menu items with the cursor up /down key. 4 Adjust the settings with the cursor right key...
... you cycle through the various smart picture modes to find the one that Natural is the correct choice. 2 You can select. Note: This Magnavox TV has been set at the factory to select either Personal, Rich, Natural, Soft, Multimedia or Eco picture settings. Note: When you can press the ... cursor right key again to display the Settings menu. Contrast This will find that best suits your personal preference. 20 Note: Depending on the remote control to enter the Picture menu. 3 Select the menu items with the cursor up /down key. 4 Adjust the settings with the cursor right key...
User Manual
Page 21
See Use of fine details in the picture. Picture format This menu item performs the same as the FORMAT button on the remote control. Select Cool to give the white colors a blue tint, Normal to give the white colors a neutral tint, Warm to select the picture 's color mix or hue. Tint Allows you to give the white colors a red tint. Color temperature This will adjust the sharpness of the remote control, p. 9. 21 Sharpness This will increase or decrease Warm (red) and Cool (blue) colors to suit personal preferences.
See Use of fine details in the picture. Picture format This menu item performs the same as the FORMAT button on the remote control. Select Cool to give the white colors a blue tint, Normal to give the white colors a neutral tint, Warm to select the picture 's color mix or hue. Tint Allows you to give the white colors a red tint. Color temperature This will adjust the sharpness of the remote control, p. 9. 21 Sharpness This will increase or decrease Warm (red) and Cool (blue) colors to suit personal preferences.

User Manual
Page 32
...cursor keys. - Side connections Camera, Camcorder, Game 1 Connect your camera, camcorder or game as shown. 2 Press the MUTE button on the remote control to the HDMI connector 1 Connect your HDMI device, turn on this connection, you can display high-definition pictures on the HDMI...With the HDMI connector you can connect HDMI Set-Top Box compatible DVD-R or DVD player with HDMI compliant consumer products. - the following TV display standards: 1920x1080i,1280x720p,720x480i or 720x480p. This is only guaranteed with HDMI, or DVI-equipped devices like a computer or other HDMI ...
...cursor keys. - Side connections Camera, Camcorder, Game 1 Connect your camera, camcorder or game as shown. 2 Press the MUTE button on the remote control to the HDMI connector 1 Connect your HDMI device, turn on this connection, you can display high-definition pictures on the HDMI...With the HDMI connector you can connect HDMI Set-Top Box compatible DVD-R or DVD player with HDMI compliant consumer products. - the following TV display standards: 1920x1080i,1280x720p,720x480i or 720x480p. This is only guaranteed with HDMI, or DVI-equipped devices like a computer or other HDMI ...

User Manual
Page 34
..., you selected the correct AV source. This may be needed due to slight differences in an improper way (e.g. E.g. Go to www.usasupport.magnavox.com to see if they are supported. keep away a wireless headphone from within a radius of accessory devices The software will need to see... seconds. Good sound but poor color or no picture Snowish picture and noise Television not responding to remote control Control of approximately four feet. If your TV. • Check if the remote control is too much heat build-up /down buttons on this user's manual. 34 This is...
..., you selected the correct AV source. This may be needed due to slight differences in an improper way (e.g. E.g. Go to www.usasupport.magnavox.com to see if they are supported. keep away a wireless headphone from within a radius of accessory devices The software will need to see... seconds. Good sound but poor color or no picture Snowish picture and noise Television not responding to remote control Control of approximately four feet. If your TV. • Check if the remote control is too much heat build-up /down buttons on this user's manual. 34 This is...


