
User manual, English (US)
Page 1
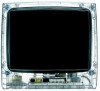
IB8468E001 If you have read your instructions and still need assistance you for quick tips that make using your Magnavox product more enjoyable. Read your User Manual first for choosing Magnavox. USER MANUAL Color Television 13MT1532 13MT1533 Thank you may access our online help fast? Need help at www.magnavox.com or call 1-800-705-2000 while with your product.
IB8468E001 If you have read your instructions and still need assistance you for quick tips that make using your Magnavox product more enjoyable. Read your User Manual first for choosing Magnavox. USER MANUAL Color Television 13MT1532 13MT1533 Thank you may access our online help fast? Need help at www.magnavox.com or call 1-800-705-2000 while with your product.
User manual, English (US)
Page 3
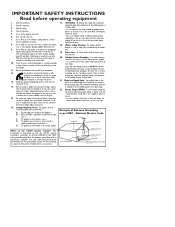
..., or has been dropped. 15. All televisions must comply with the appara- The power supply cord or the plug has been damaged; IMPORTANT SAFETY INSTRUCTIONS Read before operating equipment 1. Heed all instructions. 5. tus. Servicing is used for the grounding electrode. Wall or Ceiling Mounting - An outdoor antenna should be connected to the grounding system of the building, as close to the point of antennadischarge unit...
..., or has been dropped. 15. All televisions must comply with the appara- The power supply cord or the plug has been damaged; IMPORTANT SAFETY INSTRUCTIONS Read before operating equipment 1. Heed all instructions. 5. tus. Servicing is used for the grounding electrode. Wall or Ceiling Mounting - An outdoor antenna should be connected to the grounding system of the building, as close to the point of antennadischarge unit...
User manual, English (US)
Page 4
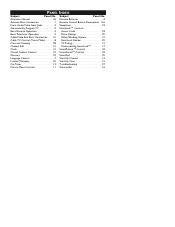
...Subject Panel No. Alternate Channel 26 Remote Batteries 4 Antenna Basic Connection 1 Remote Control Button Descriptions .5-6 Front Audio/Video Input Jacks 4 Sleeptimer 23 Automatically Program TV 9 SmartLock™ Controls Basic Remote Operation 4 Access Code 18 Basic Television Operation 4 Movie Ratings 20 Cable/Cable Box Basic Connection . . .1-2 Other Blocking Options 21 Cable TV Control (Tuner Mode 8 SmartLock Review 22 Care and Cleaning 28 TV Ratings 21 Channel Edit 10 Understanding SmartLock 17 Clock 12 SmartPicture™ Control 24 Closed Caption Control...
...Subject Panel No. Alternate Channel 26 Remote Batteries 4 Antenna Basic Connection 1 Remote Control Button Descriptions .5-6 Front Audio/Video Input Jacks 4 Sleeptimer 23 Automatically Program TV 9 SmartLock™ Controls Basic Remote Operation 4 Access Code 18 Basic Television Operation 4 Movie Ratings 20 Cable/Cable Box Basic Connection . . .1-2 Other Blocking Options 21 Cable TV Control (Tuner Mode 8 SmartLock Review 22 Care and Cleaning 28 TV Ratings 21 Channel Edit 10 Understanding SmartLock 17 Clock 12 SmartPicture™ Control 24 Closed Caption Control...
User manual, English (US)
Page 5
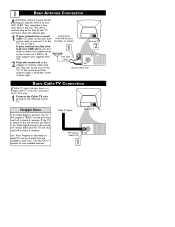
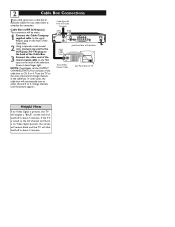
... of the TV. Use Auto Program as described on the rear of the antenna cable is easy. 1 Connect the Cable TV cable directly to connect it down tight. Go to scan available channels. 1 Basic Antenna Connection Acombination antenna receives normal broadcast channels (VHF 2-13 and UHF 14-69). Helpful Hints Cable TV Signal 75Ω Rear of the adapter or antenna cable onto the 75Ω jack on panel 9 to set up channels that are available in your antenna has flat twinlead wire...
... of the TV. Use Auto Program as described on the rear of the antenna cable is easy. 1 Connect the Cable TV cable directly to connect it down tight. Go to scan available channels. 1 Basic Antenna Connection Acombination antenna receives normal broadcast channels (VHF 2-13 and UHF 14-69). Helpful Hints Cable TV Signal 75Ω Rear of the adapter or antenna cable onto the 75Ω jack on panel 9 to set up channels that are available in your antenna has flat twinlead wire...
User manual, English (US)
Page 6
...; Jack Panel Back of TV Helpful Hints If no Video Signal is no Video Signal present, the screen will remain black and the TV will be mono. 1 Connect the Cable Company supplied cable to the signal IN(put) plug on the back of the Cable Box. 2 Using a separate round coaxial cable, connect one end to the OUT(put) (TO TV) plug on the back of the round coaxial cable to the same channel and change channels until the picture...
...; Jack Panel Back of TV Helpful Hints If no Video Signal is no Video Signal present, the screen will remain black and the TV will be mono. 1 Connect the Cable Company supplied cable to the signal IN(put) plug on the back of the Cable Box. 2 Using a separate round coaxial cable, connect one end to the OUT(put) (TO TV) plug on the back of the round coaxial cable to the same channel and change channels until the picture...
User manual, English (US)
Page 7
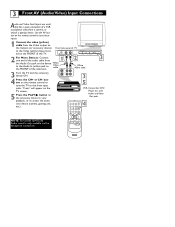
...- VOLUME + 2 For Mono Devices: Connect one end of the audio cable from the Video output on the Camera (or accessory device) Front Jack panel of the television. button on the accessory device to view playback, or to the front input jacks. "Front" will appear on the TV screen. 5 Press the PLAY ᮣ button on the remote control to tune the TV to access the accessory device (camera, gaming unit, etc.). MENU ed on Video cable...
...- VOLUME + 2 For Mono Devices: Connect one end of the audio cable from the Video output on the Camera (or accessory device) Front Jack panel of the television. button on the accessory device to view playback, or to the front input jacks. "Front" will appear on the TV screen. 5 Press the PLAY ᮣ button on the remote control to tune the TV to access the accessory device (camera, gaming unit, etc.). MENU ed on Video cable...
User manual, English (US)
Page 8
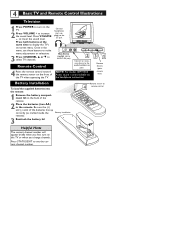
...select TV channels. 4 Basic TV and Remote Control Illustrations Television 1 Press POWER to turn on the TV or when you change channels. jack. Be sure the (+) and (-) ends of the remote. 2 Place the batteries (two AA) in the menu, use these buttons to make menu adjustments or selections. 3 Press CHANNEL ;8 or 9 to see the current channel number. the headphone connection. Connect headphones (not supplied) to lower the sound level. VOLUME + CHANNEL POWER AUDIO MENU - A/CH STATUS MENU EXIT MUTE SLEEP SURF CLOCK SMART PICTURE SOUND Helpful Hints The current channel...
...select TV channels. 4 Basic TV and Remote Control Illustrations Television 1 Press POWER to turn on the TV or when you change channels. jack. Be sure the (+) and (-) ends of the remote. 2 Place the batteries (two AA) in the menu, use these buttons to make menu adjustments or selections. 3 Press CHANNEL ;8 or 9 to see the current channel number. the headphone connection. Connect headphones (not supplied) to lower the sound level. VOLUME + CHANNEL POWER AUDIO MENU - A/CH STATUS MENU EXIT MUTE SLEEP SURF CLOCK SMART PICTURE SOUND Helpful Hints The current channel...
User manual, English (US)
Page 9
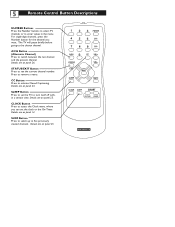
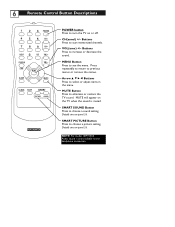
... viewed channels. SURF Button Press to select up to the chosen channel. Press to activate Closed Captioning. CC Button Press to remove a menu. Details are on panel 26. Details are on panel 23. Details are on panel 25. Details are on panel 12. 5 Remote Control Button Descriptions NUMBER Buttons Press the Number buttons to select TV channels or to turn itself off within a certain time. SLEEP Button Press to set the clock or the On-Timer. For single-digit channels, press the Number button...
... viewed channels. SURF Button Press to select up to the chosen channel. Press to activate Closed Captioning. CC Button Press to remove a menu. Details are on panel 26. Details are on panel 23. Details are on panel 25. Details are on panel 12. 5 Remote Control Button Descriptions NUMBER Buttons Press the Number buttons to select TV channels or to turn itself off within a certain time. SLEEP Button Press to set the clock or the On-Timer. For single-digit channels, press the Number button...
User manual, English (US)
Page 10
... model 13MT1533 Audio sound is muted. Press repeatedly to return to select or adjust items in the menu. Buttons Press to previous menus or remove the menus. Details are on the TV when the sound is only available via the headphone connection. CH(annel) +/- Arrow 8 9 : ; SMART PICTURE Button Press to increase or decrease the sound. Buttons Press to choose a picture setting. SMART SOUND Button Press to scan memorized channels. 6 Remote Control Button Descriptions POWER button Press to turn...
... model 13MT1533 Audio sound is muted. Press repeatedly to return to select or adjust items in the menu. Buttons Press to previous menus or remove the menus. Details are on the TV when the sound is only available via the headphone connection. CH(annel) +/- Arrow 8 9 : ; SMART PICTURE Button Press to increase or decrease the sound. Buttons Press to choose a picture setting. SMART SOUND Button Press to scan memorized channels. 6 Remote Control Button Descriptions POWER button Press to turn...

User manual, English (US)
Page 13
... SETUP menu until AUTO PROGRAM is complete, CHANNELS ARE SET will reappear briefly. 6 Press STATUS/EXIT to start scanning and memorizing channels. This makes it easy for local area (or Cable TV) channels. Connect an Antenna or Cable TV signal before starting AUTO PROGRAM. Helpful Hints Press the CH +/- 9 Auto Program (Setting TV Channels) Your TV can set itself for you to see which channels are on panels 1-2. 1 Press MENU to see CHANNEL EDIT on -screen menu. When Auto Programming is highlighted. 5 Press : to remove...
... SETUP menu until AUTO PROGRAM is complete, CHANNELS ARE SET will reappear briefly. 6 Press STATUS/EXIT to start scanning and memorizing channels. This makes it easy for local area (or Cable TV) channels. Connect an Antenna or Cable TV signal before starting AUTO PROGRAM. Helpful Hints Press the CH +/- 9 Auto Program (Setting TV Channels) Your TV can set itself for you to see which channels are on panels 1-2. 1 Press MENU to see CHANNEL EDIT on -screen menu. When Auto Programming is highlighted. 5 Press : to remove...
User manual, English (US)
Page 15
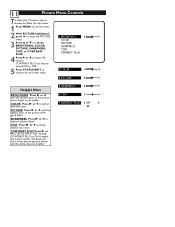
.... PICTURE Press - or ; The black portions of the picture are as bright as you prefer. CONTRAST PLUS can only be turned ON or OFF. 5 Press STATUS/EXIT to obtain natural skin tones. until the darkest parts of the picture become darker and the whites become brighter. COLOR Press - or ; to remove the on-screen menu. CONTRAST PLUS Press - 11 Picture Menu Controls T o adjust your TV picture, select a channel...
.... PICTURE Press - or ; The black portions of the picture are as bright as you prefer. CONTRAST PLUS can only be turned ON or OFF. 5 Press STATUS/EXIT to obtain natural skin tones. until the darkest parts of the picture become darker and the whites become brighter. COLOR Press - or ; to remove the on-screen menu. CONTRAST PLUS Press - 11 Picture Menu Controls T o adjust your TV picture, select a channel...

User manual, English (US)
Page 19
to set TIMER ACTIVE to display the Clock menu. 2 Press 9 until START TIME is a single digit, first enter a zero, then the digit (i.e., press "0," then press "8"). 5 4 Press : or ; Helpful Hint Remember to set AM or PM. 5 Press STATUS/EXIT to remove the on panel 13. Details are on -screen menu. If the first number is highlighted. 3 Enter the time to turn itself on when TIMER ACTIVE is ON. 1 Press CLOCK to ON. 15 Start-Up Time Used with the Timer feature, you can select a specific time at which the TV will turn on the TV using the Number buttons.
to set TIMER ACTIVE to display the Clock menu. 2 Press 9 until START TIME is a single digit, first enter a zero, then the digit (i.e., press "0," then press "8"). 5 4 Press : or ; Helpful Hint Remember to set AM or PM. 5 Press STATUS/EXIT to remove the on panel 13. Details are on -screen menu. If the first number is highlighted. 3 Enter the time to turn itself on when TIMER ACTIVE is ON. 1 Press CLOCK to ON. 15 Start-Up Time Used with the Timer feature, you can select a specific time at which the TV will turn on the TV using the Number buttons.
User manual, English (US)
Page 20
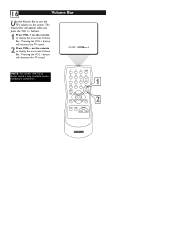
button will increase the TV sound. 2 Press VOL - Pressing the VOL - on the remote to display the on -screen Volume Bar. buttons. 1 Press VOL + on the remote to see the TV's volume on the screen. Pressing the VOL + button will decrease the TV sound. NOTE: For model 13MT1533 Audio sound is only available via the headphone connection. 16 Volume Bar Use the Volume Bar to display the on -screen Volume Bar. The Volume Bar will appear when you press the VOL +/-
button will increase the TV sound. 2 Press VOL - Pressing the VOL - on the remote to display the on -screen Volume Bar. buttons. 1 Press VOL + on the remote to see the TV's volume on the screen. Pressing the VOL + button will decrease the TV sound. NOTE: For model 13MT1533 Audio sound is only available via the headphone connection. 16 Volume Bar Use the Volume Bar to display the on -screen Volume Bar. The Volume Bar will appear when you press the VOL +/-
User manual, English (US)
Page 21
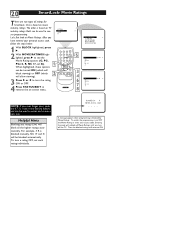
... and reality. TV-G -- MOVIE RATINGS G: General Audience - This is programming is specifically designed to censor the type of programming should only view this program suitable for all channels being blocked from which will be set to choose: Access Code - NC-17: No one or more of America. This program is specifically designed for children under the age of 17 will block programming based on ratings...
... and reality. TV-G -- MOVIE RATINGS G: General Audience - This is programming is specifically designed to censor the type of programming should only view this program suitable for all channels being blocked from which will be set to choose: Access Code - NC-17: No one or more of America. This program is specifically designed for children under the age of 17 will block programming based on ratings...
User manual, English (US)
Page 23
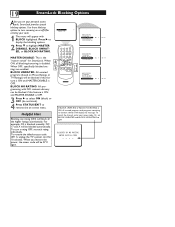
... display the blocking options. 2 Press 9 to OFF. When you set your personal access code, SmartLock provides special blocking options. When OFF, specifically blocked settings are enabled. To turn censoring on or off.After entering your access code. Or, set each rating individually. Helpful Hint Blocking any rating (ON) will block all the higher ratings automatically. BLOCK UNRATED: All unrated programs (based on -screen menu. Use these...
... display the blocking options. 2 Press 9 to OFF. When you set your personal access code, SmartLock provides special blocking options. When OFF, specifically blocked settings are enabled. To turn censoring on or off.After entering your access code. Or, set each rating individually. Helpful Hint Blocking any rating (ON) will block all the higher ratings automatically. BLOCK UNRATED: All unrated programs (based on -screen menu. Use these...
User manual, English (US)
Page 24
... are two types of ratings for SmartLock. Let's first look at Movie Ratings. Helpful Hints Blocking any rating (ON) will reset to remove the on-screen menu. 9 EXIT NOTE: If you have entered your code, the 0,7,1,1 code is based on movie industry ratings. For example, if R is based on TV industry ratings. To turn OFF the Movie Rating or enter your access code. Then...
... are two types of ratings for SmartLock. Let's first look at Movie Ratings. Helpful Hints Blocking any rating (ON) will reset to remove the on-screen menu. 9 EXIT NOTE: If you have entered your code, the 0,7,1,1 code is based on movie industry ratings. For example, if R is based on TV industry ratings. To turn OFF the Movie Rating or enter your access code. Then...
User manual, English (US)
Page 28
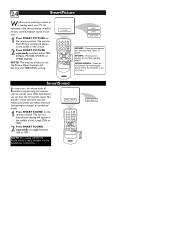
... TV has automatic video control settings matched for watching Video Tapes, or DVDs. Preset picture options for your PERSONAL setting. 1 2 3 POWER 4 5 6 CH 7 8 9 CH A/CH 0 CC VOL STATUS VOL EXIT SLEEP CLOCK MENU 1 2 MUTE SURF SMART PICTURE SOUND MOVIES - Preset picture options for watching programs where the reception is only available via the headphone connection. The current SmartPicture setting will appear in the middle of the screen. 2 Press SMART PICTURE repeatedly...
... TV has automatic video control settings matched for watching Video Tapes, or DVDs. Preset picture options for your PERSONAL setting. 1 2 3 POWER 4 5 6 CH 7 8 9 CH A/CH 0 CC VOL STATUS VOL EXIT SLEEP CLOCK MENU 1 2 MUTE SURF SMART PICTURE SOUND MOVIES - Preset picture options for watching programs where the reception is only available via the headphone connection. The current SmartPicture setting will appear in the middle of the screen. 2 Press SMART PICTURE repeatedly...

User manual, English (US)
Page 31
...- For model 13MT1433/17, coonect up auxiliary equipment, check the audio jack connections located on a wall switch. If necessary, replace them with 2 AA Heavy Duty (Zinc Chloride) or Alkaline batteries. •Clean the remote control and the remote control sensor window on page Your SmartLock Access Code Does Not Work •You can use the default code if you 're attempting to find all available channels. Unplug the TV...
...- For model 13MT1433/17, coonect up auxiliary equipment, check the audio jack connections located on a wall switch. If necessary, replace them with 2 AA Heavy Duty (Zinc Chloride) or Alkaline batteries. •Clean the remote control and the remote control sensor window on page Your SmartLock Access Code Does Not Work •You can use the default code if you 're attempting to find all available channels. Unplug the TV...
User manual, English (US)
Page 32
..., be DVD disks, laser disks, video games, CD-i disks, videotapes, digital television boxes, broadcast channels, cable channels, satellite channels, and others in your viewing): • DVD menus-listings of DVD disk content • Letterbox black bars-shown at the bottom of the TV screen • Shopping channel logos and pricing displays-bright and shown constantly or repeatedly in direct sunlight or near the cabinet, as they are bright and stationary; Use even...
..., be DVD disks, laser disks, video games, CD-i disks, videotapes, digital television boxes, broadcast channels, cable channels, satellite channels, and others in your viewing): • DVD menus-listings of DVD disk content • Letterbox black bars-shown at the bottom of the TV screen • Shopping channel logos and pricing displays-bright and shown constantly or repeatedly in direct sunlight or near the cabinet, as they are bright and stationary; Use even...
User manual, English (US)
Page 33
... higher picture resolution and offer sound connection options. Designed for the two-strand, 300 Ohm antenna wire used name for use with specific feature controls (color adjustment, programming, etc.). Designed to help the user with VCRs (or other accessories) in order to help the hearing impaired, this type of antenna wire requires an additional adapter (or balun) in progress. Programming • Adding or deleting channel numbers into the Television's memory. The TV remembers...
... higher picture resolution and offer sound connection options. Designed for the two-strand, 300 Ohm antenna wire used name for use with specific feature controls (color adjustment, programming, etc.). Designed to help the user with VCRs (or other accessories) in order to help the hearing impaired, this type of antenna wire requires an additional adapter (or balun) in progress. Programming • Adding or deleting channel numbers into the Television's memory. The TV remembers...


