User Manual
Page 1
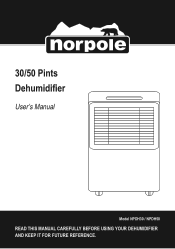
30/50 Pints User's Manual Model NPDH30 / NPDH50 READ THIS MANUAL CAREFULLY BEFORE USING YOUR DEHUMIDIFIER AND KEEP IT FOR FUTURE REFERENCE. 1
30/50 Pints User's Manual Model NPDH30 / NPDH50 READ THIS MANUAL CAREFULLY BEFORE USING YOUR DEHUMIDIFIER AND KEEP IT FOR FUTURE REFERENCE. 1
User Manual
Page 2
... purchasing a Norpole™ product. The first step to protect your product will allow us to complete the product registration on our website: www.mcappliance.com/register. Registering your product could act as your product include the following: 1. Registering your new product is required. 3. Once again, thank you for more efficient warranty service processing when warranty service is to contact you...
... purchasing a Norpole™ product. The first step to protect your product will allow us to complete the product registration on our website: www.mcappliance.com/register. Registering your product could act as your product include the following: 1. Registering your new product is required. 3. Once again, thank you for more efficient warranty service processing when warranty service is to contact you...
User Manual
Page 3
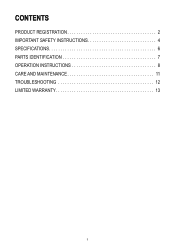
CONTENTS PRODUCT REGISTRATION 2 IMPORTANT SAFETY INSTRUCTIONS 4 SPECIFICATIONS 6 PARTS IDENTIFICATION 7 OPERATION INSTRUCTIONS 8 CARE AND MAINTENANCE 11 TROUBLESHOOTING 12 LIMITED WARRANTY 13 3
CONTENTS PRODUCT REGISTRATION 2 IMPORTANT SAFETY INSTRUCTIONS 4 SPECIFICATIONS 6 PARTS IDENTIFICATION 7 OPERATION INSTRUCTIONS 8 CARE AND MAINTENANCE 11 TROUBLESHOOTING 12 LIMITED WARRANTY 13 3
User Manual
Page 4
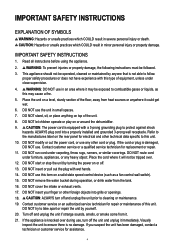
... other technical data specific to the manufactures label on or around the dehumidifier. 9. DO NOT remove the water bucket during use any heavy object. CAUTION: ALWAYS turn off and unplug the unit prior to combustible gases or liquids, as a fan control wall switch). 15. If you suspect the unit has been damaged, contact a technician or customer service for replacement or repair. 11. DO NOT...
... other technical data specific to the manufactures label on or around the dehumidifier. 9. DO NOT remove the water bucket during use any heavy object. CAUTION: ALWAYS turn off and unplug the unit prior to combustible gases or liquids, as a fan control wall switch). 15. If you suspect the unit has been damaged, contact a technician or customer service for replacement or repair. 11. DO NOT...
User Manual
Page 5
Clean filter once every two weeks. If water spills into the unit, turn it off, unplug it, and contact a qualified service technician. 23. Doing so may cause the unit to roll on carpet. ALWAYS insert the filters securely. READ AND FOLLOW THIS SAFETY INFORMATION CAREFULLY SAVE THESE INSTRUCTIONS 5 DO NOT try to move the unit when the tank is full, or force the castors to tip over and spill water. 24. 22.
Clean filter once every two weeks. If water spills into the unit, turn it off, unplug it, and contact a qualified service technician. 23. Doing so may cause the unit to roll on carpet. ALWAYS insert the filters securely. READ AND FOLLOW THIS SAFETY INFORMATION CAREFULLY SAVE THESE INSTRUCTIONS 5 DO NOT try to move the unit when the tank is full, or force the castors to tip over and spill water. 24. 22.
User Manual
Page 7
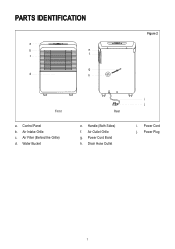
Air Filter (Behind the Grille) d. PartS Identification Figure 2 a b e c f g d h Front a. Handle (Both Sides) f. Power Cord j. Drain Hose Outlet i j i. Power Plug 7 Control Panel b. Air Intake Grille c. Water Bucket Rear e. Air Outlet Grille g. Power Cord Band h.
Air Filter (Behind the Grille) d. PartS Identification Figure 2 a b e c f g d h Front a. Handle (Both Sides) f. Power Cord j. Drain Hose Outlet i j i. Power Plug 7 Control Panel b. Air Intake Grille c. Water Bucket Rear e. Air Outlet Grille g. Power Cord Band h.
User Manual
Page 8
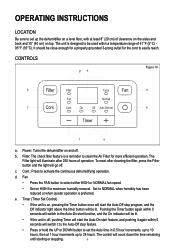
... On indicator will be used within 5 seconds will count down the time remaining until starting or stopping. 8 Cont.: Press to clean the Air Filter for the cord to easily reach. Set to NORMAL when humidity has been reduced or when quieter operation is off . The control will switch it to the Auto-Off stop program, and the Off indicator light above the timer button will be close...
... On indicator will be used within 5 seconds will count down the time remaining until starting or stopping. 8 Cont.: Press to clean the Air Filter for the cord to easily reach. Set to NORMAL when humidity has been reduced or when quieter operation is off . The control will switch it to the Auto-Off stop program, and the Off indicator light above the timer button will be close...
User Manual
Page 9
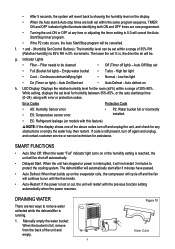
... the humidity level on the display. • When the Auto start after 3 minutes have passed. • Auto Defrost: When frost builds up on the evaporator coils, the compressor will cycle off and the fan will continue to run until the frost melts. • Auto-Restart: If the power is lost or cut, the unit will restart with error or protection codes. f. + and - (Humidity Set Control Buttons): The humidity level can be cleaned • Off (Timer...
... the humidity level on the display. • When the Auto start after 3 minutes have passed. • Auto Defrost: When frost builds up on the evaporator coils, the compressor will cycle off and the fan will continue to run until the frost melts. • Auto-Restart: If the power is lost or cut, the unit will restart with error or protection codes. f. + and - (Humidity Set Control Buttons): The humidity level can be cleaned • Off (Timer...
User Manual
Page 10
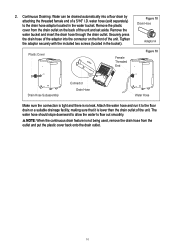
... 10 Drain Hose Adaptor A Figure 10 Drain Hose Subassembly Connector Drain Hose Water Hose Make sure the connection is tight and there is not being used, remove the drain hose from the drain outlet on the front of a 5/16" I.D. Remove the plastic cover from the outlet and put the plastic cover back onto the drain outlet. 10 Attach the water hose and run it to flow out smoothly. Remove the water bucket and insert the drain hose through the drain...
... 10 Drain Hose Adaptor A Figure 10 Drain Hose Subassembly Connector Drain Hose Water Hose Make sure the connection is tight and there is not being used, remove the drain hose from the drain outlet on the front of a 5/16" I.D. Remove the plastic cover from the outlet and put the plastic cover back onto the drain outlet. 10 Attach the water hose and run it to flow out smoothly. Remove the water bucket and insert the drain hose through the drain...

User Manual
Page 11
...: DO NOT operate the dehumidifier without the filter as dirt, dust and lint will clog it to ensure complete water drainage. Clean the Air Filters Clean the air filter with the power cord band on the rear of the unit, and clean the water bucket and filter. Wipe down from the wall outlet before emptying the water bucket or removing drain hose to sit for long periods, turn off and remove the plug from...
...: DO NOT operate the dehumidifier without the filter as dirt, dust and lint will clog it to ensure complete water drainage. Clean the Air Filters Clean the air filter with the power cord band on the rear of the unit, and clean the water bucket and filter. Wipe down from the wall outlet before emptying the water bucket or removing drain hose to sit for long periods, turn off and remove the plug from...
User Manual
Page 12
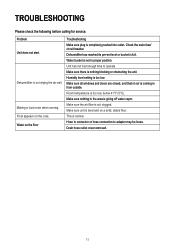
... pre-set level or bucket is coming in proper position. Make sure nothing blocking or obstructing the unit. Make sure the air filter is giving off water vapor. Room temperature is normal Hose to connector or hose connection to operate Make sure there is not drying the air well. Making a loud noise when running Frost appears on the floor Troubleshooting Make sure plug is too low. Check the main fuse/ circuit breaker...
... pre-set level or bucket is coming in proper position. Make sure nothing blocking or obstructing the unit. Make sure the air filter is giving off water vapor. Room temperature is normal Hose to connector or hose connection to operate Make sure there is not drying the air well. Making a loud noise when running Frost appears on the floor Troubleshooting Make sure plug is too low. Check the main fuse/ circuit breaker...
User Manual
Page 13
...; This warranty is responsible for non-repairable products are covered on proper use within the contiguous United States, Alaska, Hawaii and Puerto Rico. Any and all labor and transportation expenses related to perform as instructions on this warranty, the consumer is non-transferable. Model NPDH30 NPDH50 Parts &Labor One-Year Compressor (Part Only) Five Years Type of Service Carry In For Service or Assistance...
...; This warranty is responsible for non-repairable products are covered on proper use within the contiguous United States, Alaska, Hawaii and Puerto Rico. Any and all labor and transportation expenses related to perform as instructions on this warranty, the consumer is non-transferable. Model NPDH30 NPDH50 Parts &Labor One-Year Compressor (Part Only) Five Years Type of Service Carry In For Service or Assistance...