User Manual
Page 1
NORPOLE Commercial Undercounter Ice Maker User's Manual Models: NPCIM90B, NPCIM120H, NPCIM160H, NPCIM210, NPCIM280 READ THIS MANUAL CAREFULLY BEFORE USING YOUR COMMERCIAL ICE MAKER AND KEEP IT FOR FUTURE REFERENCE.
NORPOLE Commercial Undercounter Ice Maker User's Manual Models: NPCIM90B, NPCIM120H, NPCIM160H, NPCIM210, NPCIM280 READ THIS MANUAL CAREFULLY BEFORE USING YOUR COMMERCIAL ICE MAKER AND KEEP IT FOR FUTURE REFERENCE.
User Manual
Page 2
... your proof of purchase in the event of insurance loss. Registering your new product is required. 3. NORPOLE PRODUCT REGISTRATION Thank you for more efficient warranty service processing when warranty service is to contact you for purchasing a Norpole Commercial product. 2 The first step to protect your product will allow for purchasing a Norpole Commercial product. Once...
... your proof of purchase in the event of insurance loss. Registering your new product is required. 3. NORPOLE PRODUCT REGISTRATION Thank you for more efficient warranty service processing when warranty service is to contact you for purchasing a Norpole Commercial product. 2 The first step to protect your product will allow for purchasing a Norpole Commercial product. Once...
User Manual
Page 3
TABLE OF CONTENTS REGISTRATION ...2 IMPORTANT INFORMATION ...4 IMPORANT SAFETY INSTRUCTIONS ...5 SPECIFICATIONS...7 INSTALLATION INSTRUCTIONS...8 OPERATION INSTRUCTIONS...10 CARE AND MAINTENANCE...12 TROUBLESHOOTING ...14 WARRANTY ...16 3
TABLE OF CONTENTS REGISTRATION ...2 IMPORTANT INFORMATION ...4 IMPORANT SAFETY INSTRUCTIONS ...5 SPECIFICATIONS...7 INSTALLATION INSTRUCTIONS...8 OPERATION INSTRUCTIONS...10 CARE AND MAINTENANCE...12 TROUBLESHOOTING ...14 WARRANTY ...16 3
User Manual
Page 4
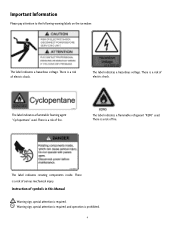
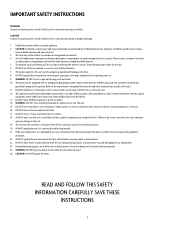
... Please pay attention to the following warning labels on the ice maker: The label indicates a hazardous voltage. The label indicates a flammable foaming agent "Cyclopentane" used . There is a risk of fire. The label indicates... a hazardous voltage. There is a risk of electric shock. The label indicates a flammable refrigerant "R290" used . The label indicates rotating components inside. There is a risk of fire. There is a risk of symbols in this Manual Warning sign, special attention is prohibited. 4 Instruction...
... Please pay attention to the following warning labels on the ice maker: The label indicates a hazardous voltage. The label indicates a flammable foaming agent "Cyclopentane" used . There is a risk of fire. The label indicates... a hazardous voltage. There is a risk of electric shock. The label indicates a flammable refrigerant "R290" used . The label indicates rotating components inside. There is a risk of fire. There is a risk of symbols in this Manual Warning sign, special attention is prohibited. 4 Instruction...
User Manual
Page 5
... for the unit. 6. The power cord is not being used for any objects into a properly installed and grounded 3-prong wall receptacle. DO NOT connect the ice maker to overload the outlet or circuit. ALWAYS unplug the unit and remove all instructions before cleaning, repair, or maintenance. 23. Be sure to a gas pipe, water pipe, telephone line or lightning rods, etc...
... for the unit. 6. The power cord is not being used for any objects into a properly installed and grounded 3-prong wall receptacle. DO NOT connect the ice maker to overload the outlet or circuit. ALWAYS unplug the unit and remove all instructions before cleaning, repair, or maintenance. 23. Be sure to a gas pipe, water pipe, telephone line or lightning rods, etc...
User Manual
Page 6
... HANDLING INSTRUCTIONS CAREFULLY. General The ice machine is not intended for used at home. 6 FLAMMABLE REFRIGERANT USED. RISK OF FIRE OR EXPLOSION. DISPOSE OF PROPERLY IN ACCORDANCE WITH FEDERAL OR LOCAL REGULATIONS. FLAMMABLE REFRIGERANT USED. With proper installation and connection to potable water and power source, the ice making will automatically stop. DO NOT USE MECHANICAL DEVICES TO DEFROST REFRIGERATOR. CONSULT REPAIR MANUAL/OWNER'S GUIDE BEFORE ATTEMPTING TO SERVICE THIS PRODUCT...
... HANDLING INSTRUCTIONS CAREFULLY. General The ice machine is not intended for used at home. 6 FLAMMABLE REFRIGERANT USED. RISK OF FIRE OR EXPLOSION. DISPOSE OF PROPERLY IN ACCORDANCE WITH FEDERAL OR LOCAL REGULATIONS. FLAMMABLE REFRIGERANT USED. With proper installation and connection to potable water and power source, the ice making will automatically stop. DO NOT USE MECHANICAL DEVICES TO DEFROST REFRIGERATOR. CONSULT REPAIR MANUAL/OWNER'S GUIDE BEFORE ATTEMPTING TO SERVICE THIS PRODUCT...

User Manual
Page 7
... Model NPCIM90B NPCIM120H NPCIM160H NPCIM210 NPCIM280 Dimensions (LxWxH) Inches (mm) 14.8" x 22.6" x 30.0" (375 × 575 × 762 mm) 19.7" x 23.2" x 33.5" (500 x 590 x 850 mm) 26.0" x 27.0" x 38.2" (660 x 685 x 970 mm) 26.0" x 27.0" x 38.2" (660 x 685 x 970 mm) 26.0" x 27.0" x 38.2" (660 x 685 x 970 mm) Ice Making Capacity 90 lbs. (41 kg)/ 24 hr Bin...
... Model NPCIM90B NPCIM120H NPCIM160H NPCIM210 NPCIM280 Dimensions (LxWxH) Inches (mm) 14.8" x 22.6" x 30.0" (375 × 575 × 762 mm) 19.7" x 23.2" x 33.5" (500 x 590 x 850 mm) 26.0" x 27.0" x 38.2" (660 x 685 x 970 mm) 26.0" x 27.0" x 38.2" (660 x 685 x 970 mm) 26.0" x 27.0" x 38.2" (660 x 685 x 970 mm) Ice Making Capacity 90 lbs. (41 kg)/ 24 hr Bin...

User Manual
Page 8
... the requirements listed on the machine nameplate. • Water source: potable water, with water pressure from 1.3 Bar to support its weight when filled with water or ice. • The electrical outlet for the ice maker must be placed on a floor sufficient to 5.5 Bar; water temperature: 40° - 95°F (5-35°C). INSTALLATION SCHEMATIC 8 INSTALLATION CAUTION: Read all instructions before installing INSTALLATION LOCATION The ice maker should not be used in...
... the requirements listed on the machine nameplate. • Water source: potable water, with water pressure from 1.3 Bar to support its weight when filled with water or ice. • The electrical outlet for the ice maker must be placed on a floor sufficient to 5.5 Bar; water temperature: 40° - 95°F (5-35°C). INSTALLATION SCHEMATIC 8 INSTALLATION CAUTION: Read all instructions before installing INSTALLATION LOCATION The ice maker should not be used in...
User Manual
Page 9
... be replaced every month to every 3 months. 8. NOTE: Make sure to be needed. Generally, it needs to install the filter so the water is running. Clean the ice ice bin and the food area inside with an inlet water filter. Place the ice machine in it with the machine. So as the the machine is flowing in warm water and soda. Connect the machine's inlet water filter and water pipe referring to make sure the ice maker...
... be replaced every month to every 3 months. 8. NOTE: Make sure to be needed. Generally, it needs to install the filter so the water is running. Clean the ice ice bin and the food area inside with an inlet water filter. Place the ice machine in it with the machine. So as the the machine is flowing in warm water and soda. Connect the machine's inlet water filter and water pipe referring to make sure the ice maker...
User Manual
Page 10
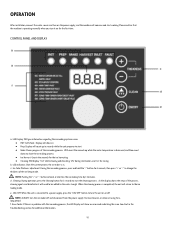
... the Troubleshooting section for 3 seconds to the ice making process, press and hold the "-" button for a long period. ON/OFF: When the unit is completed, the unit will return to start working. Ice Cube Thickness adjustment: During the ice making mode. OPERATION After installation, connect the water source and turn on the power supply, and the machine will come on and start the cleaning process...
... the Troubleshooting section for 3 seconds to the ice making process, press and hold the "-" button for a long period. ON/OFF: When the unit is completed, the unit will return to start working. Ice Cube Thickness adjustment: During the ice making mode. OPERATION After installation, connect the water source and turn on the power supply, and the machine will come on and start the cleaning process...

User Manual
Page 11
... the bin is in the Harvest cycle when the defrost valve turns on the evaporator. ● The compressor is running normally, the temperature of the water. Water then flows over the evaporator to the power supply outlet and the unit's power switch is clear, the ice making process will automatically begin making water is gradually decreasing. ● For air cooled machines, verify the...
... the bin is in the Harvest cycle when the defrost valve turns on the evaporator. ● The compressor is running normally, the temperature of the water. Water then flows over the evaporator to the power supply outlet and the unit's power switch is clear, the ice making process will automatically begin making water is gradually decreasing. ● For air cooled machines, verify the...
User Manual
Page 12
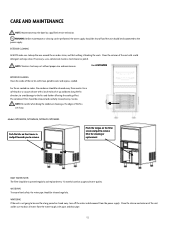
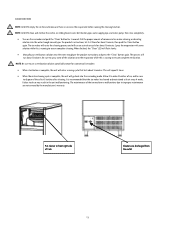
... used for cleaning or replacement. NOTE: Stainless steel may rust without proper care and maintenance. If necessary, use a commercial stainless steel cleaner or polish. The condenser filter should be done by a qualified service technician. EXTERIOR CLEANING ALWAYS make sure to keep the area around the ice maker clean, and that nothing is not going to be disconnected to drain all water from the power...
... used for cleaning or replacement. NOTE: Stainless steel may rust without proper care and maintenance. If necessary, use a commercial stainless steel cleaner or polish. The condenser filter should be done by a qualified service technician. EXTERIOR CLEANING ALWAYS make sure to keep the area around the ice maker clean, and that nothing is not going to be disconnected to drain all water from the power...
User Manual
Page 13
... of the ice machine or malfunctions due to dispose of ice, and be cleaned and maintained at least every 4 weeks. Put cleaner in the unit malfunctioning. NOTE: ALWAYS clean and sterilize the ice bin, ice sliding board, water distribution pipe, water supply pipe, and water pump, then rinse completely. • Turn on the evaporator before running to use a sterilization solution specifically meant for commercial ice makers •...
... of the ice machine or malfunctions due to dispose of ice, and be cleaned and maintained at least every 4 weeks. Put cleaner in the unit malfunctioning. NOTE: ALWAYS clean and sterilize the ice bin, ice sliding board, water distribution pipe, water supply pipe, and water pump, then rinse completely. • Turn on the evaporator before running to use a sterilization solution specifically meant for commercial ice makers •...
User Manual
Page 14
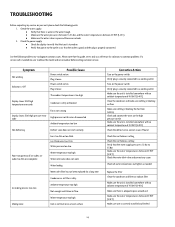
... valve, correct issues if found Check the ice thickness setting Check the ice thickness setting Verify that this guide serves only as needed , be sure to obtain the model and serial number before calling customer service. ice cubes too thin or incomplete Water temperature too high Water inlet valve does not work Water leaking Water inlet filter has not been replaced for solutions to common problems. If a service call is needed Replace the filter Clean the condenser and filter or replace filter Make...
... valve, correct issues if found Check the ice thickness setting Check the ice thickness setting Verify that this guide serves only as needed , be sure to obtain the model and serial number before calling customer service. ice cubes too thin or incomplete Water temperature too high Water inlet valve does not work Water leaking Water inlet filter has not been replaced for solutions to common problems. If a service call is needed Replace the filter Clean the condenser and filter or replace filter Make...
User Manual
Page 15
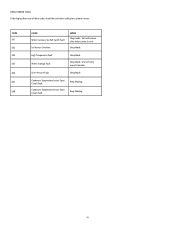
Unit will recover after water curtain is reset. CODE E01 E03 E04 E05 E06 E07 E08 CAUSE Water Curtain or Ice Full Switch Fault Ice Harvest Overtime MODE Sleep mode. Over-Pressure Fault Sleep Mode Condenser Temperature Sensor Open Circuit Fault Condenser Temperature Sensor Short Circuit Fault Keep Working Keep Working 15 Unit will retry every 30 minutes. Sleep Mode High Temperature Fault Water Shortage Fault Sleep Mode Sleep Mode. DISPLAY ERROR CODES If the display shows any of these codes, check the unit before calling for customer service.
Unit will recover after water curtain is reset. CODE E01 E03 E04 E05 E06 E07 E08 CAUSE Water Curtain or Ice Full Switch Fault Ice Harvest Overtime MODE Sleep mode. Over-Pressure Fault Sleep Mode Condenser Temperature Sensor Open Circuit Fault Condenser Temperature Sensor Short Circuit Fault Keep Working Keep Working 15 Unit will retry every 30 minutes. Sleep Mode High Temperature Fault Water Shortage Fault Sleep Mode Sleep Mode. DISPLAY ERROR CODES If the display shows any of these codes, check the unit before calling for customer service.

User Manual
Page 16
... to receiving a replacement unit or refund. Model NPCIM90B,NPCIM120H, NPCIM160H,NPCIM210, NPCIM280 Parts &Labor 1 Year Compressor (Part Only) 5 Years Type of Service In-Field For Service or Assistance please call 888-775-0202 or visit us any part(s) of 5 years. warrants the compressor (parts only) to be free from defects in accordance with published installation instructions. ● Refunds for non-repairable products are limited...
... to receiving a replacement unit or refund. Model NPCIM90B,NPCIM120H, NPCIM160H,NPCIM210, NPCIM280 Parts &Labor 1 Year Compressor (Part Only) 5 Years Type of Service In-Field For Service or Assistance please call 888-775-0202 or visit us any part(s) of 5 years. warrants the compressor (parts only) to be free from defects in accordance with published installation instructions. ● Refunds for non-repairable products are limited...

