
User Manual
Page 1
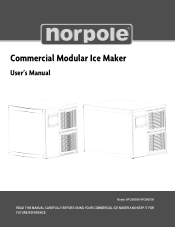
NORPOLE Commercial Modular Ice Maker User's Manual Models: NPCIM350M NPCIM500M READ THIS MANUAL CAREFULLY BEFORE USING YOUR COMMERCIAL ICE MAKER AND KEEP IT FOR FUTURE REFERENCE.
NORPOLE Commercial Modular Ice Maker User's Manual Models: NPCIM350M NPCIM500M READ THIS MANUAL CAREFULLY BEFORE USING YOUR COMMERCIAL ICE MAKER AND KEEP IT FOR FUTURE REFERENCE.

User Manual
Page 2
... in the event of registering your product will allow us to contact you regarding a safety notification or product update. 2. Registering your product could act as your product will allow for more efficient warranty service processing when warranty service is to protect your new product is required. 3. The first step to complete the product registration on...
... in the event of registering your product will allow us to contact you regarding a safety notification or product update. 2. Registering your product could act as your product will allow for more efficient warranty service processing when warranty service is to protect your new product is required. 3. The first step to complete the product registration on...

User Manual
Page 3
TABLE OF CONTENTS REGISTRATION ...2 IMPORTANT INFORMATION ...4 IMPORANT SAFETY INSTRUCTIONS ...5 SPECIFICATIONS...7 INSTALLATION INSTRUCTIONS...8 OPERATION INSTRUCTIONS...10 CARE AND MAINTENANCE...12 TROUBLESHOOTING ...14 WARRANTY ...16 3
TABLE OF CONTENTS REGISTRATION ...2 IMPORTANT INFORMATION ...4 IMPORANT SAFETY INSTRUCTIONS ...5 SPECIFICATIONS...7 INSTALLATION INSTRUCTIONS...8 OPERATION INSTRUCTIONS...10 CARE AND MAINTENANCE...12 TROUBLESHOOTING ...14 WARRANTY ...16 3
User Manual
Page 4
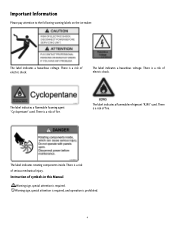
There is a risk of symbols in this Manual Warning sign, special attention is a risk of fire. The label indicates a flammable refrigerant "R290" used . The label indicates rotating components inside. Instruction of fire. There is required. There is a risk of serious mechanical injury. ...hazardous voltage. Important Information Please pay attention to the following warning labels on the ice maker: The label indicates a hazardous voltage. The label indicates a flammable foaming agent "Cyclopentane" used . There is a risk of electric shock. There is prohibited. 4
There is a risk of symbols in this Manual Warning sign, special attention is a risk of fire. The label indicates a flammable refrigerant "R290" used . The label indicates rotating components inside. Instruction of fire. There is required. There is a risk of serious mechanical injury. ...hazardous voltage. Important Information Please pay attention to the following warning labels on the ice maker: The label indicates a hazardous voltage. The label indicates a flammable foaming agent "Cyclopentane" used . There is a risk of electric shock. There is prohibited. 4

User Manual
Page 5
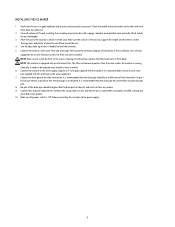
... onto the unit during cleaning, repair, or maintenance to overload the outlet or circuit. DO NOT connect the ice maker to play in the unit. 16. DO NOT store or freeze any way, immediately turn off and disconnect the power, and have experience with wet hands. 10. Read all water and ice before using the appliance. 2. Improper installation could result in...
... onto the unit during cleaning, repair, or maintenance to overload the outlet or circuit. DO NOT connect the ice maker to play in the unit. 16. DO NOT store or freeze any way, immediately turn off and disconnect the power, and have experience with wet hands. 10. Read all water and ice before using the appliance. 2. Improper installation could result in...
User Manual
Page 6
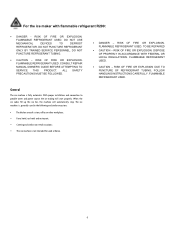
... - FLAMMABLE REFRIGERANT USED. RISK OF FIRE OR EXPLOSION. ALL SAFETY PRECAUTIONS MUST BE FOLLOWED. • DANGER - CONSULT REPAIR MANUAL/OWNER'S GUIDE BEFORE ATTEMPTING TO SERVICE THIS PRODUCT. With proper installation and connection to potable water and power source, the ice making will automatically stop. FLAMMABLE REFRIGERANT USED. • CAUTION - FLAMMABLE REFRIGERANT USED. DO NOT PUNCTURE REFRIGERANT TUBING. • CAUTION - FOLLOW HANDLING INSTRUCTIONS CAREFULLY. When the ice cubes fill up the ice bin, the machine will...
... - FLAMMABLE REFRIGERANT USED. RISK OF FIRE OR EXPLOSION. ALL SAFETY PRECAUTIONS MUST BE FOLLOWED. • DANGER - CONSULT REPAIR MANUAL/OWNER'S GUIDE BEFORE ATTEMPTING TO SERVICE THIS PRODUCT. With proper installation and connection to potable water and power source, the ice making will automatically stop. FLAMMABLE REFRIGERANT USED. • CAUTION - FLAMMABLE REFRIGERANT USED. DO NOT PUNCTURE REFRIGERANT TUBING. • CAUTION - FOLLOW HANDLING INSTRUCTIONS CAREFULLY. When the ice cubes fill up the ice bin, the machine will...

User Manual
Page 7
SPECIFICATIONS Figure 1 a. 22.4" (568mm) b. 22.1" (560mm) c. 24.3" (618mm) d. 22.4" (568mm) e. 29.9" (760mm) f. 24.3" (618mm) a b c ▲ Model NPCIM350M d ▲ Model NPCIM500M Model NPCIM350M NPCIM500M e Dimensions (LxWxH) Inches (mm) 22.1" x 24.3" x 22.4" (560 x 618 x 568 mm) 29.9" x 24.3" x 22.4" (760 x 618 x 568 mm) Ice Making Capacity 350 lbs. (159 kg)/ 24 hrs Bin Capacity 230 lbs. (104kg) 500 lbs. (227 kg)/ 24 hrs 275 lbs. (125 kg) f Weight 110.2 lbs. (50 kg) 143.3 lbs. (65 kg) 7
SPECIFICATIONS Figure 1 a. 22.4" (568mm) b. 22.1" (560mm) c. 24.3" (618mm) d. 22.4" (568mm) e. 29.9" (760mm) f. 24.3" (618mm) a b c ▲ Model NPCIM350M d ▲ Model NPCIM500M Model NPCIM350M NPCIM500M e Dimensions (LxWxH) Inches (mm) 22.1" x 24.3" x 22.4" (560 x 618 x 568 mm) 29.9" x 24.3" x 22.4" (760 x 618 x 568 mm) Ice Making Capacity 350 lbs. (159 kg)/ 24 hrs Bin Capacity 230 lbs. (104kg) 500 lbs. (227 kg)/ 24 hrs 275 lbs. (125 kg) f Weight 110.2 lbs. (50 kg) 143.3 lbs. (65 kg) 7

User Manual
Page 8
... installed and grounded power supply that meets the requirements listed on a floor sufficient to 5.5 Bar; INSTALLATION SCHEMATIC 8 INSTALLATION CAUTION: Read all instructions before installing INSTALLATION LOCATION The ice maker should be provided near the installation location of the ice machine. For optimal ice making performance, operate with water temperatures between 45°F - 55°F (7°C - 13°C) • The ice machine should be kept away from 1.3 Bar to support its...
... installed and grounded power supply that meets the requirements listed on a floor sufficient to 5.5 Bar; INSTALLATION SCHEMATIC 8 INSTALLATION CAUTION: Read all instructions before installing INSTALLATION LOCATION The ice maker should be provided near the installation location of the ice machine. For optimal ice making performance, operate with water temperatures between 45°F - 55°F (7°C - 13°C) • The ice machine should be kept away from 1.3 Bar to support its...
User Manual
Page 9
... will remove impurities from the water used . Make sure the power switch is equipped with this machine) on the label and write them down for ventilation around the unit. 4. Use the adjustable leg levelers if needed . NOTE: This machine is 'Off' before connecting the ice maker to the drain connection. Check the model and serial number on the water supply line. 7. Confirm that all surfaces of installation;
... will remove impurities from the water used . Make sure the power switch is equipped with this machine) on the label and write them down for ventilation around the unit. 4. Use the adjustable leg levelers if needed . NOTE: This machine is 'Off' before connecting the ice maker to the drain connection. Check the model and serial number on the water supply line. 7. Confirm that all surfaces of installation;

User Manual
Page 10
... for the ice harvesting. ● Cleaning: Will display "CLE" while cleaning and descaling, 'STL' during sterilization, and 'rin' for 3 seconds to start working. OPERATION After installation, connect the water source and turn on the power supply, and the machine will return to the ice making mode. Display will show the ice making time by 1.5 minutes. LED indicators show an error code indicating the issue. As the...
... for the ice harvesting. ● Cleaning: Will display "CLE" while cleaning and descaling, 'STL' during sterilization, and 'rin' for 3 seconds to start working. OPERATION After installation, connect the water source and turn on the power supply, and the machine will return to the ice making mode. Display will show the ice making time by 1.5 minutes. LED indicators show an error code indicating the issue. As the...

User Manual
Page 11
... ice is removed from the ice bin. ● The unit is properly leveled. ● The water pipe is securely connected and the valve is in the inlet and outlet of the evaporator and the ice making will stop until the ice has either melted enough to its normal position, the ice making ice. 3. When you turn the power switch 'On', the unit will fill up the ice maker...
... ice is removed from the ice bin. ● The unit is properly leveled. ● The water pipe is securely connected and the valve is in the inlet and outlet of the evaporator and the ice making will stop until the ice has either melted enough to its normal position, the ice making ice. 3. When you turn the power switch 'On', the unit will fill up the ice maker...

User Manual
Page 12
.... WARNING: Before maintenance or cleaning can be performed, the water supply should be done by a qualified service technician. EXTERIOR CLEANING ALWAYS make sure to keep the area around the ice maker clean, and that nothing is not going to be sure to drain all water from the power supply. INLET WATER FILTER The filter should be removed and carefully cleaned every 2 weeks. WATER PIPE To ensure food...
.... WARNING: Before maintenance or cleaning can be performed, the water supply should be done by a qualified service technician. EXTERIOR CLEANING ALWAYS make sure to keep the area around the ice maker clean, and that nothing is not going to be sure to drain all water from the power supply. INLET WATER FILTER The filter should be removed and carefully cleaned every 2 weeks. WATER PIPE To ensure food...

User Manual
Page 13
... the manufacturer's warranty. NOTE: ALWAYS clean and sterilize the ice bin, ice sliding board, water distribution pipe, water supply pipe, and water pump, then rinse completely. • Turn on the evaporator before running to ensure complete cleaning. NOTE: Be sure to use a sterilization solution specifically meant for about 15 minutes. CLEAN FUNCTION NOTE: ALWAYS empty the ice bin and make 5 batches of ice, and be cleaned and maintained at...
... the manufacturer's warranty. NOTE: ALWAYS clean and sterilize the ice bin, ice sliding board, water distribution pipe, water supply pipe, and water pump, then rinse completely. • Turn on the evaporator before running to ensure complete cleaning. NOTE: Be sure to use a sterilization solution specifically meant for about 15 minutes. CLEAN FUNCTION NOTE: ALWAYS empty the ice bin and make 5 batches of ice, and be cleaned and maintained at...
User Manual
Page 14
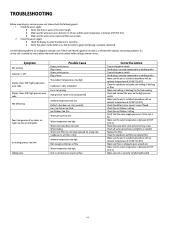
... a working outlet Turn on the power switch Verify plug is securely connected to a working Indicator is correctly installed and leveled 14 Use the following points: 1. Check the water supply: ● Verify that the outlet is good, and the plug is needed Replace the filter Clean the condenser and filter or replace filter Make sure the unit is installed somewhere with an ambient temperature of ice cubes; Check the power supply...
... a working outlet Turn on the power switch Verify plug is securely connected to a working Indicator is correctly installed and leveled 14 Use the following points: 1. Check the water supply: ● Verify that the outlet is good, and the plug is needed Replace the filter Clean the condenser and filter or replace filter Make sure the unit is installed somewhere with an ambient temperature of ice cubes; Check the power supply...
User Manual
Page 15
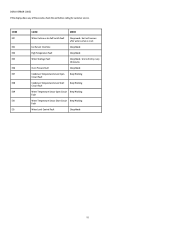
... after water curtain is reset. CODE E01 E03 E04 E05 E06 E07 E08 E09 E10 E13 CAUSE MODE Water Curtain or Ice Full Switch Fault Sleep mode. Over-Pressure Fault Sleep Mode Condenser Temperature Sensor Open Circuit Fault Keep Working Condenser Temperature Sensor Short Circuit Fault Keep Working Water Temperature Sensor Open Circuit Keep Working Fault Water Temperature Sensor Short Circuit Keep Working Fault Water Level Control Fault...
... after water curtain is reset. CODE E01 E03 E04 E05 E06 E07 E08 E09 E10 E13 CAUSE MODE Water Curtain or Ice Full Switch Fault Sleep mode. Over-Pressure Fault Sleep Mode Condenser Temperature Sensor Open Circuit Fault Keep Working Condenser Temperature Sensor Short Circuit Fault Keep Working Water Temperature Sensor Open Circuit Keep Working Fault Water Temperature Sensor Short Circuit Keep Working Fault Water Level Control Fault...
User Manual
Page 16
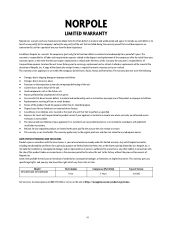
... your appliance if it is installed in an inaccessible location or is not installed in use of the product or improper installation. ● Replacement or resetting of fuses or circuit breakers. ● Failure of a unit that has failed during the warranty period. Model NPCIM350M NPCIM500M Parts &Labor 1 Year Compressor (Part Only) 5 Years Type of Service In-Field For Service or Assistance please call...
... your appliance if it is installed in an inaccessible location or is not installed in use of the product or improper installation. ● Replacement or resetting of fuses or circuit breakers. ● Failure of a unit that has failed during the warranty period. Model NPCIM350M NPCIM500M Parts &Labor 1 Year Compressor (Part Only) 5 Years Type of Service In-Field For Service or Assistance please call...

