User Manual
Page 1
NORPOLE Commercial Undercounter Ice Maker User's Manual Models: NPCIM90B, NPCIM120H, NPCIM160H, NPCIM210, NPCIM280 READ THIS MANUAL CAREFULLY BEFORE USING YOUR COMMERCIAL ICE MAKER AND KEEP IT FOR FUTURE REFERENCE.
NORPOLE Commercial Undercounter Ice Maker User's Manual Models: NPCIM90B, NPCIM120H, NPCIM160H, NPCIM210, NPCIM280 READ THIS MANUAL CAREFULLY BEFORE USING YOUR COMMERCIAL ICE MAKER AND KEEP IT FOR FUTURE REFERENCE.
User Manual
Page 2
... product could act as your proof of purchase in the event of registering your product will allow for more efficient warranty service processing when warranty service is to contact you regarding a safety notification or product update. 2. NORPOLE PRODUCT REGISTRATION Thank you for purchasing a Norpole Commercial product. 2 Registering your product include the following: 1. Registering your new...
... product could act as your proof of purchase in the event of registering your product will allow for more efficient warranty service processing when warranty service is to contact you regarding a safety notification or product update. 2. NORPOLE PRODUCT REGISTRATION Thank you for purchasing a Norpole Commercial product. 2 Registering your product include the following: 1. Registering your new...
User Manual
Page 3
TABLE OF CONTENTS REGISTRATION ...2 IMPORTANT INFORMATION ...4 IMPORANT SAFETY INSTRUCTIONS ...5 SPECIFICATIONS...7 INSTALLATION INSTRUCTIONS...8 OPERATION INSTRUCTIONS...10 CARE AND MAINTENANCE...12 TROUBLESHOOTING ...14 WARRANTY ...16 3
TABLE OF CONTENTS REGISTRATION ...2 IMPORTANT INFORMATION ...4 IMPORANT SAFETY INSTRUCTIONS ...5 SPECIFICATIONS...7 INSTALLATION INSTRUCTIONS...8 OPERATION INSTRUCTIONS...10 CARE AND MAINTENANCE...12 TROUBLESHOOTING ...14 WARRANTY ...16 3
User Manual
Page 4
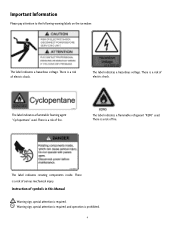
... required. Instruction of symbols in this Manual Warning sign, special attention is a risk of fire. The label indicates a flammable foaming agent "Cyclopentane" used . There is a risk of serious mechanical injury. Important Information Please pay attention to the following warning labels on the ice maker: The label indicates a hazardous voltage. The label indicates a flammable refrigerant "R290" used . The...
... required. Instruction of symbols in this Manual Warning sign, special attention is a risk of fire. The label indicates a flammable foaming agent "Cyclopentane" used . There is a risk of serious mechanical injury. Important Information Please pay attention to the following warning labels on the ice maker: The label indicates a hazardous voltage. The label indicates a flammable refrigerant "R290" used . The...
User Manual
Page 5
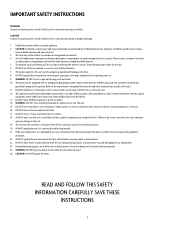
..... 9. Please contact customer service for electrical and other cord or plug. DO NOT use any adjustment or maintenance, and have the work done by certified professionals. DO NOT allow water to splash directly onto the unit during cleaning, repair, or maintenance to play in or on the ice maker. 14. The unit must be used in the ice machine. 18. DO...
..... 9. Please contact customer service for electrical and other cord or plug. DO NOT use any adjustment or maintenance, and have the work done by certified professionals. DO NOT allow water to splash directly onto the unit during cleaning, repair, or maintenance to play in or on the ice maker. 14. The unit must be used in the ice machine. 18. DO...
User Manual
Page 6
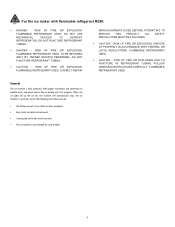
FLAMMABLE REFRIGERANT USED. RISK OF FIRE OR EXPLOSION. TO BE REPAIRED ONLY BY TRAINED SERVICE PERSONNEL. With proper installation and connection to potable water and power source, the ice making will automatically stop. RISK OF FIRE OR EXPLOSION. FLAMMABLE REFRIGERANT USED. DISPOSE OF PROPERLY IN ACCORDANCE WITH FEDERAL OR LOCAL REGULATIONS. ALL SAFETY PRECAUTIONS MUST BE FOLLOWED. • CAUTION - The ice machine is generally used in...
FLAMMABLE REFRIGERANT USED. RISK OF FIRE OR EXPLOSION. TO BE REPAIRED ONLY BY TRAINED SERVICE PERSONNEL. With proper installation and connection to potable water and power source, the ice making will automatically stop. RISK OF FIRE OR EXPLOSION. FLAMMABLE REFRIGERANT USED. DISPOSE OF PROPERLY IN ACCORDANCE WITH FEDERAL OR LOCAL REGULATIONS. ALL SAFETY PRECAUTIONS MUST BE FOLLOWED. • CAUTION - The ice machine is generally used in...

User Manual
Page 7
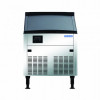
... Model NPCIM90B NPCIM120H NPCIM160H NPCIM210 NPCIM280 Dimensions (LxWxH) Inches (mm) 14.8" x 22.6" x 30.0" (375 × 575 × 762 mm) 19.7" x 23.2" x 33.5" (500 x 590 x 850 mm) 26.0" x 27.0" x 38.2" (660 x 685 x 970 mm) 26.0" x 27.0" x 38.2" (660 x 685 x 970 mm) 26.0" x 27.0" x 38.2" (660 x 685 x 970 mm) Ice Making Capacity 90 lbs. (41 kg)/ 24 hr Bin...
... Model NPCIM90B NPCIM120H NPCIM160H NPCIM210 NPCIM280 Dimensions (LxWxH) Inches (mm) 14.8" x 22.6" x 30.0" (375 × 575 × 762 mm) 19.7" x 23.2" x 33.5" (500 x 590 x 850 mm) 26.0" x 27.0" x 38.2" (660 x 685 x 970 mm) 26.0" x 27.0" x 38.2" (660 x 685 x 970 mm) 26.0" x 27.0" x 38.2" (660 x 685 x 970 mm) Ice Making Capacity 90 lbs. (41 kg)/ 24 hr Bin...

User Manual
Page 8
... ice machine should be kept away from heat sources, and should be used in a proper location meeting the following conditions: • Indoors, not more than 6,560 ft (2,000 meters) above sea level. • Ambient temperature: 40° - 104°F (5-40°C). INSTALLATION SCHEMATIC 8 water temperature: 40° - 95°F (5-35°C). INSTALLATION CAUTION: Read all instructions before installing INSTALLATION LOCATION The ice maker...
... ice machine should be kept away from heat sources, and should be used in a proper location meeting the following conditions: • Indoors, not more than 6,560 ft (2,000 meters) above sea level. • Ambient temperature: 40° - 104°F (5-40°C). INSTALLATION SCHEMATIC 8 water temperature: 40° - 95°F (5-35°C). INSTALLATION CAUTION: Read all instructions before installing INSTALLATION LOCATION The ice maker...
User Manual
Page 9
... machine. Make sure the power switch is level. 7. Use these to the water supply using the 3/4" inlet pipe supplied with potable water. 4. Open the bin door and remove the packaging tape from the water used to install a water valve (not supplied with an inlet water filter. They are installed in the direction noted on the water supply line. 9. Connect the machine to make sure the ice maker is 'Off' before connecting the ice maker to the schematic diagram of the ice maker...
... machine. Make sure the power switch is level. 7. Use these to the water supply using the 3/4" inlet pipe supplied with potable water. 4. Open the bin door and remove the packaging tape from the water used to install a water valve (not supplied with an inlet water filter. They are installed in the direction noted on the water supply line. 9. Connect the machine to make sure the ice maker is 'Off' before connecting the ice maker to the schematic diagram of the ice maker...
User Manual
Page 10
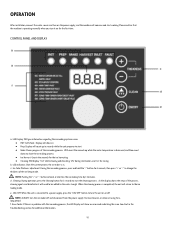
... water trough. Ice Cube Thickness adjustment: During the ice making mode. d. Error Codes: If there is connected to a power supply, press the "ON/OFF" button to turn it on and start working. CONTROL PANEL AND DISPLAY a. e. Display will show an error code indicating the issue. LED Display: Will give information regarding the ice making time by 1.5 minutes. f. See chart in . Please confirm that the machine is in the Troubleshooting...
... water trough. Ice Cube Thickness adjustment: During the ice making mode. d. Error Codes: If there is connected to a power supply, press the "ON/OFF" button to turn it on and start working. CONTROL PANEL AND DISPLAY a. e. Display will show an error code indicating the issue. LED Display: Will give information regarding the ice making time by 1.5 minutes. f. See chart in . Please confirm that the machine is in the Troubleshooting...

User Manual
Page 11
... and pump any water out of the evaporator and the ice making ice. 3. The inlet valve will then open . ● The plug is properly connected to start the ice maker. Turn the power switch to the 'On' position to the power supply outlet and the unit's power switch is , the longer the ice making will automatically begin making water is gradually decreasing. ● For air cooled machines, verify...
... and pump any water out of the evaporator and the ice making ice. 3. The inlet valve will then open . ● The plug is properly connected to start the ice maker. Turn the power switch to the 'On' position to the power supply outlet and the unit's power switch is , the longer the ice making will automatically begin making water is gradually decreasing. ● For air cooled machines, verify...
User Manual
Page 12
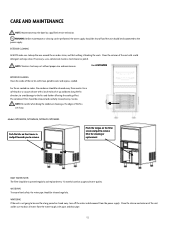
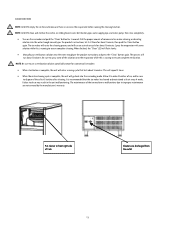
... be sure to drain all water from the power supply. For the air-cooled ice maker, the condenser should be cleaned every three weeks. The condenser filter should be removed and carefully cleaned every 2 weeks. NOTE: Be careful when doing the condenser cleaning as needed. Models: NPCIM120H, NPCIM160H, NPCIM210, NPCIM280 Push the tabs on usage and water quality. If necessary, use a commercial stainless steel...
... be sure to drain all water from the power supply. For the air-cooled ice maker, the condenser should be cleaned every three weeks. The condenser filter should be removed and carefully cleaned every 2 weeks. NOTE: Be careful when doing the condenser cleaning as needed. Models: NPCIM120H, NPCIM160H, NPCIM210, NPCIM280 Push the tabs on usage and water quality. If necessary, use a commercial stainless steel...
User Manual
Page 13
... complete, the unit will run an auto clean cycle for commercial ice makers • When sterilization is complete, the unit will flash slowly. • Manually put sterilization solution into the water trough per the products instructions, let it to use a sterilization solution specifically meant for about 15 minutes. NOTE: Be sure to make sure there is recommended that lasts about...
... complete, the unit will run an auto clean cycle for commercial ice makers • When sterilization is complete, the unit will flash slowly. • Manually put sterilization solution into the water trough per the products instructions, let it to use a sterilization solution specifically meant for about 15 minutes. NOTE: Be sure to make sure there is recommended that lasts about...
User Manual
Page 14
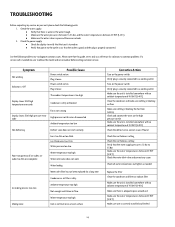
... Water temperature too high Water inlet valve does not work Water leaking Water inlet filter has not been replaced for solutions to common problems. If a service call is needed Replace the filter Clean the condenser and filter or replace filter Make sure the unit is installed somewhere with an ambient temperature of 41-104°F (5-40°C) Check the defrost valve, correct issues if found Check the ice thickness setting Check the ice thickness setting Verify that power...
... Water temperature too high Water inlet valve does not work Water leaking Water inlet filter has not been replaced for solutions to common problems. If a service call is needed Replace the filter Clean the condenser and filter or replace filter Make sure the unit is installed somewhere with an ambient temperature of 41-104°F (5-40°C) Check the defrost valve, correct issues if found Check the ice thickness setting Check the ice thickness setting Verify that power...
User Manual
Page 15
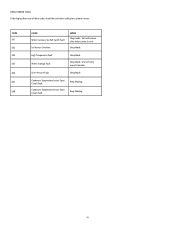
Sleep Mode High Temperature Fault Water Shortage Fault Sleep Mode Sleep Mode. Unit will recover after water curtain is reset. Unit will retry every 30 minutes. CODE E01 E03 E04 E05 E06 E07 E08 CAUSE Water Curtain or Ice Full Switch Fault Ice Harvest Overtime MODE Sleep mode. Over-Pressure Fault Sleep Mode Condenser Temperature Sensor Open Circuit Fault Condenser Temperature Sensor Short Circuit Fault Keep Working Keep Working 15 DISPLAY ERROR CODES If the display shows any of these codes, check the unit before calling for customer service.
Sleep Mode High Temperature Fault Water Shortage Fault Sleep Mode Sleep Mode. Unit will recover after water curtain is reset. Unit will retry every 30 minutes. CODE E01 E03 E04 E05 E06 E07 E08 CAUSE Water Curtain or Ice Full Switch Fault Ice Harvest Overtime MODE Sleep mode. Over-Pressure Fault Sleep Mode Condenser Temperature Sensor Open Circuit Fault Condenser Temperature Sensor Short Circuit Fault Keep Working Keep Working 15 DISPLAY ERROR CODES If the display shows any of these codes, check the unit before calling for customer service.

User Manual
Page 16
... the shelves, etc. ● Repairs performed by law. This warranty gives you specific legal rights, and you may also have other liability in use of the product or improper installation. ● Replacement or resetting of fuses or circuit breakers. ● Failure of 5 years. A refund or replacement will be free from state to the price paid for incidental or consequential...
... the shelves, etc. ● Repairs performed by law. This warranty gives you specific legal rights, and you may also have other liability in use of the product or improper installation. ● Replacement or resetting of fuses or circuit breakers. ● Failure of 5 years. A refund or replacement will be free from state to the price paid for incidental or consequential...

