User Manual
Page 1
Wine and Beverage Center User's Manual Model MCWBC24DST PLEASE READ THIS MANUAL CAREFULLY BEFORE USING YOUR WINE AND BEVERAGE CENTER AND KEEP IT FOR FUTURE REFERENCE.
Wine and Beverage Center User's Manual Model MCWBC24DST PLEASE READ THIS MANUAL CAREFULLY BEFORE USING YOUR WINE AND BEVERAGE CENTER AND KEEP IT FOR FUTURE REFERENCE.
User Manual
Page 2
... efficient warranty service processing when warranty service is to complete the product registration on our website: www.mcappliance.com/register. Registering your product could act as your product include the following: 1. Registering your product will allow us to protect your product will allow for purchasing a Magic Chef® product. Registering your new product is required. 3. The first step to contact you for purchasing a Magic Chef® product. The...
... efficient warranty service processing when warranty service is to complete the product registration on our website: www.mcappliance.com/register. Registering your product could act as your product include the following: 1. Registering your product will allow us to protect your product will allow for purchasing a Magic Chef® product. Registering your new product is required. 3. The first step to contact you for purchasing a Magic Chef® product. The...
User Manual
Page 3
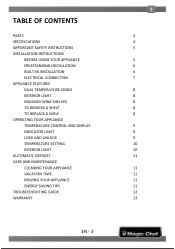
TABLE OF CONTENTS PARTS SPECIFICATIONS IMPORTANT SAFETY INSTRUCTIONS INSTALLATION INSTRUCTIONS BEFORE USING YOUR APPLIANCE FREESTANDING INSTALLATION BUILT-IN INSTALLATION ELECTRICAL CONNECTION APPLIANCE FEATURES DUAL TEMPERATURE ZONES INTERIOR LIGHT ENGAGED WINE SHELVES TO REMOVE A SHELF TO REPLACE A SHELF OPERATING YOUR APPLIANCE TEMPERATURE CONTROL AND DISPLAY INDICATOR LIGHT LOCK AND UNLOCK TEMPERATURE SETTING INTERIOR LIGHT AUTOMATIC DEFROST CARE AND MAINTENANCE CLEANING YOUR APPLIANCE VACATION TIME MOVING YOUR APPLIANCE ENERGY SAVING TIPS TROUBLESHOOTING GUIDE WARRANTY EN - 3 3 4 4 5 5 6...
TABLE OF CONTENTS PARTS SPECIFICATIONS IMPORTANT SAFETY INSTRUCTIONS INSTALLATION INSTRUCTIONS BEFORE USING YOUR APPLIANCE FREESTANDING INSTALLATION BUILT-IN INSTALLATION ELECTRICAL CONNECTION APPLIANCE FEATURES DUAL TEMPERATURE ZONES INTERIOR LIGHT ENGAGED WINE SHELVES TO REMOVE A SHELF TO REPLACE A SHELF OPERATING YOUR APPLIANCE TEMPERATURE CONTROL AND DISPLAY INDICATOR LIGHT LOCK AND UNLOCK TEMPERATURE SETTING INTERIOR LIGHT AUTOMATIC DEFROST CARE AND MAINTENANCE CLEANING YOUR APPLIANCE VACATION TIME MOVING YOUR APPLIANCE ENERGY SAVING TIPS TROUBLESHOOTING GUIDE WARRANTY EN - 3 3 4 4 5 5 6...
User Manual
Page 4
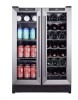
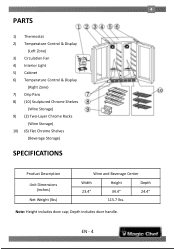
Depth includes door handle. EN - 4 4 PARTS 1) Thermostat 2) Temperature Control & Display (Left Zone) 3) Circulation Fan 4) Interior Light 5) Cabinet 6) Temperature Control & Display (Right Zone) 7) Drip Pans 8) (10) Sculptured Chrome Shelves (Wine Storage) 9) (2) Two-Layer Chrome Racks (Wine Storage) 10) (6) Flat Chrome Shelves (Beverage Storage) SPECIFICATIONS Product Description Unit Dimensions (inches) Net Weight (lbs) Wine and Beverage Center Width Height Depth 23.4" 34.4" 115.7 lbs. 24.4" Note: Height includes door cap;
Depth includes door handle. EN - 4 4 PARTS 1) Thermostat 2) Temperature Control & Display (Left Zone) 3) Circulation Fan 4) Interior Light 5) Cabinet 6) Temperature Control & Display (Right Zone) 7) Drip Pans 8) (10) Sculptured Chrome Shelves (Wine Storage) 9) (2) Two-Layer Chrome Racks (Wine Storage) 10) (6) Flat Chrome Shelves (Beverage Storage) SPECIFICATIONS Product Description Unit Dimensions (inches) Net Weight (lbs) Wine and Beverage Center Width Height Depth 23.4" 34.4" 115.7 lbs. 24.4" Note: Height includes door cap;
User Manual
Page 5
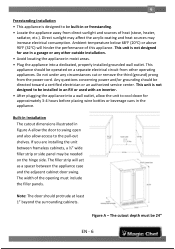
... the cooling system resulting from the unit. - Under the guidelines of federal law, refrigerants must be removed before throwing out the appliance: - This will reduce the possibility of the product. SAVE THESE INSTRUCTIONS INSTALLATION INSTRUCTIONS Before Using Your Appliance • Remove the exterior and interior packing. • Before connecting the appliance to operate, play with lukewarm water using the wine and beverage center. ...
... the cooling system resulting from the unit. - Under the guidelines of federal law, refrigerants must be removed before throwing out the appliance: - This will reduce the possibility of the product. SAVE THESE INSTRUCTIONS INSTALLATION INSTRUCTIONS Before Using Your Appliance • Remove the exterior and interior packing. • Before connecting the appliance to operate, play with lukewarm water using the wine and beverage center. ...
User Manual
Page 6
... built-in a garage or any circumstances cut or remove the third (ground) prong from direct sunlight and sources of the opening must be directed toward a certified electrician or an authorized service center. This unit is not designed for approximately 3-4 hours before placing wine bottles or beverage cans in the appliance. Do not under any other operating appliances. If you are installing...
... built-in a garage or any circumstances cut or remove the third (ground) prong from direct sunlight and sources of the opening must be directed toward a certified electrician or an authorized service center. This unit is not designed for approximately 3-4 hours before placing wine bottles or beverage cans in the appliance. Do not under any other operating appliances. If you are installing...
User Manual
Page 7
... request warranty service. If the power cord is not designed to be used with a threeprong ground. • This appliance is damaged, please contact an authorized service center. • This appliance should be properly grounded for your safety. The use of the grounded plug can negatively affect the performance of the unit. The power cord of electric shock. • Do not, under any problems...
... request warranty service. If the power cord is not designed to be used with a threeprong ground. • This appliance is damaged, please contact an authorized service center. • This appliance should be properly grounded for your safety. The use of the grounded plug can negatively affect the performance of the unit. The power cord of electric shock. • Do not, under any problems...

User Manual
Page 8
... Replace a Shelf • Place the sides of the shelf back onto the supporting guides of the two zones can be switched on or off by -side. • Each zone has its independent temperature control and display. • Each of the shelves have tabs to 21 bottles or 57 cans. Engaged Wine Shelves • All of the two zones can be used to store wine bottles or beverages...
... Replace a Shelf • Place the sides of the shelf back onto the supporting guides of the two zones can be switched on or off by -side. • Each zone has its independent temperature control and display. • Each of the shelves have tabs to 21 bottles or 57 cans. Engaged Wine Shelves • All of the two zones can be used to store wine bottles or beverages...
User Manual
Page 9
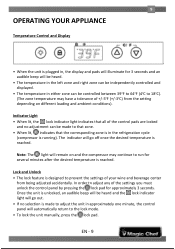
... unit in the refrigeration cycle (compressor is reached. Once the unit is unlocked, an audible beep will be controlled between 39oF to 64oF (4oC to 18oC). (The zone temperature may have a tolerance of your wine and beverage center from the setting depending on and the compressor may continue to the lock mode. • To lock the unit manually, press the lock pad. EN - 9 Note: The light...
... unit in the refrigeration cycle (compressor is reached. Once the unit is unlocked, an audible beep will be controlled between 39oF to 64oF (4oC to 18oC). (The zone temperature may have a tolerance of your wine and beverage center from the setting depending on and the compressor may continue to the lock mode. • To lock the unit manually, press the lock pad. EN - 9 Note: The light...
User Manual
Page 10
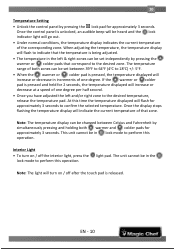
... light will increase or decrease in the left & right zones can be set between Celsius and Fahrenheit by pressing the lock pad for approximately 3 seconds to perform this operation. light pad. When adjusting the temperature, the temperature display will flash to indicate that the temperature is pressed, the temperature displayed will turn on / off the interior light, press the lock mode to the desired zone. Once the control panel...
... light will increase or decrease in the left & right zones can be set between Celsius and Fahrenheit by pressing the lock pad for approximately 3 seconds to perform this operation. light pad. When adjusting the temperature, the temperature display will flash to indicate that the temperature is pressed, the temperature displayed will turn on / off the interior light, press the lock mode to the desired zone. Once the control panel...
User Manual
Page 11
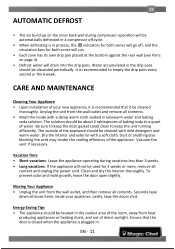
... a compressor off , and the circulation fans for 3 weeks or more, remove all contents. The outside of direct sunlight. Dry the interior and exterior with mild detergent and warm water. Vacation Time • Short vacations: Leave the appliance operating during vacations less than 3 weeks. • Long vacations: If the appliance will not be used for both zones will...
... a compressor off , and the circulation fans for 3 weeks or more, remove all contents. The outside of direct sunlight. Dry the interior and exterior with mild detergent and warm water. Vacation Time • Short vacations: Leave the appliance operating during vacations less than 3 weeks. • Long vacations: If the appliance will not be used for both zones will...
User Manual
Page 12
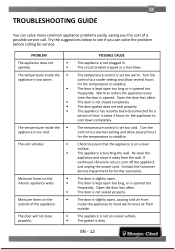
... touching the wall. The temperature control is slightly open too long or is opened too frequently. The door is dirty. The door is set too warm. The gasket is not sealed properly. Open the door less often. 12 TROUBLESHOOTING GUIDE You can solve many common appliance problems easily, saving you can solve the problem before calling for service. The door gasket does not seal properly.
... touching the wall. The temperature control is slightly open too long or is opened too frequently. The door is dirty. The door is set too warm. The gasket is not sealed properly. Open the door less often. 12 TROUBLESHOOTING GUIDE You can solve many common appliance problems easily, saving you can solve the problem before calling for service. The door gasket does not seal properly.

User Manual
Page 13
... warranty covers appliances in use of the product or • Replacement or resetting of house fuses or circuit breakers • Failure of this unit for any subsequent owner(s) LIMITATIONS OF REMEDIES AND EXCLUSIONS Product repair in accordance with the sale of the unit that the unit requires replacement or refund under this product. Model Parts & Labor Compressor (Parts Only) Type of MC Appliance Corporation. This warranty applies only to the original purchaser...
... warranty covers appliances in use of the product or • Replacement or resetting of house fuses or circuit breakers • Failure of this unit for any subsequent owner(s) LIMITATIONS OF REMEDIES AND EXCLUSIONS Product repair in accordance with the sale of the unit that the unit requires replacement or refund under this product. Model Parts & Labor Compressor (Parts Only) Type of MC Appliance Corporation. This warranty applies only to the original purchaser...

User Manual
Page 14
All rights reserved. www.mcappliance.com Printed in China d/b/a MC Appliance Corporation. Magic Chef® is a registered trademark of CNA International, Inc. CNA International, Inc.
All rights reserved. www.mcappliance.com Printed in China d/b/a MC Appliance Corporation. Magic Chef® is a registered trademark of CNA International, Inc. CNA International, Inc.


