
User Manual
Page 3
...be closed when the tub is to local law ordinances. 9. Never unplug your old appliance is moving. Do not try to remove clothes while the washer tub is not being used to a complete stop before using your appliance, follow these basic precautionary guidelines, which includes the following: 1. Do not ... to come to clean flammable or explosive substances should not be properly installed in poor condition. Do not add or mix any repairs to the washer. 13. Do not use this material have been previously spotted, cleaned in, washed in, or soaked in user manual. 3. If your appliance by...
...be closed when the tub is to local law ordinances. 9. Never unplug your old appliance is moving. Do not try to remove clothes while the washer tub is not being used to a complete stop before using your appliance, follow these basic precautionary guidelines, which includes the following: 1. Do not ... to come to clean flammable or explosive substances should not be properly installed in poor condition. Do not add or mix any repairs to the washer. 13. Do not use this material have been previously spotted, cleaned in, washed in, or soaked in user manual. 3. If your appliance by...

User Manual
Page 4
...electrician install the proper receptacle wall outlet. This appliance is properly grounded. This three-pronged plug must be properly grounded using your compact washer. 23. Have a qualified technician install the proper wall outlet for several minutes prior to carry out. Do not repair or replace any...reason this appliance from the power source. 4 17. Do not modify the provided plug with the controls. 19. Do not operate this washer unless all local codes and ordinances. ! This appliance must be produced in a household hot water system that is highly explosive. Do ...
...electrician install the proper receptacle wall outlet. This appliance is properly grounded. This three-pronged plug must be properly grounded using your compact washer. 23. Have a qualified technician install the proper wall outlet for several minutes prior to carry out. Do not repair or replace any...reason this appliance from the power source. 4 17. Do not modify the provided plug with the controls. 19. Do not operate this washer unless all local codes and ordinances. ! This appliance must be produced in a household hot water system that is highly explosive. Do ...

User Manual
Page 5
Do not directly rinse the machine with water when cleaning. 5 Do not install the washer in moisture enriched environment in order to yourself and others, or property damage, observe the following items: Observe the following visual guidelines: Do not disassemble and reassemble the washer without authorization. SAFETY AND PRECAUTIONS In order to prevent injury to avoid electric shock, fire, or other electrical accidents. Do not insert your hand and take out clothes inside the spinning tub before it stops.
Do not directly rinse the machine with water when cleaning. 5 Do not install the washer in moisture enriched environment in order to yourself and others, or property damage, observe the following items: Observe the following visual guidelines: Do not disassemble and reassemble the washer without authorization. SAFETY AND PRECAUTIONS In order to prevent injury to avoid electric shock, fire, or other electrical accidents. Do not insert your hand and take out clothes inside the spinning tub before it stops.
User Manual
Page 7
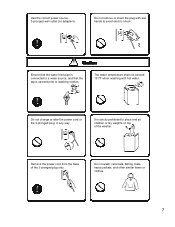
... prohibited to place and sit children or lay weights on top of the 3-pronged plug only. Remove the power cord from the base of the washer. Do not change or alter the power cord or the 3-pronged plug, in any way. It is opened prior to avoid electric shock. The water...
... prohibited to place and sit children or lay weights on top of the 3-pronged plug only. Remove the power cord from the base of the washer. Do not change or alter the power cord or the 3-pronged plug, in any way. It is opened prior to avoid electric shock. The water...

User Manual
Page 8
... hose to prevent breakage of the water inlet valve joint. Foam Cushion Base PLACEMENT OF UPPER WATER DRAIN HOSE The height of washer with the foam cushion is strictly prohibited. INSTALLATION INSTRUCTIONS REMOVE PACKAGING • Remove packaging, foam cushions, and bottom cardboard. • Open the... washer door and take out all the accessories in the drum • Use of the drain hose (A) should be less than 1.20", and ...
... hose to prevent breakage of the water inlet valve joint. Foam Cushion Base PLACEMENT OF UPPER WATER DRAIN HOSE The height of washer with the foam cushion is strictly prohibited. INSTALLATION INSTRUCTIONS REMOVE PACKAGING • Remove packaging, foam cushions, and bottom cardboard. • Open the... washer door and take out all the accessories in the drum • Use of the drain hose (A) should be less than 1.20", and ...

User Manual
Page 9
Faucet Faucet Adapter Quick Connector Washer Water inlet hose Washer Drain hose Washers Rear View of Washer filter
Faucet Faucet Adapter Quick Connector Washer Water inlet hose Washer Drain hose Washers Rear View of Washer filter
User Manual
Page 12
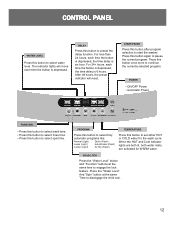
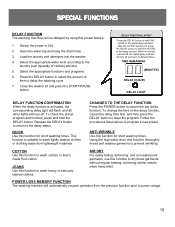
DELAY Press this button after program selection to start the washer. START/PAUSE Press this button to preset the delay function. POWER • ON/OFF Power • Automatic Power FUNCTION • Press this button to select ...
DELAY Press this button after program selection to start the washer. START/PAUSE Press this button to preset the delay function. POWER • ON/OFF Power • Automatic Power FUNCTION • Press this button to select ...
User Manual
Page 13
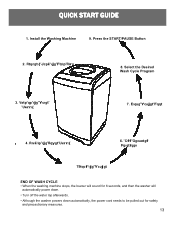
... END OF WASH CYCLE • When the washing machine stops, the buzzer will sound for 6 seconds, and then the washer will automatically power down. • Turn off the water tap afterwards. • Although the washer powers down automatically, the power cord needs to be pulled out for safety and precautionary measures. 13
... END OF WASH CYCLE • When the washing machine stops, the buzzer will sound for 6 seconds, and then the washer will automatically power down. • Turn off the water tap afterwards. • Although the washer powers down automatically, the power cord needs to be pulled out for safety and precautionary measures. 13
User Manual
Page 14
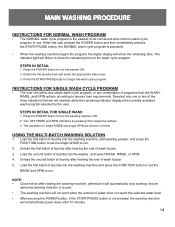
...3. STEPS IN DETAIL 1. STEPS IN DETAIL FOR SINGLE WASH 1. Press the POWER button to run . Load the second batch of laundry into the washer, and select WASH, RINSE, or SPIN. 4. The indicator light will show the remaining time for single RINSE and single SPIN are not needed, while... buttons. 3. Load the first batch of laundry into the washing machine and press the FUNCTION button to set the single WASH to turn the washer ON. 2. Press the POWER button to use. MAIN WASHING PROCEDURE INSTRUCTIONS FOR NORMAL WASH PROGRAM • The NORMAL wash cycle program is not...
...3. STEPS IN DETAIL 1. STEPS IN DETAIL FOR SINGLE WASH 1. Press the POWER button to run . Load the second batch of laundry into the washer, and select WASH, RINSE, or SPIN. 4. The indicator light will show the remaining time for single RINSE and single SPIN are not needed, while... buttons. 3. Load the first batch of laundry into the washing machine and press the FUNCTION button to set the single WASH to turn the washer ON. 2. Press the POWER button to use. MAIN WASHING PROCEDURE INSTRUCTIONS FOR NORMAL WASH PROGRAM • The NORMAL wash cycle program is not...
User Manual
Page 15
...FUNCTION The washing machine will automatically resume operation from cotton. Press the DELAY button to select the amount of clothing articles). 5. Close the washer lid and press the START/PAUSE button. Follow the procedures listed above to the delay status. Release the DELAY button to return to .... Switch the power to the delay function. Open the water tap and hang the drain hose. 3. Load the laundry and detergent into the washer. 4. After the number reaches 24, press the DELAY button to add SIX HOURS to ON. 2. This function is activated, the corresponding delay...
...FUNCTION The washing machine will automatically resume operation from cotton. Press the DELAY button to select the amount of clothing articles). 5. Close the washer lid and press the START/PAUSE button. Follow the procedures listed above to the delay status. Release the DELAY button to return to .... Switch the power to the delay function. Open the water tap and hang the drain hose. 3. Load the laundry and detergent into the washer. 4. After the number reaches 24, press the DELAY button to add SIX HOURS to ON. 2. This function is activated, the corresponding delay...
User Manual
Page 16
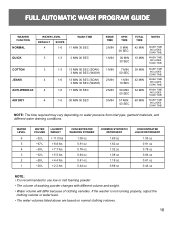
...The water volumes listed above are based on water pressure from inlet pipe, garment materials, and different water draining conditions. If the washer is recommended to use low or mid foaming powder • The volume of washing powder changes with different volume and weight. ...• Water volume will differ because of clothing varieties. FULL AUTOMATIC WASH PROGRAM GUIDE WASHER FUNCTION NORMAL WATER LEVEL DEFAULT SCOPE 4 1-6 WASH TIME 11 MIN 30 SEC QUICK 3 1-3 2 MIN 00 SEC COTTON 3 JEANS 4 ANTI-WRINKLE...
...The water volumes listed above are based on water pressure from inlet pipe, garment materials, and different water draining conditions. If the washer is recommended to use low or mid foaming powder • The volume of washing powder changes with different volume and weight. ...• Water volume will differ because of clothing varieties. FULL AUTOMATIC WASH PROGRAM GUIDE WASHER FUNCTION NORMAL WATER LEVEL DEFAULT SCOPE 4 1-6 WASH TIME 11 MIN 30 SEC QUICK 3 1-3 2 MIN 00 SEC COTTON 3 JEANS 4 ANTI-WRINKLE...
User Manual
Page 17
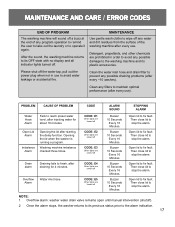
...to stop the alarm. PROBLEM CAUSE OF PROBLEM CODE ALARM SOUND STOPPING ALARM Water Hose Alarm Fails to stop the alarm. Overflow alarm: washer water drain valve remains open until manual intervention (shutoff). 2. Then close lid to operate it again. CODE: E5 Other lights are... sound, the washing machine returns to its previous status prior to avoid water leakage or accidental fire. Once the alarm stops, the washer returns to prevent any possible draining problems (after draining for about 16 minutes. MAINTENANCE AND CARE / ERROR CODES END OF PROGRAM The...
...to stop the alarm. PROBLEM CAUSE OF PROBLEM CODE ALARM SOUND STOPPING ALARM Water Hose Alarm Fails to stop the alarm. Overflow alarm: washer water drain valve remains open until manual intervention (shutoff). 2. Then close lid to operate it again. CODE: E5 Other lights are... sound, the washing machine returns to its previous status prior to avoid water leakage or accidental fire. Once the alarm stops, the washer returns to prevent any possible draining problems (after draining for about 16 minutes. MAINTENANCE AND CARE / ERROR CODES END OF PROGRAM The...


