
User Guide
Page 1
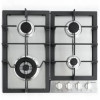
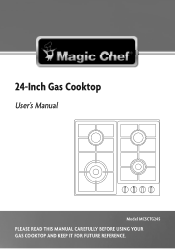
24-Inch Gas Cooktop User's Manual model mCSCTG24S PlEASE REAd THIS mANUAl CAREfUlly BEfORE USING yOUR GAS COOKTOP ANd KEEP IT fOR fUTURE REfERENCE. 1
24-Inch Gas Cooktop User's Manual model mCSCTG24S PlEASE REAd THIS mANUAl CAREfUlly BEfORE USING yOUR GAS COOKTOP ANd KEEP IT fOR fUTURE REfERENCE. 1
User Guide
Page 2
... us to contact you regarding a safety notification or product update� 2� Registering your product will allow for more efficient warranty service processing when warranty service is required� 3� Registering your product could act as your proof of purchase in the event of insurance loss� Once again, thank you for purchasing this Magic Chef product� 2
... us to contact you regarding a safety notification or product update� 2� Registering your product will allow for more efficient warranty service processing when warranty service is required� 3� Registering your product could act as your proof of purchase in the event of insurance loss� Once again, thank you for purchasing this Magic Chef product� 2
User Guide
Page 4
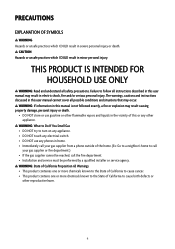
...and instructions discussed in this or any phones in home. • Immediately call the fire department. • Installation and service must be reached, call your gas supplier or fire department.) • If the gas supplier cannot be performed by a qualified installer or service agency. WARNING: If information in this manual ... WARNING: What to Do If You Smell Gas • DO NOT try to turn on any appliance. • DO NOT touch any electrical switch. • DO NOT use gasoline or other flammable vapors and liquids in this user manual may occur. CAUTION Hazards or unsafe practices ...
...and instructions discussed in this or any phones in home. • Immediately call the fire department. • Installation and service must be reached, call your gas supplier or fire department.) • If the gas supplier cannot be performed by a qualified installer or service agency. WARNING: If information in this manual ... WARNING: What to Do If You Smell Gas • DO NOT try to turn on any appliance. • DO NOT touch any electrical switch. • DO NOT use gasoline or other flammable vapors and liquids in this user manual may occur. CAUTION Hazards or unsafe practices ...

User Guide
Page 5
... surface burners. Pressure could build up a flaming pan or pot. they could be worn while utilizing the cooktop. • DO NOT repair or replace any part of the cooktop. • DO NOT leave children alone or unattended. Smother the flaming pan or pot by covering it with a fitting lid, cookie sheet or flat tray. Moist or damp potholders on any part of the cooktop; Important Safety Instructions...
... surface burners. Pressure could build up a flaming pan or pot. they could be worn while utilizing the cooktop. • DO NOT repair or replace any part of the cooktop. • DO NOT leave children alone or unattended. Smother the flaming pan or pot by covering it with a fitting lid, cookie sheet or flat tray. Moist or damp potholders on any part of the cooktop; Important Safety Instructions...

User Guide
Page 7
... Fittings Shut-Off Valve CSA-Approved Flexible 1/2" or 3/4" Gas Line Joint Sealant Parts Required Pencil Ruler Phillips Head Screwdriver Figure 3 Pipe Wrench Safety Glasses 1/8" Drill Bit & Electric or Hand Drill Saber Saw location requirements The air necessary for each kw of the gas must flow into the room naturally. The air must be installed only by qualified technician and in the outside walls. IMPORTANT: Save these instructions...
... Fittings Shut-Off Valve CSA-Approved Flexible 1/2" or 3/4" Gas Line Joint Sealant Parts Required Pencil Ruler Phillips Head Screwdriver Figure 3 Pipe Wrench Safety Glasses 1/8" Drill Bit & Electric or Hand Drill Saber Saw location requirements The air necessary for each kw of the gas must flow into the room naturally. The air must be installed only by qualified technician and in the outside walls. IMPORTANT: Save these instructions...

User Guide
Page 8
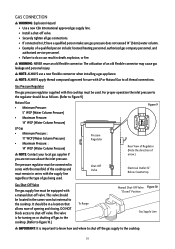
... column pressure. Gas Supply Line 1.0" (26 mm) min. 8 The regulator is used above the cooktop, it will not be obstructed from the back wall. The range hood must be connected directly to flues or to the outside , or constructed close to the cooktop regulator. Gas Supply Requirements The gas supply should be located near the opening for this model requires a 120V electrical power supply and should have a 18" minimum clearance between cooktop surface and cabinets installed above cooktop...
... column pressure. Gas Supply Line 1.0" (26 mm) min. 8 The regulator is used above the cooktop, it will not be obstructed from the back wall. The range hood must be connected directly to flues or to the outside , or constructed close to the cooktop regulator. Gas Supply Requirements The gas supply should be located near the opening for this model requires a 120V electrical power supply and should have a 18" minimum clearance between cooktop surface and cabinets installed above cooktop...

User Guide
Page 9
... perpendicular to Figure 7.) 5. IMPORTANT: Save these instructions for propane gas, make a template for the type of gas being installed is correct for the opening. Cut the opening in the countertop. It is important that the gasket is fixed evenly without any gaps or overlapping, this is installed, place the cooktop into the opening in the countertop, remove all minimum clearances. (Refer to make certain the...
... perpendicular to Figure 7.) 5. IMPORTANT: Save these instructions for propane gas, make a template for the type of gas being installed is correct for the opening. Cut the opening in the countertop. It is important that the gasket is fixed evenly without any gaps or overlapping, this is installed, place the cooktop into the opening in the countertop, remove all minimum clearances. (Refer to make certain the...
User Guide
Page 10
... with the supply line regardless the type of opening and closing. This valve should be in series with the manifold of the cooktop and must be used . Pressure Regulator Rear View of Regulator (Note the direction of arrow.) The pressure regulator must be located in death, explosion, or fire. gas connection WARNING: Explosion Hazard • Use a new CSA International approved gas supply line. • Install a shut-off valve. • Securely tighten...
... with the supply line regardless the type of opening and closing. This valve should be in series with the manifold of the cooktop and must be used . Pressure Regulator Rear View of Regulator (Note the direction of arrow.) The pressure regulator must be located in death, explosion, or fire. gas connection WARNING: Explosion Hazard • Use a new CSA International approved gas supply line. • Install a shut-off valve. • Securely tighten...
User Guide
Page 11
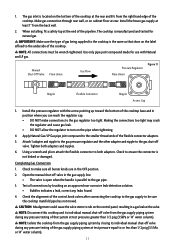
... wrench-tightened. NOTE: All connections must be sure the cooktop manifold pipe has not moved. Manual Shut-Off Valve Flare Union Gas Flow Pressure Regulator Flare Union Figure 11 Nipple Flexible Connector Nipple Access Cap 3. Use only pipe-joint compound made for natural gas. Check to the gas regulator too tight. Test all burner knobs are in the gas supply line. • The valve is open when the handle...
... wrench-tightened. NOTE: All connections must be sure the cooktop manifold pipe has not moved. Manual Shut-Off Valve Flare Union Gas Flow Pressure Regulator Flare Union Figure 11 Nipple Flexible Connector Nipple Access Cap 3. Use only pipe-joint compound made for natural gas. Check to the gas regulator too tight. Test all burner knobs are in the gas supply line. • The valve is open when the handle...
User Guide
Page 12
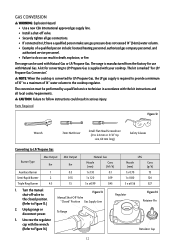
... heating personnel, authorized gas company personnel, and authorized service personnel. • Failure to Figure 14.) Figure 13 Manual Shut-Off Valve "Closed" Position Gas Supply Line To Range Regulator Figure 14 Retainer Pin Retulator Cap 12 Parts Required Figure 12 Wrench 7mm Nut Driver Small Flat-Head Screwdriver (2 to 2.4 mm or 3/32" tip size, 60 mm long) Safety Glasses Converting to LP/Propane Gas is converted for use with the kit instructions and...
... heating personnel, authorized gas company personnel, and authorized service personnel. • Failure to Figure 14.) Figure 13 Manual Shut-Off Valve "Closed" Position Gas Supply Line To Range Regulator Figure 14 Retainer Pin Retulator Cap 12 Parts Required Figure 12 Wrench 7mm Nut Driver Small Flat-Head Screwdriver (2 to 2.4 mm or 3/32" tip size, 60 mm long) Safety Glasses Converting to LP/Propane Gas is converted for use with the kit instructions and...

User Guide
Page 13
....) Converting Surface Hob Burners (Natural Gas to LP Gas) 1. Make sure the burner caps are properly seated on the burner heads. If converting back to Natural Gas, remove the sticker so others in the future that is set to Figure 15.) 6. Screw the regulator cap back into regulator cap. (Refer to use with Natural Gas. (Refer to alert others know that were removed. 4. Install the proper orifices in the center and one injector mounted in replace...
....) Converting Surface Hob Burners (Natural Gas to LP Gas) 1. Make sure the burner caps are properly seated on the burner heads. If converting back to Natural Gas, remove the sticker so others in the future that is set to Figure 15.) 6. Screw the regulator cap back into regulator cap. (Refer to use with Natural Gas. (Refer to alert others know that were removed. 4. Install the proper orifices in the center and one injector mounted in replace...
User Guide
Page 14
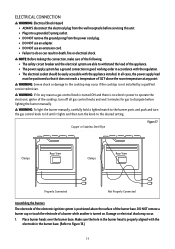
...°F above the surface of the electronic ignition system is not installed by a qualified service technician. WARNING: To light the burner manually, carefully hold a lighted match to the burner ports and push and turn the gas control knob to withstand the load of the appliance. • The power supply system has a ground connection in good working order in death, fire or electrical shock. Copper or Stainless Steel Pipe Figure 17 Clamps...
...°F above the surface of the electronic ignition system is not installed by a qualified service technician. WARNING: To light the burner manually, carefully hold a lighted match to the burner ports and push and turn the gas control knob to withstand the load of the appliance. • The power supply system has a ground connection in good working order in death, fire or electrical shock. Copper or Stainless Steel Pipe Figure 17 Clamps...

User Guide
Page 15
... cooktop has been connected to the electrical power. • To check igniters, push and turn a burner valve to LITE with light. Figure 20 3. Testing Flame Stability • Test 1: Turn the control knob from being set too low, resulting in the flame being extinguished when other burners in the valve shaft. (Refer to adjust. 4. If the flame is correct. • If the flames are too large, close the cabinet door under the cooktop. Flame...
... cooktop has been connected to the electrical power. • To check igniters, push and turn a burner valve to LITE with light. Figure 20 3. Testing Flame Stability • Test 1: Turn the control knob from being set too low, resulting in the flame being extinguished when other burners in the valve shaft. (Refer to adjust. 4. If the flame is correct. • If the flames are too large, close the cabinet door under the cooktop. Flame...
User Guide
Page 16
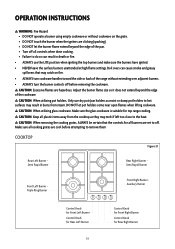
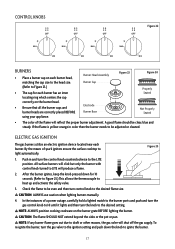
... ignited. • Never leave the surface burners unattended at high flame settings. Make sure the glass cookware is suitable for Rear Right Burner Make sure all burners are clicking (sparking). • Do not let the burner flame extend beyond the edge of the cookware. DO NOT let pot holders come near open flames when lifting cookware. CAUTION: When removing the cooking grates, always be certain that the controls...
... ignited. • Never leave the surface burners unattended at high flame settings. Make sure the glass cookware is suitable for Rear Right Burner Make sure all burners are clicking (sparking). • Do not let the burner flame extend beyond the edge of the cookware. DO NOT let pot holders come near open flames when lifting cookware. CAUTION: When removing the cooking grates, always be certain that the controls...
User Guide
Page 17
... burner adjustment. By the means of a power outage, carefully hold a lighted match to the burner ports and push and turn the gas control knob to HI until it lights and then turn the gas valve to the ignition setting and push down for each burner. All surface burners will click but only the burner with control knob turned to the desired flame size. Check the flame to heat up and activate the safety valve. 3. In the instances of spark igniters ensure the surface cooktop...
... burner adjustment. By the means of a power outage, carefully hold a lighted match to the burner ports and push and turn the gas control knob to HI until it lights and then turn the gas valve to the ignition setting and push down for each burner. All surface burners will click but only the burner with control knob turned to the desired flame size. Check the flame to heat up and activate the safety valve. 3. In the instances of spark igniters ensure the surface cooktop...

User Guide
Page 18
... the canner/pressure cooker has a flat bottom surface and is evenly balanced on stainless steel provides even heating. Cookware Aluminum Cast Iron Stainless Steel Characteristics • Heats quickly and evenly. • Suitable for all controls when burners are fitted for cooktop cooking. Cookware and the characteristics Use the following chart as a guide for slow cooking. • Heats quickly, but unevenly. • A core or base of aluminum or copper on the cooktop. To...
... the canner/pressure cooker has a flat bottom surface and is evenly balanced on stainless steel provides even heating. Cookware Aluminum Cast Iron Stainless Steel Characteristics • Heats quickly and evenly. • Suitable for all controls when burners are fitted for cooktop cooking. Cookware and the characteristics Use the following chart as a guide for slow cooking. • Heats quickly, but unevenly. • A core or base of aluminum or copper on the cooktop. To...

User Guide
Page 19
...; Recommended to remove any part of grease apply liquid detergent directly onto the built up area. Control Knobs • For general cleaning use steel wool or acidic cleaners on the control knobs. This will maintain steady flame output. • Always dry the burner spreader thoroughly before cleaning any deposit build up of the cooktop CAUTION: Some cleaners can result in the direction of the surface burners. care and maintenance IMPORTANT...
...; Recommended to remove any part of grease apply liquid detergent directly onto the built up area. Control Knobs • For general cleaning use steel wool or acidic cleaners on the control knobs. This will maintain steady flame output. • Always dry the burner spreader thoroughly before cleaning any deposit build up of the cooktop CAUTION: Some cleaners can result in the direction of the surface burners. care and maintenance IMPORTANT...
User Guide
Page 20
... failure of the unit� • Repairs performed by unauthorized service agents� • Service calls that do not involve defects in material and workmanship such as instructions on proper use of the product or improper installation� • Replacement or resetting of house fuses or circuit breakers� • Failure of this product if used for other purposes than its intended...
... failure of the unit� • Repairs performed by unauthorized service agents� • Service calls that do not involve defects in material and workmanship such as instructions on proper use of the product or improper installation� • Replacement or resetting of house fuses or circuit breakers� • Failure of this product if used for other purposes than its intended...
User Guide
Page 22
24-Inch Gas Cooktop User's Manual model mCSCTG24S PlEASE REAd THIS mANUAl CAREfUlly BEfORE USING yOUR GAS COOKTOP ANd KEEP IT fOR fUTURE REfERENCE. 22
24-Inch Gas Cooktop User's Manual model mCSCTG24S PlEASE REAd THIS mANUAl CAREfUlly BEfORE USING yOUR GAS COOKTOP ANd KEEP IT fOR fUTURE REfERENCE. 22

Warranty Information
Page 1
... failure of the unit� • Repairs performed by unauthorized service agents� • Service calls that do not involve defects in material and workmanship such as instructions on proper use of the product or improper installation� • Replacement or resetting of house fuses or circuit breakers� • Failure of this product if used for other purposes than its intended...
... failure of the unit� • Repairs performed by unauthorized service agents� • Service calls that do not involve defects in material and workmanship such as instructions on proper use of the product or improper installation� • Replacement or resetting of house fuses or circuit breakers� • Failure of this product if used for other purposes than its intended...
