User Manual
Page 1
-Inch Gas Cooktop User's Manual Model MCSCTG S PLEASE READ THIS MANUAL CAREFULLY BEFORE USING YOUR GAS COOKTOP AND KEEP IT FOR FUTURE REFERENCE. 1
-Inch Gas Cooktop User's Manual Model MCSCTG S PLEASE READ THIS MANUAL CAREFULLY BEFORE USING YOUR GAS COOKTOP AND KEEP IT FOR FUTURE REFERENCE. 1
User Manual
Page 2
... for purchasing this Magic Chef® product. The first step to protect your product will allow for purchasing this Magic Chef product. 2 Registering your new product is required. 3. Registering your... product could act as your proof of purchase in the event of registering your product will allow us to complete the product registration on our website: www.mcappliance.com/register. The benefits of insurance loss. Once again, thank you for more efficient warranty service...
... for purchasing this Magic Chef® product. The first step to protect your product will allow for purchasing this Magic Chef product. 2 Registering your new product is required. 3. Registering your... product could act as your proof of purchase in the event of registering your product will allow us to complete the product registration on our website: www.mcappliance.com/register. The benefits of insurance loss. Once again, thank you for more efficient warranty service...
User Manual
Page 4
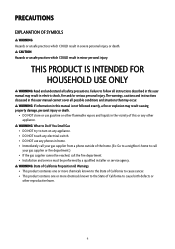
...Smell Gas DO NOT try to call your gas supplier from a phone outside of this user manual cannot cover all safety precautions. Failure to follow all instructions described in this manual is not followed exactly, a fire or explosion may result in electric ...gas supplier cannot be performed by a qualified installer or service agency. DO NOT use gasoline or other flammable vapors and liquids in the vicinity of the home. (Ex: Go to a neighbor's home to turn on any appliance. Installation and service must be reached, call the fire department. The warnings, cautions and instructions...
...Smell Gas DO NOT try to call your gas supplier from a phone outside of this user manual cannot cover all safety precautions. Failure to follow all instructions described in this manual is not followed exactly, a fire or explosion may result in electric ...gas supplier cannot be performed by a qualified installer or service agency. DO NOT use gasoline or other flammable vapors and liquids in the vicinity of the home. (Ex: Go to a neighbor's home to turn on any appliance. Installation and service must be reached, call the fire department. The warnings, cautions and instructions...
User Manual
Page 5
... NOT repair or replace any part of fat drippings on any part of the pan or pot can burst, causing injury. If the cooktop is in use water on the surface burners. Loose fitting or hanging garments SHOULD NOT be referred to line any part of the cooktop. Use multi-purpose dry chemicals or foam-type fire extinguisher. Use only dry pot holders. All other servicing should...
... NOT repair or replace any part of fat drippings on any part of the pan or pot can burst, causing injury. If the cooktop is in use water on the surface burners. Loose fitting or hanging garments SHOULD NOT be referred to line any part of the cooktop. Use multi-purpose dry chemicals or foam-type fire extinguisher. Use only dry pot holders. All other servicing should...

User Manual
Page 7
...'s installation instructions, local gas fitting regulations, municipal building codes, electrical wiring regulations, local water supply regulations. Read and save these instructions for the combustion of power. 7 The air must flow into the room naturally. TOOLS AND PARTS Tools Required Figure 2 Pipe Fittings Shut-Off Valve CSA-Approved Flexible 1/2" or 3/4" Gas Line Joint Sealant Parts Required Pencil Ruler Phillips Head Screwdriver Figure 3 Pipe Wrench Safety Glasses 1/8" Drill Bit & Electric or Hand Drill Saber Saw LOCATION REQUIREMENTS...
...'s installation instructions, local gas fitting regulations, municipal building codes, electrical wiring regulations, local water supply regulations. Read and save these instructions for the combustion of power. 7 The air must flow into the room naturally. TOOLS AND PARTS Tools Required Figure 2 Pipe Fittings Shut-Off Valve CSA-Approved Flexible 1/2" or 3/4" Gas Line Joint Sealant Parts Required Pencil Ruler Phillips Head Screwdriver Figure 3 Pipe Wrench Safety Glasses 1/8" Drill Bit & Electric or Hand Drill Saber Saw LOCATION REQUIREMENTS...
User Manual
Page 8
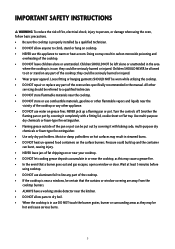
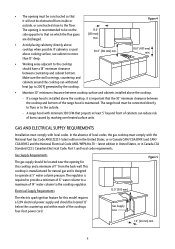
... sure the wall coverings, countertop and cabinets around the cooktop can reduce risk of local codes, the gas cooktop must be connected directly to flues or to the outside , or constructed close to the floor. The range hood must comply with the National Fuel Gas Code ANSI Z223.1- Electrical Supply Requirements Figure 5 12.0" (305 mm) The electric spark ignition feature for this model requires a 120V electrical power supply and should be located 12" below...
... sure the wall coverings, countertop and cabinets around the cooktop can reduce risk of local codes, the gas cooktop must be connected directly to flues or to the outside , or constructed close to the floor. The range hood must comply with the National Fuel Gas Code ANSI Z223.1- Electrical Supply Requirements Figure 5 12.0" (305 mm) The electric spark ignition feature for this model requires a 120V electrical power supply and should be located 12" below...
User Manual
Page 9
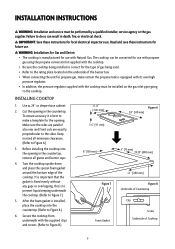
... these instructions for use with Natural Gas. INSTALLING COOKTOP 1. Cut the opening in the countertop. Secure the cooktop from underneath with the cooktop must be converted for local electrical inspectors use . IMPORTANT: Save these instructions for use with propane gas using the propane conversion kit supplied with its own high pressure regulator. The cooktop can result in mind all grates and burner caps. 4. Refer to the rating plate located on the gas inlet pipe going to Figure 6.) 6. Before installing the cooktop into the countertop...
... these instructions for use with Natural Gas. INSTALLING COOKTOP 1. Cut the opening in the countertop. Secure the cooktop from underneath with the cooktop must be converted for local electrical inspectors use . IMPORTANT: Save these instructions for use with propane gas using the propane conversion kit supplied with its own high pressure regulator. The cooktop can result in mind all grates and burner caps. 4. Refer to the rating plate located on the gas inlet pipe going to Figure 6.) 6. Before installing the cooktop into the countertop...
User Manual
Page 10
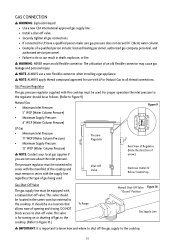
... line regardless the type of opening and closing. Pressure Regulator Rear View of Regulator (Note the direction of arrow.) The pressure regulator must be in series with the manifold of the cooktop and must remain in a location that allows ease of gas being used . Gas Pressure Regulator The gas pressure regulator supplied with this cooktop must be used . Shut-Off Valve Electrical Outlet 12" Below Countertop Gas Shut-Off Valve The gas supply line must be equipped with LP or Natural Gas...
... line regardless the type of opening and closing. Pressure Regulator Rear View of Regulator (Note the direction of arrow.) The pressure regulator must be in series with the manifold of the cooktop and must remain in a location that allows ease of gas being used . Gas Pressure Regulator The gas pressure regulator supplied with this cooktop must be used . Shut-Off Valve Electrical Outlet 12" Below Countertop Gas Shut-Off Valve The gas supply line must be equipped with LP or Natural Gas...
User Manual
Page 11
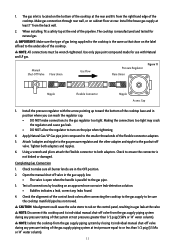
... the regulator cap. Attach 1 adapter and nipple to the gas pressure regulator and the other adapter and nipple to ensure the connector is not kinked or damaged. Check to make connections to the gas regulator too tight. 1. Install the house gas supply at the end of the cooktop. Use only pipe-joint compound made for natural gas. Install the pressure regulator with Natural and LP gas. Open the manual shut-off valve...
... the regulator cap. Attach 1 adapter and nipple to the gas pressure regulator and the other adapter and nipple to ensure the connector is not kinked or damaged. Check to make connections to the gas regulator too tight. 1. Install the house gas supply at the end of the cooktop. Use only pipe-joint compound made for natural gas. Install the pressure regulator with Natural and LP gas. Open the manual shut-off valve...
User Manual
Page 12
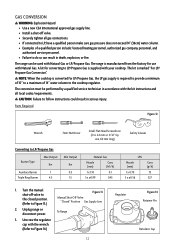
... cooktop is supplied with your cooktop. If connected to the cooktop regulator. The conversion must be used with the kit instructions and all gas connections. Unscrew the regulator cap with Natural Gas. The kit is required to provide a minimum of 10" to a maximum of a qualified person include: licensed heating personnel, authorized gas company personnel, and authorized service personnel. CAUTION: Failure to Figure 14.) Figure 13 Manual Shut-Off Valve "Closed" Position Gas Supply Line To Range 12 Regulator...
... cooktop is supplied with your cooktop. If connected to the cooktop regulator. The conversion must be used with the kit instructions and all gas connections. Unscrew the regulator cap with Natural Gas. The kit is required to provide a minimum of 10" to a maximum of a qualified person include: licensed heating personnel, authorized gas company personnel, and authorized service personnel. CAUTION: Failure to Figure 14.) Figure 13 Manual Shut-Off Valve "Closed" Position Gas Supply Line To Range 12 Regulator...
User Manual
Page 13
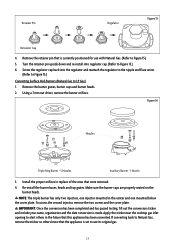
... currently positioned for use its original gas. 13 Turn the retainer pin upside down and re-install into the regulator and reattach the regulator to the nipple and flare union. (Refer to Figure 15.) Converting Surface Hob Burners (Natural Gas to Figure 15.) 5. Using a 7 mm nut driver, remove the burner orifices. Make sure the burner caps are properly seated on the burner heads. IMPORTANT: Once the conversion has been completed...
... currently positioned for use its original gas. 13 Turn the retainer pin upside down and re-install into the regulator and reattach the regulator to the nipple and flare union. (Refer to Figure 15.) Converting Surface Hob Burners (Natural Gas to Figure 15.) 5. Using a 7 mm nut driver, remove the burner orifices. Make sure the burner caps are properly seated on the burner heads. IMPORTANT: Once the conversion has been completed...
User Manual
Page 14
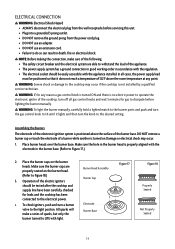
... the cooktop and supply line have been carefully checked for any point. Burner Head Assembly Burner Cap Electrode Burner Base Figure 17 Figure 18 Properly Seated Not Properly Seated 14 DO NOT remove the ground prong from the wall receptacle before lighting the burner manually. NOTE: Before making the connection, make a series of the burner base. WARNING: To light the burner manually, carefully hold a lighted match to the burner ports and push and turn the gas control knob...
... the cooktop and supply line have been carefully checked for any point. Burner Head Assembly Burner Cap Electrode Burner Base Figure 17 Figure 18 Properly Seated Not Properly Seated 14 DO NOT remove the ground prong from the wall receptacle before lighting the burner manually. NOTE: Before making the connection, make a series of the burner base. WARNING: To light the burner manually, carefully hold a lighted match to the burner ports and push and turn the gas control knob...
User Manual
Page 15
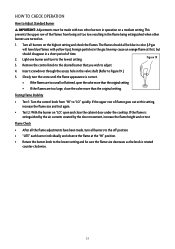
.... Remove the control knob to the desired burner that you wish to "LO" quickly. If the flames are too large, close the cabinet door under the cooktop. HOW TO CHECK OPERATION How to Adjust Standard Burner IMPORTANT: Adjustments must be sure the flame size decreases as the knob is rotated counter-clockwise. 15 This prevents the upper row of time. 2. The flames should disappear in the gas line...
.... Remove the control knob to the desired burner that you wish to "LO" quickly. If the flames are too large, close the cabinet door under the cooktop. HOW TO CHECK OPERATION How to Adjust Standard Burner IMPORTANT: Adjustments must be sure the flame size decreases as the knob is rotated counter-clockwise. 15 This prevents the upper row of time. 2. The flames should disappear in the gas line...
User Manual
Page 16
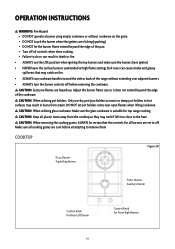
...: Excessive flames are clicking (sparking). CAUTION: When removing the cooking grates, ALWAYS be certain that may result in death or fire. ALWAYS turn the burner controls off before attempting to remove them COOKTOP Figure 20 Burner Triple Ring Burner Front Burner Auxiliary Burner Control Knob for Rear Left Burner 16 Control Knob for top range cooking. Only use the LITE position when igniting the top burners and make sure the burners have ignited. Make sure the glass cookware...
...: Excessive flames are clicking (sparking). CAUTION: When removing the cooking grates, ALWAYS be certain that may result in death or fire. ALWAYS turn the burner controls off before attempting to remove them COOKTOP Figure 20 Burner Triple Ring Burner Front Burner Auxiliary Burner Control Knob for Rear Left Burner 16 Control Knob for top range cooking. Only use the LITE position when igniting the top burners and make sure the burners have ignited. Make sure the glass cookware...

User Manual
Page 17
... or pan. CAUTION: ALWAYS use caution when lighting burners manually. 4. NOTE: If any burner flame goes out due to the desired setting. In the instances of a power outage, carefully hold a lighted match to the burner ports and push and turn the gas control knob to HI until it lights and then turn the control knob counterclockwise to the LITE position. All surface burners will shut off the gas supply. ELECTRIC GAS IGNITION The gas burners utilize an electric ignition device located near each burner...
... or pan. CAUTION: ALWAYS use caution when lighting burners manually. 4. NOTE: If any burner flame goes out due to the desired setting. In the instances of a power outage, carefully hold a lighted match to the burner ports and push and turn the gas control knob to HI until it lights and then turn the control knob counterclockwise to the LITE position. All surface burners will shut off the gas supply. ELECTRIC GAS IGNITION The gas burners utilize an electric ignition device located near each burner...

User Manual
Page 18
... Aluminum Cast Iron Stainless Steel Characteristics Heats quickly and evenly. Heats slowly and evenly. If the fat is the appropriate in use. To avoid spillover make sure cookware is unstable or easily tippable as a guide for all controls when burners are fitted for slow cooking. Good for cooktop cooking. DEEP FRYING ALWAYS use a thermometer and adjust the surface control knob to the canner/pressure cooker. DO NOT let the burner flames...
... Aluminum Cast Iron Stainless Steel Characteristics Heats quickly and evenly. Heats slowly and evenly. If the fat is the appropriate in use. To avoid spillover make sure cookware is unstable or easily tippable as a guide for all controls when burners are fitted for slow cooking. Good for cooktop cooking. DEEP FRYING ALWAYS use a thermometer and adjust the surface control knob to the canner/pressure cooker. DO NOT let the burner flames...

User Manual
Page 19
... soft, lint-free cloth. ALWAYS dry the burner spreader thoroughly before turning OFF all surface burners and grates to cool prior to utilize a non-abrasive cloth or plastic scrubbing pad. CARE AND MAINTENANCE IMPORTANT: DO NOT attempt to avoid damage. Stainless Steel DO NOT use steel wool or acidic cleaners on the control knobs. Grates and End Caps DO NOT clean until the grates and caps have cooled...
... soft, lint-free cloth. ALWAYS dry the burner spreader thoroughly before turning OFF all surface burners and grates to cool prior to utilize a non-abrasive cloth or plastic scrubbing pad. CARE AND MAINTENANCE IMPORTANT: DO NOT attempt to avoid damage. Stainless Steel DO NOT use steel wool or acidic cleaners on the control knobs. Grates and End Caps DO NOT clean until the grates and caps have cooled...
User Manual
Page 20
... owner(s). LIMITED WARRANTY MC Appliance Corporation warrants each new Gas Cooktop to be free from state to state. Repairs performed by law. Model Parts One Year Labor One Year Type of house fuses or circuit breakers. Any and all implied warranties including merchantability and fitness for incidental or consequential damages and no circumstances is the consumer permitted to return this limited warranty. Replacement or resetting of Service...
... owner(s). LIMITED WARRANTY MC Appliance Corporation warrants each new Gas Cooktop to be free from state to state. Repairs performed by law. Model Parts One Year Labor One Year Type of house fuses or circuit breakers. Any and all implied warranties including merchantability and fitness for incidental or consequential damages and no circumstances is the consumer permitted to return this limited warranty. Replacement or resetting of Service...

User Manual
Page 21
d/b/a MC Appliance Corporation. Magic Chef® logo is a registered trademark of CNA International, Inc. All rights reserved. CNA International, Inc. www.mcappliance.com 21 Printed in China
d/b/a MC Appliance Corporation. Magic Chef® logo is a registered trademark of CNA International, Inc. All rights reserved. CNA International, Inc. www.mcappliance.com 21 Printed in China

User Manual
Page 44
www.mcappliance.com 44 Printed in China Magic Chef® logo is a registered trademark of CNA International, Inc. All rights reserved. d/b/a MC Appliance Corporation. CNA International, Inc.
www.mcappliance.com 44 Printed in China Magic Chef® logo is a registered trademark of CNA International, Inc. All rights reserved. d/b/a MC Appliance Corporation. CNA International, Inc.