User Manual
Page 1
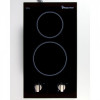
12-Inch Electric Cooktop User's Manual Model MCSCTE12BG1 MCSCTE12BG2 PLEASE READ THIS MANUAL CAREFULLY BEFORE USING YOUR ELECTRIC 1 RANGE AND KEEP IT FOR FUTURE REFERENCE.
12-Inch Electric Cooktop User's Manual Model MCSCTE12BG1 MCSCTE12BG2 PLEASE READ THIS MANUAL CAREFULLY BEFORE USING YOUR ELECTRIC 1 RANGE AND KEEP IT FOR FUTURE REFERENCE.
User Manual
Page 2
... could act as your product include the following: 1. PRODUCT REGISTRATION Thank you for purchasing this Magic Chef® product. The benefits of registering your proof of purchase in the event of insurance loss. Registering your product will allow for more efficient warranty service processing when warranty service is to contact you regarding a safety notification or product update. 2.
... could act as your product include the following: 1. PRODUCT REGISTRATION Thank you for purchasing this Magic Chef® product. The benefits of registering your proof of purchase in the event of insurance loss. Registering your product will allow for more efficient warranty service processing when warranty service is to contact you regarding a safety notification or product update. 2.
User Manual
Page 4
Failure to follow all possible conditions and situations that may result in electric shock, fire and/or serious personal injury. CAUTION Hazards or unsafe practices which COULD result in severe personal injury or death. The warnings, cautions and instructions discussed in this user manual cannot cover all instructions described in this user manual may occur. 4 PRECAUTIONS EXPLANATION OF SYMBOLS WARNING Hazards or unsafe practices which COULD result in minor personal injury. THIS PRODUCT IS INTENDED FOR HOUSEHOLD USE ONLY WARNING: Read and understand all safety precautions.
Failure to follow all possible conditions and situations that may result in electric shock, fire and/or serious personal injury. CAUTION Hazards or unsafe practices which COULD result in severe personal injury or death. The warnings, cautions and instructions discussed in this user manual cannot cover all instructions described in this user manual may occur. 4 PRECAUTIONS EXPLANATION OF SYMBOLS WARNING Hazards or unsafe practices which COULD result in minor personal injury. THIS PRODUCT IS INTENDED FOR HOUSEHOLD USE ONLY WARNING: Read and understand all safety precautions.
User Manual
Page 5
... the cooktop unless specifically recommended in use water on a hot cooking area, be stored near units. DO NOT repair or replace any of clothing. DO NOT use . Smother fire or flame or use a towel or other servicing SHOULD be left alone or unattended in burns from steam. NEVER leave surface units unattended at high heat settings. DO NOT cook on hot surfaces may ignite. 9. DO NOT place any part of...
... the cooktop unless specifically recommended in use water on a hot cooking area, be stored near units. DO NOT repair or replace any of clothing. DO NOT use . Smother fire or flame or use a towel or other servicing SHOULD be left alone or unattended in burns from steam. NEVER leave surface units unattended at high heat settings. DO NOT cook on hot surfaces may ignite. 9. DO NOT place any part of...

User Manual
Page 6
SPECIFICATIONS 12" (305 mm) 19.3" (490mm) 21.5" (546 mm) Figure 1 11.4" (290 mm) 2" (52 mm) 3.15" (80 mm) Glass Width Glass Depth Cooktop Height Including Conduit (located at rear of cooktop, right side) Frame Width Frame Depth Cooktop Height Net Weight Voltage Rating Power Rating 12" (305 mm) 21.5" (546 mm) 3.15" (80 mm) 11.4" (290 mm) 19.3" (490 mm) 2" (52 mm) 14.1 lbs.(6.4kg) 240 V, 60 Hz 3000 W 120V, 60 Hz 2600 W 6
SPECIFICATIONS 12" (305 mm) 19.3" (490mm) 21.5" (546 mm) Figure 1 11.4" (290 mm) 2" (52 mm) 3.15" (80 mm) Glass Width Glass Depth Cooktop Height Including Conduit (located at rear of cooktop, right side) Frame Width Frame Depth Cooktop Height Net Weight Voltage Rating Power Rating 12" (305 mm) 21.5" (546 mm) 3.15" (80 mm) 11.4" (290 mm) 19.3" (490 mm) 2" (52 mm) 14.1 lbs.(6.4kg) 240 V, 60 Hz 3000 W 120V, 60 Hz 2600 W 6

User Manual
Page 8
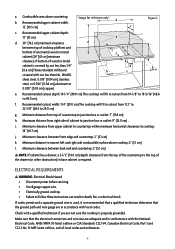
... to "Electrical Requirements" section on page 9.) LOCATION REQUIREMENTS IMPORTANT: If installing a range hood or microwave hood combination above the cooktop, follow the instructions provided with any tools listed here. Read and follow the range hood or microwave hood combination installation instructions for convenient use minimum dimensions given. Tools Reguired Tape Measure 1/4" (6.35 mm) Nut Driver Marker or Pencil Pliers Flat-Blade Screwdriver Parts Supplied Foam Strip Roll Clamping Brackets (4) 2-1/2" (6.4 cm) Clamping Screws (2) Parts Reguired A UL Listed or...
... to "Electrical Requirements" section on page 9.) LOCATION REQUIREMENTS IMPORTANT: If installing a range hood or microwave hood combination above the cooktop, follow the instructions provided with any tools listed here. Read and follow the range hood or microwave hood combination installation instructions for convenient use minimum dimensions given. Tools Reguired Tape Measure 1/4" (6.35 mm) Nut Driver Marker or Pencil Pliers Flat-Blade Screwdriver Parts Supplied Foam Strip Roll Clamping Brackets (4) 2-1/2" (6.4 cm) Clamping Screws (2) Parts Reguired A UL Listed or...
User Manual
Page 9
...) The cooktop will fit in cutout from top of countertop to follow these instructions can result in conformance with not less than No. 28 MSG h k k f sheet steel, 0.015" [0.04 cm] stainless steel, or 0.024" [0.06 cm] aluminum or 0.020" [0.05 cm] copper) e. Minimum clearance from 19-1/8" to 19-5/16" (48.6 to cooktop: 18" (45.7 cm) j. Minimum clearance between back wall and countertop: 2" (5.1 cm) NOTE: If cabinet has...
...) The cooktop will fit in cutout from top of countertop to follow these instructions can result in conformance with not less than No. 28 MSG h k k f sheet steel, 0.015" [0.04 cm] stainless steel, or 0.024" [0.06 cm] aluminum or 0.020" [0.05 cm] copper) e. Minimum clearance from 19-1/8" to 19-5/16" (48.6 to cooktop: 18" (45.7 cm) j. Minimum clearance between back wall and countertop: 2" (5.1 cm) NOTE: If cabinet has...
User Manual
Page 10
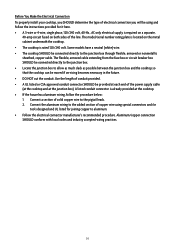
...., AC only electrical supply is located on both sides of solid copper wire to aluminum. DO NOT cut the conduit. The model/serial number rating plate is required on a separate, 40-amp circuit fused on the metal cabinet underneath the cooktop. The cooktop SHOULD be provided at each end of the power supply cable (at the cooktop and at the cooktop. If the house has aluminum wiring, follow the instructions provided for...
...., AC only electrical supply is located on both sides of solid copper wire to aluminum. DO NOT cut the conduit. The model/serial number rating plate is required on a separate, 40-amp circuit fused on the metal cabinet underneath the cooktop. The cooktop SHOULD be provided at each end of the power supply cable (at the cooktop and at the cooktop. If the house has aluminum wiring, follow the instructions provided for...

User Manual
Page 11
... cooktop is needed , lift entire cooktop up from the cooktop for the cooktop. IMPORTANT: Clamping brackets SHOULD NOT be installed after the cooktop is needed , lift entire cooktop up from the packaging. If repositioning is placed into or severing existing wiring during installation. 1. INSTALLATION INSTRUCTIONS PREPARING COOKTOP FOR INSTALLATION WARNING: Excessive Weight Hazard Use two or more people, place cooktop right side up into the cutout. Cooktop INSTALLING COOKTOP Type 1: Cooktop Over Undercounter Built-In Oven Using...
... cooktop is needed , lift entire cooktop up from the cooktop for the cooktop. IMPORTANT: Clamping brackets SHOULD NOT be installed after the cooktop is needed , lift entire cooktop up from the packaging. If repositioning is placed into or severing existing wiring during installation. 1. INSTALLATION INSTRUCTIONS PREPARING COOKTOP FOR INSTALLATION WARNING: Excessive Weight Hazard Use two or more people, place cooktop right side up into the cutout. Cooktop INSTALLING COOKTOP Type 1: Cooktop Over Undercounter Built-In Oven Using...
User Manual
Page 12
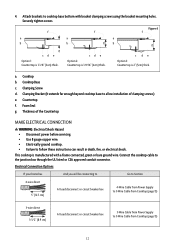
..., fire, or electrical shock. Cooktop Base c. Electrical Connection Options If your home has And you will be connecting to Go to Section 4-wire direct 5" (12.7 cm) A fused disconnect or circuit breaker box 4-Wire Cable from Power Supply to 3-Wire Cable from Cooktop (page 13) 3-wire direct 3-1/2" (8.9 cm) A fused disconnect or circuit breaker box 3-Wire Cable from Power Supply to cooktop base bottom with a frame connected, green or bare ground wire. f a b g cd e Option 1: Countertop is 2" (5cm) thick. Electrically ground cooktop. Clamping Screw d. Foam Seal g.
..., fire, or electrical shock. Cooktop Base c. Electrical Connection Options If your home has And you will be connecting to Go to Section 4-wire direct 5" (12.7 cm) A fused disconnect or circuit breaker box 4-Wire Cable from Power Supply to 3-Wire Cable from Cooktop (page 13) 3-wire direct 3-1/2" (8.9 cm) A fused disconnect or circuit breaker box 3-Wire Cable from Power Supply to cooktop base bottom with a frame connected, green or bare ground wire. f a b g cd e Option 1: Countertop is 2" (5cm) thick. Electrically ground cooktop. Clamping Screw d. Foam Seal g.

User Manual
Page 13
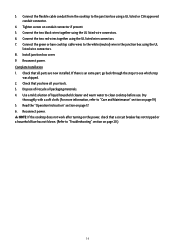
Disconnect power 2. Connect the two red wires together using the UL listed wire connectors. 6. Install junction box cover. 10. Green or Bare Ground Wire (from Cooktop) g d. 3-Wire Cable from Power Supply) i g. Black Wires d i. Tighten screws on the end of the white wire. Put a UL listed wire connector on conduit connector, if present. 5. UL Listed Wire Connector h. UL Listed or CSA Approved Conduit Connector 1. Disconnect power 2. Red Wires b e c. White Wire (from Cooktop e. UL Listed Wire Connector h. Remove junction box cover, if present....
Disconnect power 2. Connect the two red wires together using the UL listed wire connectors. 6. Install junction box cover. 10. Green or Bare Ground Wire (from Cooktop) g d. 3-Wire Cable from Power Supply) i g. Black Wires d i. Tighten screws on the end of the white wire. Put a UL listed wire connector on conduit connector, if present. 5. UL Listed Wire Connector h. UL Listed or CSA Approved Conduit Connector 1. Disconnect power 2. Red Wires b e c. White Wire (from Cooktop e. UL Listed Wire Connector h. Remove junction box cover, if present....
User Manual
Page 14
... a circuit breaker has not tripped or a household fuse has not blown. (Refer to clean cooktop before use. Read the "Operation Instruction" section on conduit connector if present. 5. Connect the two red wires together using the UL listed wire connectors. 6. Use a mild solution of /recycle all packaging materials. 4. Connect the two black wires together using the UL listed wire connectors. 7. Dispose of liquid household cleaner and warm water to "Troubleshooting...
... a circuit breaker has not tripped or a household fuse has not blown. (Refer to clean cooktop before use. Read the "Operation Instruction" section on conduit connector if present. 5. Connect the two red wires together using the UL listed wire connectors. 6. Use a mild solution of /recycle all packaging materials. 4. Connect the two black wires together using the UL listed wire connectors. 7. Dispose of liquid household cleaner and warm water to "Troubleshooting...
User Manual
Page 15
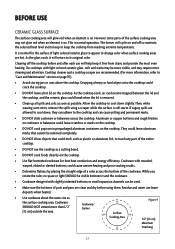
... is removed. Allow the cooktop to cool down , they can adhere to the cooktop and can leave deposits when heated. DO NOT cook popcorn in prepackaged aluminum containers on the cooktop. Cookware designed with light colored ceramic glass, soils and stains may be used. Use cookware about the same size as a cutting board. BEFORE USE CERAMIC GLASS SURFACE The surface cooking area will return to its original color. Cleaning off to...
... is removed. Allow the cooktop to cool down , they can adhere to the cooktop and can leave deposits when heated. DO NOT cook popcorn in prepackaged aluminum containers on the cooktop. Cookware designed with light colored ceramic glass, soils and stains may be used. Use cookware about the same size as a cutting board. BEFORE USE CERAMIC GLASS SURFACE The surface cooking area will return to its original color. Cleaning off to...
User Manual
Page 16
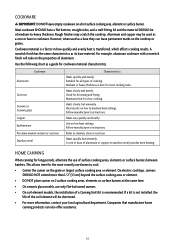
... low heat settings. Rough finishes may be used as a core or base in how quickly and evenly heat is best for cookware material characteristics. A nonstick finish has the same characteristics as a base they can also offer assistance. 16 Cookware Aluminum Cast iron Ceramic or Ceramic glass Copper Earthenware Porcelain enamel-onsteel or cast iron Stainless steel Characteristics Heats quickly and evenly. Follow manufacturer's instructions. Use on a hot surface cooking area, element or surface burner...
... low heat settings. Rough finishes may be used as a core or base in how quickly and evenly heat is best for cookware material characteristics. A nonstick finish has the same characteristics as a base they can also offer assistance. 16 Cookware Aluminum Cast iron Ceramic or Ceramic glass Copper Earthenware Porcelain enamel-onsteel or cast iron Stainless steel Characteristics Heats quickly and evenly. Follow manufacturer's instructions. Use on a hot surface cooking area, element or surface burner...
User Manual
Page 17
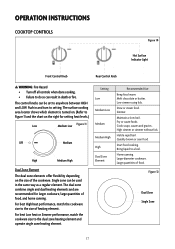
... cookware. Bring liquid to the dual zone heating element and operate single zone heating element. For best Low heat or Simmer performance, match the cookware size to a boil. Quickly brown or sear food. OPERATION INSTRUCTIONS COOKTOP CONTROLS Figure 10 Hot Surface Indicator Light Front Control Knob Rear Control Knob WARNING: Fire Hazard Turn off all controls when done cooking. The control knobs can be used in and turn to the size of food, and home canning. Stew...
... cookware. Bring liquid to the dual zone heating element and operate single zone heating element. For best Low heat or Simmer performance, match the cookware size to a boil. Quickly brown or sear food. OPERATION INSTRUCTIONS COOKTOP CONTROLS Figure 10 Hot Surface Indicator Light Front Control Knob Rear Control Knob WARNING: Fire Hazard Turn off all controls when done cooking. The control knobs can be used in and turn to the size of food, and home canning. Stew...

User Manual
Page 18
Turn knob to the DUAL position. 2. Low Off Dual High Figure 13 Medium Low Medium Medium High Hot Surface Indicator Light This unit features a Hot Surface Indicator Light. Push in and turn knob from the OFF position to the SINGLE zone anywhere between LOW and HIGH. 2. The Hot Surface Indicator Light will glow as long as any surface cooking area is turned off. 18 Turn knob to touch, even after the surface cooking area(s) is too hot to OFF position when finished. Push in and turn knob from the OFF position to OFF when finished. To Use SINGLE: 1. To Use DUAL: 1.
Turn knob to the DUAL position. 2. Low Off Dual High Figure 13 Medium Low Medium Medium High Hot Surface Indicator Light This unit features a Hot Surface Indicator Light. Push in and turn knob from the OFF position to the SINGLE zone anywhere between LOW and HIGH. 2. The Hot Surface Indicator Light will glow as long as any surface cooking area is turned off. 18 Turn knob to touch, even after the surface cooking area(s) is too hot to OFF position when finished. Push in and turn knob from the OFF position to OFF when finished. To Use SINGLE: 1. To Use DUAL: 1.
User Manual
Page 19
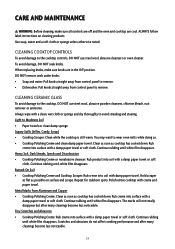
...: Pull knobs straight away from control panel to wear oven mitts while doing so. Burned-On Soil Cooktop Polishing Creme and Cooktop Scraper: Rub creme into soil with creme and paper towel. ALWAYS follow label instructions on surface and scrape. Light to remove. Continue rubbing until white film disappears. Hold scraper as flat as possible on cleaning products. Metal Marks from control panel to Moderate...
...: Pull knobs straight away from control panel to wear oven mitts while doing so. Burned-On Soil Cooktop Polishing Creme and Cooktop Scraper: Rub creme into soil with creme and paper towel. ALWAYS follow label instructions on surface and scrape. Light to remove. Continue rubbing until white film disappears. Hold scraper as flat as possible on cleaning products. Metal Marks from control panel to Moderate...
User Manual
Page 20
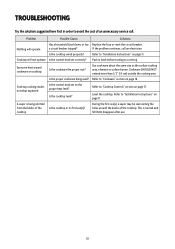
... service call an electrician. Use cookware about the same size as the surface cooking area, element or surface burner. Is the proper cookware being emitted from the knobs of the Is the cooktop in order to avoid the cost of the cooktop. Cooktop cooking results not what expected Is the control knob set correctly? Refer to a setting. Level the cooktop. If the problem continues, call . Push in knob before turning to "Cooktop Controls...
... service call an electrician. Use cookware about the same size as the surface cooking area, element or surface burner. Is the proper cookware being emitted from the knobs of the Is the cooktop in order to avoid the cost of the cooktop. Cooktop cooking results not what expected Is the control knob set correctly? Refer to a setting. Level the cooktop. If the problem continues, call . Push in knob before turning to "Cooktop Controls...
User Manual
Page 21
... remedy any such defect or to furnish a new part(s), at www.mcappliance.com to request warranty service or order parts. 21 This warranty does not cover the following: Damages due to misuse or abuse. Replacement or resetting of the unit that fails to failure of the product or improper installation. The removal and reinstallation of this product. MC Appliance Corporation...
... remedy any such defect or to furnish a new part(s), at www.mcappliance.com to request warranty service or order parts. 21 This warranty does not cover the following: Damages due to misuse or abuse. Replacement or resetting of the unit that fails to failure of the product or improper installation. The removal and reinstallation of this product. MC Appliance Corporation...
User Manual
Page 23
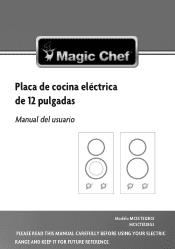
Placa de cocina eléctrica de 12 pulgadas Manual del usuario Modelo MCSCTE12BG1 MCSCTE12BG2 PLEASE READ THIS MANUAL CAREFULLY BEFORE USING YOUR ELECTRIC 23 RANGE AND KEEP IT FOR FUTURE REFERENCE.
Placa de cocina eléctrica de 12 pulgadas Manual del usuario Modelo MCSCTE12BG1 MCSCTE12BG2 PLEASE READ THIS MANUAL CAREFULLY BEFORE USING YOUR ELECTRIC 23 RANGE AND KEEP IT FOR FUTURE REFERENCE.