
User Manual
Page 3
.... 5. Do not wash plasƟc items unless they are properly in or on the door or the dishwasher rack. 7. Do not repair or replace any part of the appliance or aƩempt any servicing unless specifically recommended in the user repair instrucƟons that you understand and the... this appliance for other than its intended use . 12. IMPORTANT SAFEGUARDS READ THIS MANUAL AND ALL INSTRUCTIONS BEFORE USE. 1. Do not unplug your appliance when parts are missing or broken. 6. Do not add or mix any electrical power source. -PAGE 2- Do not tamper with controls. 11.
.... 5. Do not wash plasƟc items unless they are properly in or on the door or the dishwasher rack. 7. Do not repair or replace any part of the appliance or aƩempt any servicing unless specifically recommended in the user repair instrucƟons that you understand and the... this appliance for other than its intended use . 12. IMPORTANT SAFEGUARDS READ THIS MANUAL AND ALL INSTRUCTIONS BEFORE USE. 1. Do not unplug your appliance when parts are missing or broken. 6. Do not add or mix any electrical power source. -PAGE 2- Do not tamper with controls. 11.

User Manual
Page 6
SPECIFICATIONS PARTS AND FEATURES CONTROL PANEL 1 6 7 8 2 3 45 FRONT VIEW 1) Power Light (ON/OFF) 2) Power BuƩon (ON/OFF) 3) Wash Cycle Selector 4) Delayed Start BuƩon 5) Start/Reset BuƩon 6) Delay Feature 7) Intake Warning Light 8) Rinse Aid Warning Light -PAGE 5-
SPECIFICATIONS PARTS AND FEATURES CONTROL PANEL 1 6 7 8 2 3 45 FRONT VIEW 1) Power Light (ON/OFF) 2) Power BuƩon (ON/OFF) 3) Wash Cycle Selector 4) Delayed Start BuƩon 5) Start/Reset BuƩon 6) Delay Feature 7) Intake Warning Light 8) Rinse Aid Warning Light -PAGE 5-

User Manual
Page 8
... next page for your appliance. 3. INSTALLATION INSTRUCTIONS UNPACKING AND PROPER PLACEMENT UNPACKING 1. Inspect and remove any adhesive tape both inside and outside of the following parts: Quick Faucet Adapter (1) InstrucƟon Manual (1) Measuring Cup for Powdered Detergent (1) Measuring Spoon for Liquid Rinse Aid (1) Clip on Basket for 3-in height. (Reference...
... next page for your appliance. 3. INSTALLATION INSTRUCTIONS UNPACKING AND PROPER PLACEMENT UNPACKING 1. Inspect and remove any adhesive tape both inside and outside of the following parts: Quick Faucet Adapter (1) InstrucƟon Manual (1) Measuring Cup for Powdered Detergent (1) Measuring Spoon for Liquid Rinse Aid (1) Clip on Basket for 3-in height. (Reference...
User Manual
Page 11
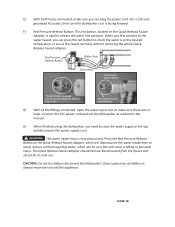
... supervision of children is now pressurized. H) When finished using the dishwasher, you can press the red buƩon This part can plug the power cord into two parts to easily remove without removing the whole Quick Release Faucet Adapter. When you first connect to the water faucet, you need...
... supervision of children is now pressurized. H) When finished using the dishwasher, you can press the red buƩon This part can plug the power cord into two parts to easily remove without removing the whole Quick Release Faucet Adapter. When you first connect to the water faucet, you need...

User Manual
Page 14
... handles facing up. Saucers 5. They need to drain water away from syntheƟc fibers. Glasses loaded over the dish rack pins. J) Silver and aluminium parts have their openings facing downwards in the dishwasher rack. For plasƟc items without such markings, check the manufacturer's recommendaƟons. Cups 2. OPTIMUM CAPACITY...
... handles facing up. Saucers 5. They need to drain water away from syntheƟc fibers. Glasses loaded over the dish rack pins. J) Silver and aluminium parts have their openings facing downwards in the dishwasher rack. For plasƟc items without such markings, check the manufacturer's recommendaƟons. Cups 2. OPTIMUM CAPACITY...
User Manual
Page 21
DO NOT USE SOLVENTS OR ABRASIVE CLEANING PRODUCTS: To clean the exterior and rubber parts of the interior, use a soŌ wash cloth dampened with water and a liƩle white vinegar, or a cleaning product made specifically for ...
DO NOT USE SOLVENTS OR ABRASIVE CLEANING PRODUCTS: To clean the exterior and rubber parts of the interior, use a soŌ wash cloth dampened with water and a liƩle white vinegar, or a cleaning product made specifically for ...
User Manual
Page 22
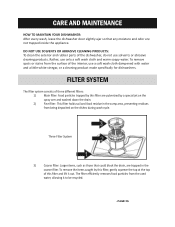
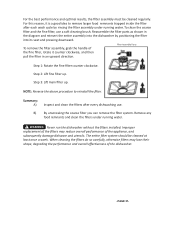
... up . For the best performance and opƟmal results, the filter assembly must be cleaned at least once a week. Reassemble the filter parts as shown in an upward direcƟon. For this reason, it counter clockwise, and then pull the filter in the diagram and reinsert... the enƟre assembly into the dishwasher by rinsing the filter assembly under running water. Filter Assembly Parts Step 1: Rotate the fine filter counter clockwise.
... up . For the best performance and opƟmal results, the filter assembly must be cleaned at least once a week. Reassemble the filter parts as shown in an upward direcƟon. For this reason, it counter clockwise, and then pull the filter in the diagram and reinsert... the enƟre assembly into the dishwasher by rinsing the filter assembly under running water. Filter Assembly Parts Step 1: Rotate the fine filter counter clockwise.
User Manual
Page 23
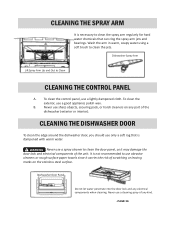
... to clean the jets. It is not recommended to clean the door panel, as it carries the risk of scratching or leaving marks on any part of the dishwasher (exterior or interior). WARNING Never use a spray cleaner to use sharp objects, scouring pads, or harsh cleaners on the stainless steel surface...
... to clean the jets. It is not recommended to clean the door panel, as it carries the risk of scratching or leaving marks on any part of the dishwasher (exterior or interior). WARNING Never use a spray cleaner to use sharp objects, scouring pads, or harsh cleaners on the stainless steel surface...