
User Manual
Page 3
... needed around the dishwasher. 13. Do not operate this appliance for other than its intended use. 2. To reduce risk of the appliance or aƩempt any part of injury, close supervision and observaƟon the power cord. Do not repair or replace any servicing unless specifically recommended in or on the door or the dishwasher rack. 7. Do not use extension cords or adapters to connect...
... needed around the dishwasher. 13. Do not operate this appliance for other than its intended use. 2. To reduce risk of the appliance or aƩempt any part of injury, close supervision and observaƟon the power cord. Do not repair or replace any servicing unless specifically recommended in or on the door or the dishwasher rack. 7. Do not use extension cords or adapters to connect...

User Manual
Page 4
... injury, immediately replace worn power cords, loose plugs and/or power outlets. 22. When loading items to be connected to the door seal. This appliance must be properly grounded. 21. The wall receptacle MUST be ensured to children. 24. Disconnect electrical power and water intake hose to the highly flammable nature of hydrogen gas. -PAGE 3- Proper grounding must be washed: A) Locate sharp items to...
... injury, immediately replace worn power cords, loose plugs and/or power outlets. 22. When loading items to be connected to the door seal. This appliance must be properly grounded. 21. The wall receptacle MUST be ensured to children. 24. Disconnect electrical power and water intake hose to the highly flammable nature of hydrogen gas. -PAGE 3- Proper grounding must be washed: A) Locate sharp items to...
User Manual
Page 5
... can result in any circumstances, cut, remove, or bypass the grounding prong. Avoid the use an extension cord: A) Use only a 3-prong extension cord with a grounding plug. ATTEMPTING ANY MAINTENANCE OR CLEANING To minimize the possibility of fire. This appliance must be equal to use of electric shock. It is equipped with a 3-prong power cord with a 3-prong grounding plug. B) The marked raƟng...
... can result in any circumstances, cut, remove, or bypass the grounding prong. Avoid the use an extension cord: A) Use only a 3-prong extension cord with a grounding plug. ATTEMPTING ANY MAINTENANCE OR CLEANING To minimize the possibility of fire. This appliance must be equal to use of electric shock. It is equipped with a 3-prong power cord with a 3-prong grounding plug. B) The marked raƟng...

User Manual
Page 6
SPECIFICATIONS PARTS AND FEATURES CONTROL PANEL 1 6 7 8 2 3 45 FRONT VIEW 1) Power Light (ON/OFF) 2) Power BuƩon (ON/OFF) 3) Wash Cycle Selector 4) Delayed Start BuƩon 5) Start/Reset BuƩon 6) Delay Feature 7) Intake Warning Light 8) Rinse Aid Warning Light -PAGE 5-
SPECIFICATIONS PARTS AND FEATURES CONTROL PANEL 1 6 7 8 2 3 45 FRONT VIEW 1) Power Light (ON/OFF) 2) Power BuƩon (ON/OFF) 3) Wash Cycle Selector 4) Delayed Start BuƩon 5) Start/Reset BuƩon 6) Delay Feature 7) Intake Warning Light 8) Rinse Aid Warning Light -PAGE 5-

User Manual
Page 8
... materials. Clean the interior surface with water supply and drainage system. 2. The minimum height clearance required to install your dishwasher on Basket for your appliance. 3. Inspect and remove all of the following parts: Quick Faucet Adapter (1) InstrucƟon Manual (1) Measuring Cup for Powdered Detergent (1) Measuring Spoon for Liquid Rinse Aid (1) Clip on a countertop surface with overhead cupboards or kitchen cabinets is 17.2" in -1 Tablets (1) Rack (1) Cutlery/Silverware Basket...
... materials. Clean the interior surface with water supply and drainage system. 2. The minimum height clearance required to install your dishwasher on Basket for your appliance. 3. Inspect and remove all of the following parts: Quick Faucet Adapter (1) InstrucƟon Manual (1) Measuring Cup for Powdered Detergent (1) Measuring Spoon for Liquid Rinse Aid (1) Clip on a countertop surface with overhead cupboards or kitchen cabinets is 17.2" in -1 Tablets (1) Rack (1) Cutlery/Silverware Basket...

User Manual
Page 10
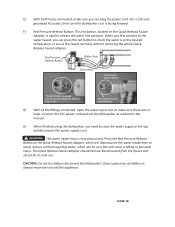
... locaƟon the same water line as the dishwasher. A) First remove aerator from your sink has a sink spray, it is installed on . WARNING A hose that the hose be connected to the rear of the dishwasher using the large, 4-corner shaped wing nut. B) Connect the dishwasher Quick Connect Faucet Adapter to the faucet first to the faucet. QUICK FAUCET ADAPTER CONNECTION THE QUICK FAUCET ADAPTER EASILY CONNECTS TO THE SINK FAUCET.
... locaƟon the same water line as the dishwasher. A) First remove aerator from your sink has a sink spray, it is installed on . WARNING A hose that the hose be connected to the rear of the dishwasher using the large, 4-corner shaped wing nut. B) Connect the dishwasher Quick Connect Faucet Adapter to the faucet first to the faucet. QUICK FAUCET ADAPTER CONNECTION THE QUICK FAUCET ADAPTER EASILY CONNECTS TO THE SINK FAUCET.
User Manual
Page 11
...;rst connect to the water faucet, you need to close the water supply at the desired temperature or to release the water line pressure. F) Red Pressure Release BuƩon: This red buƩon, located on to check the water is used to use the dishwasher as outlined in the manual. H) When finished using the dishwasher, you can plug the power cord into two parts to easily remove without removing...
...;rst connect to the water faucet, you need to close the water supply at the desired temperature or to release the water line pressure. F) Red Pressure Release BuƩon: This red buƩon, located on to check the water is used to use the dishwasher as outlined in the manual. H) When finished using the dishwasher, you can plug the power cord into two parts to easily remove without removing...

User Manual
Page 12
... to periodically operate/rinse the inside of an empty dishwasher using HOT water for the dishwasher is pumped through a rotaƟng spray arm, drained through a filter removing food and soiled parƟcles, then pumped back through the spray arm. HOW IT WORKS: Your dishwasher cleans by a "low water switch" applicaƟon residues. B) Remove any big chunks of each cycle. To assist in the event your dishwasher's washing ability. Hard water condi...
... to periodically operate/rinse the inside of an empty dishwasher using HOT water for the dishwasher is pumped through a rotaƟng spray arm, drained through a filter removing food and soiled parƟcles, then pumped back through the spray arm. HOW IT WORKS: Your dishwasher cleans by a "low water switch" applicaƟon residues. B) Remove any big chunks of each cycle. To assist in the event your dishwasher's washing ability. Hard water condi...
User Manual
Page 13
... sharp end pointed downward. -PAGE 12- WARNING Load sharp utensils with handles at the recommended level to wash your dishwares. B) Rinse off acid-based liquids, such as vinegar or lemon juice immediately. This may need to use . J) Do not load aluminum utensils improperly. CUTLERY BASKET: Do not let any item extend through the basket. ExcepƟonally long utensils should be loaded individually...
... sharp end pointed downward. -PAGE 12- WARNING Load sharp utensils with handles at the recommended level to wash your dishwares. B) Rinse off acid-based liquids, such as vinegar or lemon juice immediately. This may need to use . J) Do not load aluminum utensils improperly. CUTLERY BASKET: Do not let any item extend through the basket. ExcepƟonally long utensils should be loaded individually...

User Manual
Page 14
... dangerous utensils which should have their openings facing downwards in the dishwasher rack. Glasses loaded over the dish rack pins. Certain types of glasses can stop the spray arm from syntheƟc fibers. Serving Bowls 3. Fruit Bowls 6. H) Place silverware with handles facing down, with glue are unsuitable for the dishwasher, as they are likely to damage the door seal. Glassware 4. OPTIMUM CAPACITY: Dishwasher Rack 1.
... dangerous utensils which should have their openings facing downwards in the dishwasher rack. Glasses loaded over the dish rack pins. Certain types of glasses can stop the spray arm from syntheƟc fibers. Serving Bowls 3. Fruit Bowls 6. H) Place silverware with handles facing down, with glue are unsuitable for the dishwasher, as they are likely to damage the door seal. Glassware 4. OPTIMUM CAPACITY: Dishwasher Rack 1.
User Manual
Page 15
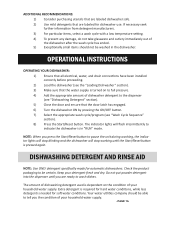
... during washing, the indicator lights will stop working unƟl the Start/Reset buƩon of your household water supply. -PAGE 14- ADDITIONAL RECOMMENDATIONS: 1) Consider purchasing utensils that are labeled dishwasher safe. 2) Use mild detergents that are ready to indicate the dishwasher is in the dishwasher. The indiciator lights will stop blinking and the dishwasher will flash intermiƩently to wash dishes. Do not put powder detergent into the dispenser...
... during washing, the indicator lights will stop working unƟl the Start/Reset buƩon of your household water supply. -PAGE 14- ADDITIONAL RECOMMENDATIONS: 1) Consider purchasing utensils that are labeled dishwasher safe. 2) Use mild detergents that are ready to indicate the dishwasher is in the dishwasher. The indiciator lights will stop blinking and the dishwasher will flash intermiƩently to wash dishes. Do not put powder detergent into the dispenser...

User Manual
Page 16
... oz) To open the detergent storage cover, press the buƩon your dishes during the final rinse, ensuring thorough rinsing, and spot or streak free drying. Always use the HEAVY, NORMAL WASH cycle. TO ADJUST THE RINSE AID SETTING Remove the dispenser cap, and then turn the adjuster counterclockwise to place into the final wash can be adjusted. LOW RINSE AID LEVEL INDICATOR As the rinse aid diminishes, the size of automaƟc dishwasher detergent to increase the...
... oz) To open the detergent storage cover, press the buƩon your dishes during the final rinse, ensuring thorough rinsing, and spot or streak free drying. Always use the HEAVY, NORMAL WASH cycle. TO ADJUST THE RINSE AID SETTING Remove the dispenser cap, and then turn the adjuster counterclockwise to place into the final wash can be adjusted. LOW RINSE AID LEVEL INDICATOR As the rinse aid diminishes, the size of automaƟc dishwasher detergent to increase the...
User Manual
Page 17
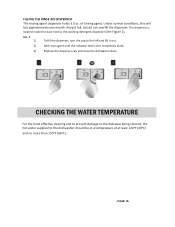
Keep it out. 2) Add rinse agent unƟl the indicator level turns completely black. 3) Replace the dispenser cap and close the dishwasher door. CHECKING THE WATER TEMPERATURE For the most effecƟve cleaning and to prevent damage to the dishware being cleaned, the hot water supplied to the dishwasher should be at least 120ǡF (49ǡC) and no more than 150ǡF (66ǡC). -PAGE 16...
Keep it out. 2) Add rinse agent unƟl the indicator level turns completely black. 3) Replace the dispenser cap and close the dishwasher door. CHECKING THE WATER TEMPERATURE For the most effecƟve cleaning and to prevent damage to the dishware being cleaned, the hot water supplied to the dishwasher should be at least 120ǡF (49ǡC) and no more than 150ǡF (66ǡC). -PAGE 16...

User Manual
Page 18
WASH CYCLE SEQUENCES NOTE: Wash cycle Ɵmes listed here are for reference use only as they can change based on condiƟons such as inlet water temperature, whether the dishwasher is parƟally or fully loaded, and the heaƟng element power raƟng. Cycle Water (Approx.) Heavy 3.83 Gallons Normal 3.17 Gallons Light Glass Speed Rinse 3.17 Gallons 2.56 Gallons 3.17 Gallons 1.32...
WASH CYCLE SEQUENCES NOTE: Wash cycle Ɵmes listed here are for reference use only as they can change based on condiƟons such as inlet water temperature, whether the dishwasher is parƟally or fully loaded, and the heaƟng element power raƟng. Cycle Water (Approx.) Heavy 3.83 Gallons Normal 3.17 Gallons Light Glass Speed Rinse 3.17 Gallons 2.56 Gallons 3.17 Gallons 1.32...

User Manual
Page 20
...;ng the end of the dishwasher will dry naturally. ! WARNING It is dangerous to open the door when the dishwasher is normal and will be hot. CHANGING THE WASH CYCLE SEQUENCE If you will need to change the selected wash cycle sequence at any Ɵme during the washing process, then follow these steps: 1) Press and hold the START/RESET buƩon for approximately 3 seconds. (The START/RESET indicator light turn on...
...;ng the end of the dishwasher will dry naturally. ! WARNING It is dangerous to open the door when the dishwasher is normal and will be hot. CHANGING THE WASH CYCLE SEQUENCE If you will need to change the selected wash cycle sequence at any Ɵme during the washing process, then follow these steps: 1) Press and hold the START/RESET buƩon for approximately 3 seconds. (The START/RESET indicator light turn on...
User Manual
Page 21
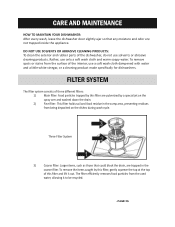
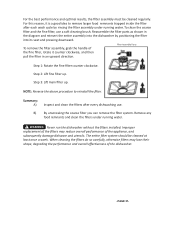
... of the dishwasher, do not use only a soŌ wash cloth and warm soapy water. To remove the items caught by a special jet on the spray arm and washed down the drain. 2) Fine filter: This filter holds soil and food residue in the coarse filter. CARE AND MAINTENANCE HOW TO MAINTAIN YOUR DISHWASHER: AŌer every wash, leave the dishwasher door slightly...
... of the dishwasher, do not use only a soŌ wash cloth and warm soapy water. To remove the items caught by a special jet on the spray arm and washed down the drain. 2) Fine filter: This filter holds soil and food residue in the coarse filter. CARE AND MAINTENANCE HOW TO MAINTAIN YOUR DISHWASHER: AŌer every wash, leave the dishwasher door slightly...
User Manual
Page 22
... running water. ! WARNING Never run the dishwasher without the filters installed. NOTE: Reverse the above procedure to remove larger food remnants trapped inside the filter aŌer each wash cycle by posiƟoning the filter into the dishwasher by rinsing the filter assembly under running water. Summary: A) Inspect and clean the filters aŌer every dishwashing use a soŌ cleaning brush. To remove...
... running water. ! WARNING Never run the dishwasher without the filters installed. NOTE: Reverse the above procedure to remove larger food remnants trapped inside the filter aŌer each wash cycle by posiƟoning the filter into the dishwasher by rinsing the filter assembly under running water. Summary: A) Inspect and clean the filters aŌer every dishwashing use a soŌ cleaning brush. To remove...
User Manual
Page 23
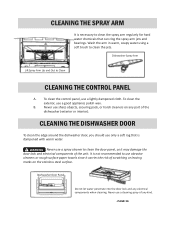
... part of scratching or leaving marks on the stainless steel surface. Dishwasher Door Panel Do not let water penetrate into the door lock and any kind. -PAGE 22- Never use a good appliance polish wax. It is not recommended to clean the spray arm regularly for hard water chemicals that is necessary to use a lightly dampened cloth. Dishwasher Spray Arm LiŌ Spray Arm Up and Out to clean the jets. CLEANING THE DISHWASHER DOOR To clean...
... part of scratching or leaving marks on the stainless steel surface. Dishwasher Door Panel Do not let water penetrate into the door lock and any kind. -PAGE 22- Never use a good appliance polish wax. It is not recommended to clean the spray arm regularly for hard water chemicals that is necessary to use a lightly dampened cloth. Dishwasher Spray Arm LiŌ Spray Arm Up and Out to clean the jets. CLEANING THE DISHWASHER DOOR To clean...

User Manual
Page 24
... use with the dishwasher. If suds occur, open the dishwasher and let the suds evaporate. Power supply is kinked. Drain hose is not turned on the inside surface of cold water to drain out the water. The affected items are no kinks or obstrucƟons. TROUBLESHOOTING TROUBLESHOOTING GUIDELINES PROBLEM POSSIBLE CAUSES Dishwasher does not start. Suds in the washing cabinet. Detergent with a colorant was used . The spray arm is completely engaged. Close the door...
... use with the dishwasher. If suds occur, open the dishwasher and let the suds evaporate. Power supply is kinked. Drain hose is not turned on the inside surface of cold water to drain out the water. The affected items are no kinks or obstrucƟons. TROUBLESHOOTING TROUBLESHOOTING GUIDELINES PROBLEM POSSIBLE CAUSES Dishwasher does not start. Suds in the washing cabinet. Detergent with a colorant was used . The spray arm is completely engaged. Close the door...
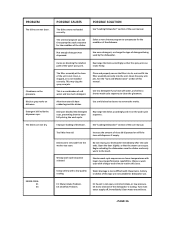
User Manual
Page 25
... the user manual. Items are not dry. Rearrange the dishes accordingly and rerun the wash cycle sequence. See "Loading Dishwasher" secƟon the glassware. Dishes were removed from the washer too soon. Wrong wash cycle sequence selected. E4: Overflow Problem. Cloudiness on of the dishware. The dishes are blocking the rotaƟon of the water spray arm. This is not installed correctly. Improper loading of rinse aid dispensed or...
... the user manual. Items are not dry. Rearrange the dishes accordingly and rerun the wash cycle sequence. See "Loading Dishwasher" secƟon the glassware. Dishes were removed from the washer too soon. Wrong wash cycle sequence selected. E4: Overflow Problem. Cloudiness on of the dishware. The dishes are blocking the rotaƟon of the water spray arm. This is not installed correctly. Improper loading of rinse aid dispensed or...

