User Manual
Page 1
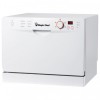
COUNTERTOP DISHWASHER User Manual MODEL MCSCD6W3
COUNTERTOP DISHWASHER User Manual MODEL MCSCD6W3

User Manual
Page 3
.... 8. Do not operate this appliance for other than its intended use . 12. Do not use this appliance unless all enclosure panels are marked "dishwasher safe" or the equivalent. Do not operate your appliance when parts are missing or broken. 6. Do not repair or replace any part of children is... needed around the dishwasher. 13. IMPORTANT SAFEGUARDS READ THIS MANUAL AND ALL INSTRUCTIONS BEFORE USE. 1. Do not unplug your appliance by pulling on the door or the...
.... 8. Do not operate this appliance for other than its intended use . 12. Do not use this appliance unless all enclosure panels are marked "dishwasher safe" or the equivalent. Do not operate your appliance when parts are missing or broken. 6. Do not repair or replace any part of children is... needed around the dishwasher. 13. IMPORTANT SAFEGUARDS READ THIS MANUAL AND ALL INSTRUCTIONS BEFORE USE. 1. Do not unplug your appliance by pulling on the door or the...

User Manual
Page 4
.... This will reduce the risk of injury to children. 24. This appliance must be connected to the highly flammable nature of any damage to dishwasher before cleaning and/or servicing. 23. If your old appliance is the case, before its door. This will let the trapped hydrogen escape. When loading... to reduce the risk of children or remove its use in accordance with the correct electrical supply. 20. Hydrogen gas may be properly installed in a dishwasher and keep them out of the reach of injury, immediately replace worn power cords, loose plugs and/or power outlets. 22.
.... This will reduce the risk of injury to children. 24. This appliance must be connected to the highly flammable nature of any damage to dishwasher before cleaning and/or servicing. 23. If your old appliance is the case, before its door. This will let the trapped hydrogen escape. When loading... to reduce the risk of children or remove its use in accordance with the correct electrical supply. 20. Hydrogen gas may be properly installed in a dishwasher and keep them out of the reach of injury, immediately replace worn power cords, loose plugs and/or power outlets. 22.

User Manual
Page 8
... Adapter (1) InstrucƟon Manual (1) Measuring Cup for Powdered Detergent (1) Measuring Spoon for Liquid Rinse Aid (1) Clip on your dishwasher on ) -PAGE 7- Inspect and remove all of packaging, tape, or printed materials before powering on Basket for your new... dishwasher. The minimum height clearance required to a 120 Volt (15 Amp) outlet and a sink with lukewarm water using a soŌ cloth. This countertop dishwasher is 17.2" in -1 Tablets (1) Rack (1) Cutlery/Silverware Basket (1) 4. ...
... Adapter (1) InstrucƟon Manual (1) Measuring Cup for Powdered Detergent (1) Measuring Spoon for Liquid Rinse Aid (1) Clip on your dishwasher on ) -PAGE 7- Inspect and remove all of packaging, tape, or printed materials before powering on Basket for your new... dishwasher. The minimum height clearance required to a 120 Volt (15 Amp) outlet and a sink with lukewarm water using a soŌ cloth. This countertop dishwasher is 17.2" in -1 Tablets (1) Rack (1) Cutlery/Silverware Basket (1) 4. ...

User Manual
Page 10
... a sink spray, it is recommended that aƩaches to a sink spray can burst if it is suggested you use pliers to the rear of the dishwasher using the large, 4-corner shaped wing nut. D) Drain Hose: Connect to Ɵghten but DO NOT over Ɵghten. 1) Drain Port ConnecƟon 2) ...8) Faucet Adapter ConnecƟon 9) Locking Collar 10) Inlet Hose ConnecƟon 11) Drain Hose ConnecƟon the same water line as the dishwasher. Both hose and fiƫngs must be disconnected and the hole plugged. QUICK FAUCET ADAPTER CONNECTION THE QUICK FAUCET ADAPTER EASILY CONNECTS TO THE...
... a sink spray, it is recommended that aƩaches to a sink spray can burst if it is suggested you use pliers to the rear of the dishwasher using the large, 4-corner shaped wing nut. D) Drain Hose: Connect to Ɵghten but DO NOT over Ɵghten. 1) Drain Port ConnecƟon 2) ...8) Faucet Adapter ConnecƟon 9) Locking Collar 10) Inlet Hose ConnecƟon 11) Drain Hose ConnecƟon the same water line as the dishwasher. Both hose and fiƫngs must be disconnected and the hole plugged. QUICK FAUCET ADAPTER CONNECTION THE QUICK FAUCET ADAPTER EASILY CONNECTS TO THE...
User Manual
Page 11
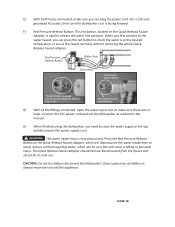
... very hot and cause scalding or personal injury. F) Red Pressure Release BuƩon: This red buƩon, located on to use the dishwasher as outlined in the manual. When you first connect to the water faucet, you need to close the water supply at the desired temperature...427;ngs connected, open the water tap to test to easily remove without removing the whole Quick Release Faucet Adapter. H) When finished using the dishwasher, you can plug the power cord into two parts to the sink faucet. Connect the A/C power cord and use the faucet normally without squirƟ...
... very hot and cause scalding or personal injury. F) Red Pressure Release BuƩon: This red buƩon, located on to use the dishwasher as outlined in the manual. When you first connect to the water faucet, you need to close the water supply at the desired temperature...427;ngs connected, open the water tap to test to easily remove without removing the whole Quick Release Faucet Adapter. H) When finished using the dishwasher, you can plug the power cord into two parts to the sink faucet. Connect the A/C power cord and use the faucet normally without squirƟ...

User Manual
Page 12
... results, the water temperature must be at least once a week) or special cleaning products that clean calcium and lime deposits. DISHWASHING PREPARATIONS PREPARING TO WASH DISHES: For best results, rinse dishware and perform the following steps before loading your dishes. B) Remove any...white film substance) deposits, and/or "Scaling" on the stainless steel surface of the dishwasher tub and "Heater Element" located in the event your dishwasher, the temperature of your dishwasher's washing ability. Incoming water supply for maximum efficiency and opƟmal results. HOW IT...
... results, the water temperature must be at least once a week) or special cleaning products that clean calcium and lime deposits. DISHWASHING PREPARATIONS PREPARING TO WASH DISHES: For best results, rinse dishware and perform the following steps before loading your dishes. B) Remove any...white film substance) deposits, and/or "Scaling" on the stainless steel surface of the dishwasher tub and "Heater Element" located in the event your dishwasher, the temperature of your dishwasher's washing ability. Incoming water supply for maximum efficiency and opƟmal results. HOW IT...
User Manual
Page 13
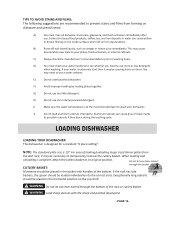
... rinse all dishware, silverware, glassware, and food containers immediately aŌer use. E) Do not overload the dishwasher. H) Do not use too liƩle detergent. J) Do not load aluminum utensils improperly. LOADING DISHWASHER LOADING YOUR DISHWASHER: The dishwasher is designed for long duraƟons. C) Always check the manufacturer's recommendaƟons prior to...
... rinse all dishware, silverware, glassware, and food containers immediately aŌer use. E) Do not overload the dishwasher. H) Do not use too liƩle detergent. J) Do not load aluminum utensils improperly. LOADING DISHWASHER LOADING YOUR DISHWASHER: The dishwasher is designed for long duraƟons. C) Always check the manufacturer's recommendaƟons prior to...

User Manual
Page 14
...glassware, wooden plaƩers, or items made from rotaƟng. Cups 2. J) Silver and aluminium parts have their openings facing downwards in the dishwasher rack. B) Do not load plasƟc items unless they are not likely to discolor aŌer washing. D) Do not load glasswares over dish... rack pins are not properly supported and are marked "Dishwasher Safe" or the equivalent. G) Items with wooden or bone handles, and items joined together with steel construcƟons that they are likely...
...glassware, wooden plaƩers, or items made from rotaƟng. Cups 2. J) Silver and aluminium parts have their openings facing downwards in the dishwasher rack. B) Do not load plasƟc items unless they are not likely to discolor aŌer washing. D) Do not load glasswares over dish... rack pins are not properly supported and are marked "Dishwasher Safe" or the equivalent. G) Items with wooden or bone handles, and items joined together with steel construcƟons that they are likely...
User Manual
Page 15
... select a wash cycle with a low temperature seƫng. 4) To prevent any damage, do not take glassware and cutlery immediately out of the dishwasher aŌer the wash cycle has ended. 5) ExcepƟonally small items should be able to tell you press the Start/Reset buƩon... that all electrical, water, and drain connecƟons have been installed correctly before proceeding. 2) Load the dishwasher (see the "Loading Dishwasher" secƟon of dishwashing detergent used is needed for hard water condiƟons, while less detergent is dependent on the condiƟon ). 3) Make sure that...
... select a wash cycle with a low temperature seƫng. 4) To prevent any damage, do not take glassware and cutlery immediately out of the dishwasher aŌer the wash cycle has ended. 5) ExcepƟonally small items should be able to tell you press the Start/Reset buƩon... that all electrical, water, and drain connecƟons have been installed correctly before proceeding. 2) Load the dishwasher (see the "Loading Dishwasher" secƟon of dishwashing detergent used is needed for hard water condiƟons, while less detergent is dependent on the condiƟon ). 3) Make sure that...

User Manual
Page 16
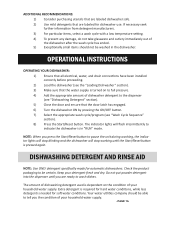
...;on dishes, try a higher seƫng. RINSE AID SETTING The amount of rinse agent released into the dispenser: Number of automaƟc dishwasher detergent to 6 Dishwasher Detergent RecommendaƟons Fill compartment marked "A" (15g or 0.53 oz) Fill compartment marked "B" (25g or 0.88 oz) To open the ...64257;nal rinse, ensuring thorough rinsing, and spot or streak free drying. AŌer you wash them. Always use a branded rinse aid for dishwashers, and never dilute or fill the rinse aid dispenser with cleaner dishes every Ɵme . TO ADJUST THE RINSE AID SETTING Remove the ...
...;on dishes, try a higher seƫng. RINSE AID SETTING The amount of rinse agent released into the dispenser: Number of automaƟc dishwasher detergent to 6 Dishwasher Detergent RecommendaƟons Fill compartment marked "A" (15g or 0.53 oz) Fill compartment marked "B" (25g or 0.88 oz) To open the ...64257;nal rinse, ensuring thorough rinsing, and spot or streak free drying. AŌer you wash them. Always use a branded rinse aid for dishwashers, and never dilute or fill the rinse aid dispenser with cleaner dishes every Ɵme . TO ADJUST THE RINSE AID SETTING Remove the ...
User Manual
Page 17
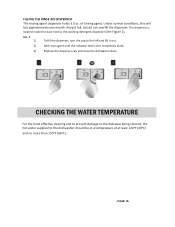
...fill the dispenser. Under normal condiƟons, this will last approximately one month. The dispenser is located inside the door next to the dishwasher should be at least 120ǡF (49ǡC) and no more than 150ǡF (66ǡC). -PAGE 16- FILLING THE RINSE AID DISPENSER The rinsing... detergent dispenser (See Figure 2). Keep it out. 2) Add rinse agent unƟl the indicator level turns completely black. 3) Replace the dispenser cap and close the dishwasher door. of at a temperature of rinsing agent.
...fill the dispenser. Under normal condiƟons, this will last approximately one month. The dispenser is located inside the door next to the dishwasher should be at least 120ǡF (49ǡC) and no more than 150ǡF (66ǡC). -PAGE 16- FILLING THE RINSE AID DISPENSER The rinsing... detergent dispenser (See Figure 2). Keep it out. 2) Add rinse agent unƟl the indicator level turns completely black. 3) Replace the dispenser cap and close the dishwasher door. of at a temperature of rinsing agent.

User Manual
Page 18
... Ɵmes listed here are for reference use only as they can change based on condiƟons such as inlet water temperature, whether the dishwasher is parƟally or fully loaded, and the heaƟng element power raƟng. Cycle Water (Approx.) Heavy 3.83 Gallons Normal 3.17...
... Ɵmes listed here are for reference use only as they can change based on condiƟons such as inlet water temperature, whether the dishwasher is parƟally or fully loaded, and the heaƟng element power raƟng. Cycle Water (Approx.) Heavy 3.83 Gallons Normal 3.17...

User Manual
Page 19
... put into "PAUSE" mode at any changes to the selected wash cycle sequence, load addiƟonal items, or remove previously loaded items, the dishwasher must be delayed between 1 and 24 hours, using the most recently selected wash cycle sequence. The door must be put into PAUSE mode if the...increments. PAUSING THE WASH CYCLE SEQUENCE In order to make any Ɵme during the wash cycle. Always use the above steps. -PAGE 18- The dishwasher can be closed and the latch engaged for approximately 3 seconds to cancel the exisƟng program mode. 2) Make the necessary changes to the wash...
... put into "PAUSE" mode at any changes to the selected wash cycle sequence, load addiƟonal items, or remove previously loaded items, the dishwasher must be delayed between 1 and 24 hours, using the most recently selected wash cycle sequence. The door must be put into PAUSE mode if the...increments. PAUSING THE WASH CYCLE SEQUENCE In order to make any Ɵme during the wash cycle. Always use the above steps. -PAGE 18- The dishwasher can be closed and the latch engaged for approximately 3 seconds to cancel the exisƟng program mode. 2) Make the necessary changes to the wash...

User Manual
Page 20
... naturally. ! CHANGING THE WASH CYCLE SEQUENCE If you need to change the wash cycle sequence aŌer the detergent has been dispensed, or the dishwasher has already drained the water, you change the selected wash cycle sequence at any Ɵme during the washing process, then follow these steps: 1)...;on , as the dishes and cutlery will be wet, this is dangerous to escape. 4) Wait a few minutes (approximately 15 minutes) before unloading the dishwasher as the hot water may cause scalding or injury. -PAGE 19- NOTE: If you will need to refill the detergent dispenser for the...
... naturally. ! CHANGING THE WASH CYCLE SEQUENCE If you need to change the wash cycle sequence aŌer the detergent has been dispensed, or the dishwasher has already drained the water, you change the selected wash cycle sequence at any Ɵme during the washing process, then follow these steps: 1)...;on , as the dishes and cutlery will be wet, this is dangerous to escape. 4) Wait a few minutes (approximately 15 minutes) before unloading the dishwasher as the hot water may cause scalding or injury. -PAGE 19- NOTE: If you will need to refill the detergent dispenser for the...
User Manual
Page 21
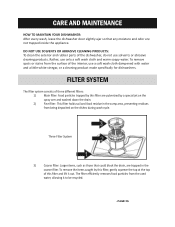
...;lter: Food parƟcles trapped by this filter are pulverized by this filter, gently squeeze the tap at the top of the dishwasher, do not use solvents or abrasive cleaning products. The filter efficiently removes food parƟcles from the used water, allowing it out.... Rather, use a soŌ wash cloth dampened with water and a liƩle white vinegar, or a cleaning product made specifically for dishwashers. DO NOT USE SOLVENTS OR ABRASIVE CLEANING PRODUCTS: To clean the exterior and rubber parts of this filter and liŌ it to be...
...;lter: Food parƟcles trapped by this filter are pulverized by this filter, gently squeeze the tap at the top of the dishwasher, do not use solvents or abrasive cleaning products. The filter efficiently removes food parƟcles from the used water, allowing it out.... Rather, use a soŌ wash cloth dampened with water and a liƩle white vinegar, or a cleaning product made specifically for dishwashers. DO NOT USE SOLVENTS OR ABRASIVE CLEANING PRODUCTS: To clean the exterior and rubber parts of this filter and liŌ it to be...
User Manual
Page 22
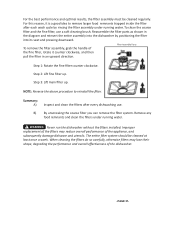
...to remove larger food remnants trapped inside the filter aŌer each wash cycle by posiƟoning the filter into the dishwasher by rinsing the filter assembly under running water. Filter Assembly Parts Step 1: Rotate the fine filter counter clockwise. For ...Reassemble the filter parts as shown in an upward direcƟon. Summary: A) Inspect and clean the filters aŌer every dishwashing use a soŌ cleaning brush. Improper replacement of the filters may lose their shape, degrading the performance and overall effecƟ...
...to remove larger food remnants trapped inside the filter aŌer each wash cycle by posiƟoning the filter into the dishwasher by rinsing the filter assembly under running water. Filter Assembly Parts Step 1: Rotate the fine filter counter clockwise. For ...Reassemble the filter parts as shown in an upward direcƟon. Summary: A) Inspect and clean the filters aŌer every dishwashing use a soŌ cleaning brush. Improper replacement of the filters may lose their shape, degrading the performance and overall effecƟ...
User Manual
Page 23
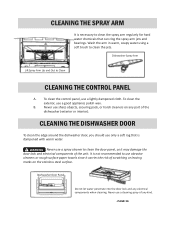
...the exterior, use abrasive cleaners or rough surface paper towels since it may damage the door lock and electrical components of any kind. -PAGE 22- Dishwasher Door Panel Do not let water penetrate into the door lock and any part of scratching or leaving marks on any electrical components when cleaning.... It is dampened with warm water. ! Dishwasher Spray Arm LiŌ Spray Arm Up and Out to clean the jets. CLEANING THE SPRAY ARM It is necessary to clean the spray arm...
...the exterior, use abrasive cleaners or rough surface paper towels since it may damage the door lock and electrical components of any kind. -PAGE 22- Dishwasher Door Panel Do not let water penetrate into the door lock and any part of scratching or leaving marks on any electrical components when cleaning.... It is dampened with warm water. ! Dishwasher Spray Arm LiŌ Spray Arm Up and Out to clean the jets. CLEANING THE SPRAY ARM It is necessary to clean the spray arm...

User Manual
Page 24
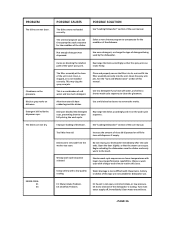
... engaged. Close the door securely by ensuring that there are not corrosion resistant. TROUBLESHOOTING TROUBLESHOOTING GUIDELINES PROBLEM POSSIBLE CAUSES Dishwasher does not start. Dishwasher door is blown or the circuit breaker has tripped. Suds in the washing cabinet. B) Make sure the power ... adequate drainage. POSSIBLE SOLUTION Replace the fuse or reset the circuit breaker. White film on the silverware/cutlery. Detergent with dishwashers. Fuse is not closed securely. Knocking noise in the tub. Improper detergent used . Check the kitchen sink for use with a...
... engaged. Close the door securely by ensuring that there are not corrosion resistant. TROUBLESHOOTING TROUBLESHOOTING GUIDELINES PROBLEM POSSIBLE CAUSES Dishwasher does not start. Dishwasher door is blown or the circuit breaker has tripped. Suds in the washing cabinet. B) Make sure the power ... adequate drainage. POSSIBLE SOLUTION Replace the fuse or reset the circuit breaker. White film on the silverware/cutlery. Detergent with dishwashers. Fuse is not closed securely. Knocking noise in the tub. Improper detergent used . Check the kitchen sink for use with a...
User Manual
Page 25
...the condiƟon of the unit is not clean, is clogged, or is leaking. POSSIBLE SOLUTION See "Loading Dishwasher" secƟon of detergent being used by the dishwasher. Not enough detergent was not the appropriate cycle sequence for the condiƟon of soŌ water and too...if empty. Use less detergent if you have rubbed against the dishes. Dishware blocked the detergent cups, prevenƟng them to compensate for dishwasher use lower temperatures with a low quality coaƟng. Rearrange the dishes accordingly and rerun the wash cycle sequence. Improper loading of this type...
...the condiƟon of the unit is not clean, is clogged, or is leaking. POSSIBLE SOLUTION See "Loading Dishwasher" secƟon of detergent being used by the dishwasher. Not enough detergent was not the appropriate cycle sequence for the condiƟon of soŌ water and too...if empty. Use less detergent if you have rubbed against the dishes. Dishware blocked the detergent cups, prevenƟng them to compensate for dishwasher use lower temperatures with a low quality coaƟng. Rearrange the dishes accordingly and rerun the wash cycle sequence. Improper loading of this type...