
User Manual
Page 2
CONTENTS IMPORTANT SAFETY INSTRUCTIONS 3 SPECIFICATIONS 6 PARTS AND FEATURES 7 INSTALLATION INSTRUCTIONS 9 RECOMMENDATIONS FOR USE 12 OPERATIONAL INSTRUCTIONS 16 CARE AND MAINTENANCE 21 TROUBLESHOOTING 24 WARRANTY 26 2
CONTENTS IMPORTANT SAFETY INSTRUCTIONS 3 SPECIFICATIONS 6 PARTS AND FEATURES 7 INSTALLATION INSTRUCTIONS 9 RECOMMENDATIONS FOR USE 12 OPERATIONAL INSTRUCTIONS 16 CARE AND MAINTENANCE 21 TROUBLESHOOTING 24 WARRANTY 26 2
User Manual
Page 3
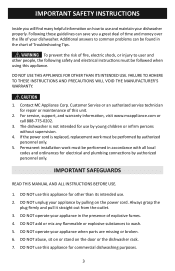
... the risk of fire, electric shock, or injury to common problems can save you will find many helpful information on the door or the dishwasher rack. 7. Customer Service or an authorized service technician for use this unit. 2. The dishwasher is replaced, replacement work must be performed in the presence of explosive fumes. 4. If the power cord is not intended for repair or maintenance of this appliance for...
... the risk of fire, electric shock, or injury to common problems can save you will find many helpful information on the door or the dishwasher rack. 7. Customer Service or an authorized service technician for use this unit. 2. The dishwasher is replaced, replacement work must be performed in the presence of explosive fumes. 4. If the power cord is not intended for repair or maintenance of this appliance for...
User Manual
Page 4
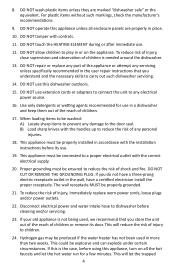
.... B) Load sharp knives with the installation instructions before cleaning and/or servicing. 23. Proper grounding must be connected to dishwasher before its door. Disconnect electrical power and water intake hose to a proper electrical outlet with controls. 11. If your old appliance is needed around the dishwasher. 13. DO NOT touch the HEATING ELEMENT during or after immediate use extension cords or adapters to connect the unit to any servicing unless specifically recommended in the user repair instructions...
.... B) Load sharp knives with the installation instructions before cleaning and/or servicing. 23. Proper grounding must be connected to dishwasher before its door. Disconnect electrical power and water intake hose to a proper electrical outlet with controls. 11. If your old appliance is needed around the dishwasher. 13. DO NOT touch the HEATING ELEMENT during or after immediate use extension cords or adapters to connect the unit to any servicing unless specifically recommended in the user repair instructions...

User Manual
Page 7
①B ①C PARTS AND FEATURES CONTROL PANEL A) Dishwasher Door B) Rinse Aid Indicator C) Door Handle D) Start/Pause/Reset Button E) Wash Program Button ①A F) Power Button (ON/OFF) DE F 1) Heavy Cycle 2) Normal Cycle 3) Light Cycle 4) Speed Cycle 5) Soak Cycle INSIDE VIEW ⑥ ⑦ 1) Detergent Dispenser 2) Cutlery Basket 3) Filter Assembly 4) Rinse Aid Dispenser 5) Spray Arms 6) Cup Rack 7) Basket 7
①B ①C PARTS AND FEATURES CONTROL PANEL A) Dishwasher Door B) Rinse Aid Indicator C) Door Handle D) Start/Pause/Reset Button E) Wash Program Button ①A F) Power Button (ON/OFF) DE F 1) Heavy Cycle 2) Normal Cycle 3) Light Cycle 4) Speed Cycle 5) Soak Cycle INSIDE VIEW ⑥ ⑦ 1) Detergent Dispenser 2) Cutlery Basket 3) Filter Assembly 4) Rinse Aid Dispenser 5) Spray Arms 6) Cup Rack 7) Basket 7
User Manual
Page 9
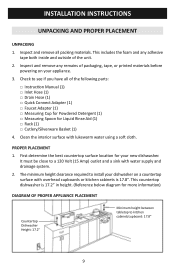
... kitchen cabinets is 17.2" in height. (Reference below diagram for more information) DIAGRAM OF PROPER APPLIANCE PLACEMENT Countertop Dishwasher Height: 17.2" Minimum height between tabletop to install your appliance. 3. Inspect and remove any adhesive tape both inside and outside of the following parts: □ Instruction Manual (1) □ Inlet Hose (1) □ Drain Hose (1) □ Quick Connect Adapter (1) □ Faucet Adapter (1) □ Measuring Cup for Powdered Detergent (1) □ Measuring Spoon for your new dishwasher...
... kitchen cabinets is 17.2" in height. (Reference below diagram for more information) DIAGRAM OF PROPER APPLIANCE PLACEMENT Countertop Dishwasher Height: 17.2" Minimum height between tabletop to install your appliance. 3. Inspect and remove any adhesive tape both inside and outside of the following parts: □ Instruction Manual (1) □ Inlet Hose (1) □ Drain Hose (1) □ Quick Connect Adapter (1) □ Faucet Adapter (1) □ Measuring Cup for Powdered Detergent (1) □ Measuring Spoon for your new dishwasher...
User Manual
Page 10
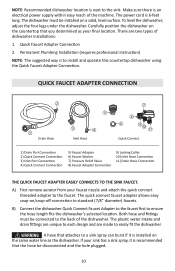
... installed on a solid, level surface. Carefully position the dishwasher on /snap-off connection to install and operate this countertop dishwasher using the Quick Faucet Adapter Connection. The plastic water intake and drain fittings are unique to each design and are two types of the machine. Make sure there is an electrical power supply within easy reach of dishwasher installations: 1. Quick Faucet Adapter Connection 2. A) First remove aerator from your final location. The power cord is 6-feet long. The dishwasher...
... installed on a solid, level surface. Carefully position the dishwasher on /snap-off connection to install and operate this countertop dishwasher using the Quick Faucet Adapter Connection. The plastic water intake and drain fittings are unique to each design and are two types of the machine. Make sure there is an electrical power supply within easy reach of dishwasher installations: 1. Quick Faucet Adapter Connection 2. A) First remove aerator from your final location. The power cord is 6-feet long. The dishwasher...
User Manual
Page 11
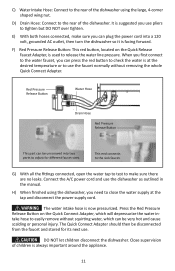
... Button: This red button, located on the Quick Connect Adapter, which can be unscrewed into a 120 volt, grounded AC outlet, then turn the dishwasher so it is suggested you need to adjust for its next use the dishwasher as outlined in - Connect the A/C power cord and use . E) With both hoses connected, make sure there are no leaks. C) Water Intake Hose: Connect to the sink faucet. G) With all the fittings connected, open the water tap to test...
... Button: This red button, located on the Quick Connect Adapter, which can be unscrewed into a 120 volt, grounded AC outlet, then turn the dishwasher so it is suggested you need to adjust for its next use the dishwasher as outlined in - Connect the A/C power cord and use . E) With both hoses connected, make sure there are no leaks. C) Water Intake Hose: Connect to the sink faucet. G) With all the fittings connected, open the water tap to test...

User Manual
Page 12
... your dishwasher's washing ability. To prevent damage to periodically operate/rinse the inside of an empty dishwasher using HOT water for the dishwasher is pumped out and replaced with clean water at least once a week) or special cleaning products that clean calcium and lime deposits. To assist in the sump underneath the removable filter screen. C) Remove sticky food residues and loosen burned-on the stainless steel surface of the dishwasher tub and "Heater Element" located...
... your dishwasher's washing ability. To prevent damage to periodically operate/rinse the inside of an empty dishwasher using HOT water for the dishwasher is pumped out and replaced with clean water at least once a week) or special cleaning products that clean calcium and lime deposits. To assist in the sump underneath the removable filter screen. C) Remove sticky food residues and loosen burned-on the stainless steel surface of the dishwasher tub and "Heater Element" located...

User Manual
Page 13
...) remove the cutlery basket. LOADING DISHWASHER LOADING YOUR DISHWASHER The dishwasher is extremely hard then it may cause discoloration over time to your plates, food containers, or internal cabinets. For ease of loading/unloading larger sized dinner plates from forming on for a standard "6 place setting". F) Avoid improper loading by nesting plates together. I) Make sure the water temperature is at the recommended level to wash your water is...
...) remove the cutlery basket. LOADING DISHWASHER LOADING YOUR DISHWASHER The dishwasher is extremely hard then it may cause discoloration over time to your plates, food containers, or internal cabinets. For ease of loading/unloading larger sized dinner plates from forming on for a standard "6 place setting". F) Avoid improper loading by nesting plates together. I) Make sure the water temperature is at the recommended level to wash your water is...

User Manual
Page 14
D) DO NOT load glasswares over dish rack pins are not properly supported and are unsuitable for the dishwasher, as they are marked "Dishwasher Safe" or the equivalent. They need to discolor after a large number of glasses can stop the spray arm from rotating. Do not load silverware with the exception of knives and other potentially dangerous utensils which can become dull after washing. Certain...
D) DO NOT load glasswares over dish rack pins are not properly supported and are unsuitable for the dishwasher, as they are marked "Dishwasher Safe" or the equivalent. They need to discolor after a large number of glasses can stop the spray arm from rotating. Do not load silverware with the exception of knives and other potentially dangerous utensils which can become dull after washing. Certain...
User Manual
Page 16
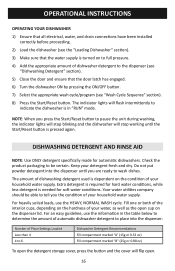
... The indiciator lights will flash intermittently to the dispenser (see "Wash Cycle Sequence" section). 8) Press the Start/Reset button. For heavily soiled loads, use the information in the table below to determine the amount of dishwasher detergent to indicate the dishwasher is pressed again. For an easy guideline, use the HEAVY, NORMAL WASH cycle. NOTE: When you the condition of your detergent fresh and dry. DISHWASHING DETERGENT AND RINSE AID NOTE: Use ONLY detergent specifically made for...
... The indiciator lights will flash intermittently to the dispenser (see "Wash Cycle Sequence" section). 8) Press the Start/Reset button. For heavily soiled loads, use the information in the table below to determine the amount of dishwasher detergent to indicate the dishwasher is pressed again. For an easy guideline, use the HEAVY, NORMAL WASH cycle. NOTE: When you the condition of your detergent fresh and dry. DISHWASHING DETERGENT AND RINSE AID NOTE: Use ONLY detergent specifically made for...
User Manual
Page 17
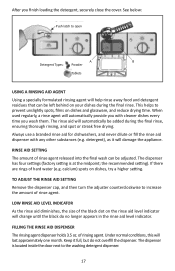
... reduce drying time. Keep it will automatically be added during the final rinse. detergent), as it full, but do no longer appears in the rinse aid level indicator. The dispenser has four settings (factory setting is located inside the door next to prevent unslightly spots, films on dishes, try a higher setting. TO ADJUST THE RINSE AID SETTING Remove the dispenser cap, and then turn the adjuster counterclockwise to open A B Detergent Types: Powder Tablets USING A RINSING AID AGENT Using a specially formulated rinsing agent will help rinse...
... reduce drying time. Keep it will automatically be added during the final rinse. detergent), as it full, but do no longer appears in the rinse aid level indicator. The dispenser has four settings (factory setting is located inside the door next to prevent unslightly spots, films on dishes, try a higher setting. TO ADJUST THE RINSE AID SETTING Remove the dispenser cap, and then turn the adjuster counterclockwise to open A B Detergent Types: Powder Tablets USING A RINSING AID AGENT Using a specially formulated rinsing agent will help rinse...

User Manual
Page 18
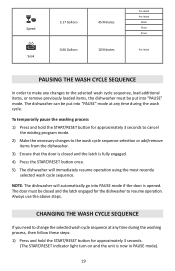
... loaded, and the heating element power rating. Cycle Heavy Water (Approx.) Time (Approx.) 3.83 Gallons 100 Minutes Normal (*AHAM DW-1-2005) 3.17 Gallons Light 3.17 Gallons 85 Minutes 75 Minutes Sequence Pre-Wash Pre-Wash Wash Wash Rinse Rinse Dry Pre-Wash Pre-Wash Wash Rinse Rinse Dry Pre-Wash Pre-Wash Wash Rinse Rinse Dry 18 ① ② ③ 1) To fill the dispenser, turn the cap to the left and lift it out. 2) Add rinse agent until the indicator level turns completely black. 3) Replace the dispenser cap and close the dishwasher door...
... loaded, and the heating element power rating. Cycle Heavy Water (Approx.) Time (Approx.) 3.83 Gallons 100 Minutes Normal (*AHAM DW-1-2005) 3.17 Gallons Light 3.17 Gallons 85 Minutes 75 Minutes Sequence Pre-Wash Pre-Wash Wash Wash Rinse Rinse Dry Pre-Wash Pre-Wash Wash Rinse Rinse Dry Pre-Wash Pre-Wash Wash Rinse Rinse Dry 18 ① ② ③ 1) To fill the dispenser, turn the cap to the left and lift it out. 2) Add rinse agent until the indicator level turns completely black. 3) Replace the dispenser cap and close the dishwasher door...
User Manual
Page 19
... you need to change the selected wash cycle sequence at any time during the washing process, then follow these steps: 1) Press and hold the START/RESET button for approximately 3 seconds to cancel the existing program mode. 2) Make the necessary changes to the wash cycle sequence selection or add/remove items from the dishwasher. 3) Ensure that the door is closed and the latch engaged for approximately 3 seconds. (The START/RESET indicator light turn on...
... you need to change the selected wash cycle sequence at any time during the washing process, then follow these steps: 1) Press and hold the START/RESET button for approximately 3 seconds to cancel the existing program mode. 2) Make the necessary changes to the wash cycle sequence selection or add/remove items from the dishwasher. 3) Ensure that the door is closed and the latch engaged for approximately 3 seconds. (The START/RESET indicator light turn on...

User Manual
Page 20
... aids in the drying process. 5) The interior of the dishwasher will be wet, this is in operation, as the dishes and cutlery will dry naturally. It is dangerous to open the door when the dishwasher is normal and will be at a temperature of they wash cycle. 1) Shut off the water supply. 2) Turn the dishwasher OFF by pressing the program button. 3) Press the START/RESET button again to resume operation using the newly selected wash cycle sequence. END...
... aids in the drying process. 5) The interior of the dishwasher will be wet, this is in operation, as the dishes and cutlery will dry naturally. It is dangerous to open the door when the dishwasher is normal and will be at a temperature of they wash cycle. 1) Shut off the water supply. 2) Turn the dishwasher OFF by pressing the program button. 3) Press the START/RESET button again to resume operation using the newly selected wash cycle sequence. END...

User Manual
Page 21
... filter assembly must be recycled. To clean the coarse filter and the fine filter, use a soft wash cloth dampened with water and a little white vinegar, or a cleaning product made specifically for dishwashers. CARE AND MAINTENANCE HOW TO MAINTAIN YOUR DISHWASHER After every wash, leave the dishwasher door slightly ajar so that could block the drain, are not trapped inside the filter after each wash cycle by rinsing the filter assembly under running water. DO NOT USE SOLVENTS OR ABRASIVE CLEANING PRODUCTS...
... filter assembly must be recycled. To clean the coarse filter and the fine filter, use a soft wash cloth dampened with water and a little white vinegar, or a cleaning product made specifically for dishwashers. CARE AND MAINTENANCE HOW TO MAINTAIN YOUR DISHWASHER After every wash, leave the dishwasher door slightly ajar so that could block the drain, are not trapped inside the filter after each wash cycle by rinsing the filter assembly under running water. DO NOT USE SOLVENTS OR ABRASIVE CLEANING PRODUCTS...

User Manual
Page 23
... leaving marks on any part of the dishwasher (exterior or interior). It is dampened with warm water. Dishwasher Door Panel Do not let water penetrate into the door lock and any electrical components when cleaning. CLEANING THE CONTROL PANEL To clean the control panel, use a cleaning spray of any kind. Never use a lightly dampened cloth. Never use abrasive cleaners or rough surface paper towels since it may damage the door lock and electrical components of the unit...
... leaving marks on any part of the dishwasher (exterior or interior). It is dampened with warm water. Dishwasher Door Panel Do not let water penetrate into the door lock and any electrical components when cleaning. CLEANING THE CONTROL PANEL To clean the control panel, use a cleaning spray of any kind. Never use a lightly dampened cloth. Never use abrasive cleaners or rough surface paper towels since it may damage the door lock and electrical components of the unit...
User Manual
Page 24
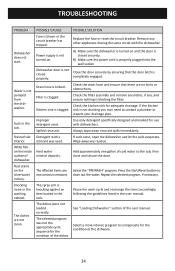
... interior. Knocking noise in the user manual. The dishes were not loaded correctly. Use only detergent specifically designed and marked for adequate drainage. Pause the wash cycle and rearrange the items accordingly, following the guidelines listed in the washing cabinet. Suds in the rack. Rust stains on . The dishes are not corrosion resistant. Power supply is not closed securely. Dishwasher door is not turned on the silverware/ cutlery. Filter is clogged. Improper detergent used . Hard water...
... interior. Knocking noise in the user manual. The dishes were not loaded correctly. Use only detergent specifically designed and marked for adequate drainage. Pause the wash cycle and rearrange the items accordingly, following the guidelines listed in the washing cabinet. Suds in the rack. Rust stains on . The dishes are not corrosion resistant. Power supply is not closed securely. Dishwasher door is not turned on the silverware/ cutlery. Filter is clogged. Improper detergent used . Hard water...
User Manual
Page 25
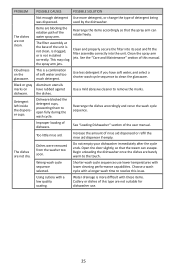
... amount of dishware. Dishes were removed from the washer too soon. the dishes. Improper loading of rinse aid dispensed or refill the rinse aid dispenser if empty. Wrong wash cycle sequence selected. Using cutlery with lower cleaning performance capabilities. Water drainage is not installed correctly. The filter assembly at the base of the user manual. Do not empty your dishwasher immediately after the cycle ends. Shorter wash cycle sequences use . 25 Clean the spray arm jets. Use less detergent if you have rubbed...
... amount of dishware. Dishes were removed from the washer too soon. the dishes. Improper loading of rinse aid dispensed or refill the rinse aid dispenser if empty. Wrong wash cycle sequence selected. Using cutlery with lower cleaning performance capabilities. Water drainage is not installed correctly. The filter assembly at the base of the user manual. Do not empty your dishwasher immediately after the cycle ends. Shorter wash cycle sequences use . 25 Clean the spray arm jets. Use less detergent if you have rubbed...

User Manual
Page 26
...; The removal and reinstallation of your sole and exclusive remedy under this unit for any failed unit not returned to our factory. • Any delivery costs incurred as instructions on this limited warranty. LIMITATIONS OF REMEDIES AND EXCLUSIONS Product repair in accordance with published installation instructions. WARRANTY LIMITED WARRANTY MC Appliance Corporation warrants each new Countertop Dishwasher to be free from the...
...; The removal and reinstallation of your sole and exclusive remedy under this unit for any failed unit not returned to our factory. • Any delivery costs incurred as instructions on this limited warranty. LIMITATIONS OF REMEDIES AND EXCLUSIONS Product repair in accordance with published installation instructions. WARRANTY LIMITED WARRANTY MC Appliance Corporation warrants each new Countertop Dishwasher to be free from the...

