User Manual
Page 1
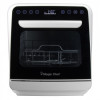
Countertop Dishwasher User's Manual Models: MCSDRY1S / MCSDRY35W1 Model: MCSCD3W PLEASE READ THIS MANUAL CAREFULLY BEFORE USING YOUR DISHWASHER AND KEEP IT FOR FUTURE REFERENCE.
Countertop Dishwasher User's Manual Models: MCSDRY1S / MCSDRY35W1 Model: MCSCD3W PLEASE READ THIS MANUAL CAREFULLY BEFORE USING YOUR DISHWASHER AND KEEP IT FOR FUTURE REFERENCE.
User Manual
Page 2
... contact you regarding a safety notification or product update. 2. Once again, thank you for purchasing a Magic Chef® product. The first step to complete the product registration on our website: www.mcappliance.com/register. Registering your product include the following: 1. Registering your product could act as your new product is required. 3. The benefits of insurance loss. PRODUCT REGISTRATION Thank you for purchasing a Magic Chef product. 2
... contact you regarding a safety notification or product update. 2. Once again, thank you for purchasing a Magic Chef® product. The first step to complete the product registration on our website: www.mcappliance.com/register. Registering your product include the following: 1. Registering your product could act as your new product is required. 3. The benefits of insurance loss. PRODUCT REGISTRATION Thank you for purchasing a Magic Chef product. 2
User Manual
Page 3
CONTENTS PRODUCT REGISTRATION 2 IMPORTANT SAFETY INSTRUCTIONS 4 SPECIFICATIONS 6 PARTS AND FEATURES 6 BEFORE USE 7 OPERATING INSTRUCTIONS 8 CARE AND MAINTENANCE 10 TROUBLESHOOTING 10 LIMITED WARRANTY 11 3
CONTENTS PRODUCT REGISTRATION 2 IMPORTANT SAFETY INSTRUCTIONS 4 SPECIFICATIONS 6 PARTS AND FEATURES 6 BEFORE USE 7 OPERATING INSTRUCTIONS 8 CARE AND MAINTENANCE 10 TROUBLESHOOTING 10 LIMITED WARRANTY 11 3
User Manual
Page 4
... of hot water spraying out of the appliance. Only fill the water tank with the control panel or display. 7. There is flammable, do not insert any objects (such as pins or wire) into an appropriate outlet that cycle. 4 Avoid damaging the door gasket of the appliance. IMPORTANT SAFETY INSTRUCTIONS This manual contains Safety Instructions, Installation and Operating Instructions, and Troubleshooting Tips. DO NOT use and before using that is installed...
... of hot water spraying out of the appliance. Only fill the water tank with the control panel or display. 7. There is flammable, do not insert any objects (such as pins or wire) into an appropriate outlet that cycle. 4 Avoid damaging the door gasket of the appliance. IMPORTANT SAFETY INSTRUCTIONS This manual contains Safety Instructions, Installation and Operating Instructions, and Troubleshooting Tips. DO NOT use and before using that is installed...
User Manual
Page 5
...DO NOT modify or cut the power cord and DO NOT operate any other liquids. Contact customer service or a service technician. 38. CAUTION: Appliance can be tripped over edge of an external timer or separate remote-control system. 35. DO NOT plug in unit if power cord is damaged or malfunctions ... be very hot during or after operation. READ AND FOLLOW THIS SAFETY INFORMATION CAREFULLY SAVE THESE INSTRUCTIONS 5 DO NOT let the cord hang over . 41. DO NOT run cord under furniture, appliances, or any way. The appliance is not in , on the power cord. ALWAYS keep cord away from the...
...DO NOT modify or cut the power cord and DO NOT operate any other liquids. Contact customer service or a service technician. 38. CAUTION: Appliance can be tripped over edge of an external timer or separate remote-control system. 35. DO NOT plug in unit if power cord is damaged or malfunctions ... be very hot during or after operation. READ AND FOLLOW THIS SAFETY INFORMATION CAREFULLY SAVE THESE INSTRUCTIONS 5 DO NOT let the cord hang over . 41. DO NOT run cord under furniture, appliances, or any way. The appliance is not in , on the power cord. ALWAYS keep cord away from the...

User Manual
Page 7
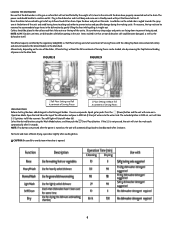
... back of dishwasher. Place the drainage hose in place. (Fig. 3) Attach the spray arm to the sink and an electrical outlet for any damage and verify that . Examine the entire unit for the power cord and drain hose to reach. Turn the cylinder filter clockwise to lock in the sink and attach with a soft dry cloth. FIGURE 5 7 Place the dishwasher on the door or control panel, be...
... back of dishwasher. Place the drainage hose in place. (Fig. 3) Attach the spray arm to the sink and an electrical outlet for any damage and verify that . Examine the entire unit for the power cord and drain hose to reach. Turn the cylinder filter clockwise to lock in the sink and attach with a soft dry cloth. FIGURE 5 7 Place the dishwasher on the door or control panel, be...
User Manual
Page 9
... will start the wash cycle automatically after 2 minutes. Open the tank lid on the size of the dishes, 3 Place Settings without Full Assortment of Serving Pieces WASHING DISHES Before shutting the door, add detergent to the Detergent Holder. LOADING THE DISHWASHER Be sure that the dishwasher is angled towards the spray arm at the bottom of the unit, and avoid having items touching each other to prevent noises and...
... will start the wash cycle automatically after 2 minutes. Open the tank lid on the size of the dishes, 3 Place Settings without Full Assortment of Serving Pieces WASHING DISHES Before shutting the door, add detergent to the Detergent Holder. LOADING THE DISHWASHER Be sure that the dishwasher is angled towards the spray arm at the bottom of the unit, and avoid having items touching each other to prevent noises and...
User Manual
Page 10
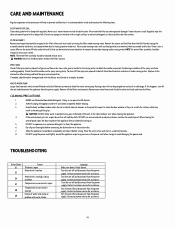
... needed, add dishwasher detergent and start the [Heavy wash] mode in a cool, dry location. 8. When cleaning the control panel, open Temperature sensor circuit is shorted Failure of the unit or the steam exhaust vent when cleaning the appliance. 4. Place the unit in a box and store in an empty chamber. Never use coarse materials or abrasive cleaners to avoid damaging the power cord. Remove the coarse and fine filter...
... needed, add dishwasher detergent and start the [Heavy wash] mode in a cool, dry location. 8. When cleaning the control panel, open Temperature sensor circuit is shorted Failure of the unit or the steam exhaust vent when cleaning the appliance. 4. Place the unit in a box and store in an empty chamber. Never use coarse materials or abrasive cleaners to avoid damaging the power cord. Remove the coarse and fine filter...
User Manual
Page 11
... to shipping damage or improper installation or electrical connections. • Damages due to misuse or abuse. • Content losses due to failure of the unit. • Inside components such as door panels, shelves, racks, etc. • Repairs performed by an authorized service technician is not available. • The removal and reinstallation of this limited warranty. Any and all implied...
... to shipping damage or improper installation or electrical connections. • Damages due to misuse or abuse. • Content losses due to failure of the unit. • Inside components such as door panels, shelves, racks, etc. • Repairs performed by an authorized service technician is not available. • The removal and reinstallation of this limited warranty. Any and all implied...

