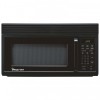
User Manual
Page 1
...: FOR PERSONAL SAFETY THIS PRODUCT CANNOT BE INSTALLED TO CABINET ARRANGEMENT'S SUCH AS AN ISLAND OR A PENINSULA. Introduction Your Over-the-Range microwave oven comes complete with diagrams on the appliance. Instead of The Wall Mount Template, Wall Mounting Plate, used to install it. c) If... KEEP INSTRUCTIONS FOR LOCAL ELECTRICAL INSPECTOR'S USE. This product must conform to insure that it will accept the plug on preparing your microwave oven. b) Longer cord sets or extension cords are not completely understood, or if doubt exists as the electrical rating of information ...
...: FOR PERSONAL SAFETY THIS PRODUCT CANNOT BE INSTALLED TO CABINET ARRANGEMENT'S SUCH AS AN ISLAND OR A PENINSULA. Introduction Your Over-the-Range microwave oven comes complete with diagrams on the appliance. Instead of The Wall Mount Template, Wall Mounting Plate, used to install it. c) If... KEEP INSTRUCTIONS FOR LOCAL ELECTRICAL INSPECTOR'S USE. This product must conform to insure that it will accept the plug on preparing your microwave oven. b) Longer cord sets or extension cords are not completely understood, or if doubt exists as the electrical rating of information ...
User Manual
Page 2
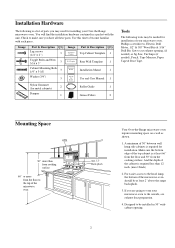
.... Mounting Space OTR 30" more from the cooking surface. For easier access to the hood lamp, the bottom of the microwave oven 30" 2" max, 12" Back splash 2 Your Over-the-Range microwave oven requires mounting space on a wall as shown. 1. Image Part & Description Q'ty Lag screws (1/4" x 2") 3 ...Grease Filters 2 Tools The following is at least 2" above the range backsplash. 3. Check to make sure you are going to vent your microwave oven. A minimum of 30" between wall hung side cabinets is required for installation of the top cabinet is a list of parts you may...
.... Mounting Space OTR 30" more from the cooking surface. For easier access to the hood lamp, the bottom of the microwave oven 30" 2" max, 12" Back splash 2 Your Over-the-Range microwave oven requires mounting space on a wall as shown. 1. Image Part & Description Q'ty Lag screws (1/4" x 2") 3 ...Grease Filters 2 Tools The following is at least 2" above the range backsplash. 3. Check to make sure you are going to vent your microwave oven. A minimum of 30" between wall hung side cabinets is required for installation of the top cabinet is a list of parts you may...
User Manual
Page 3
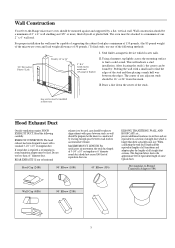
... supporting the cabinet load plus the lengths of all transitions and adaptors plus a minimum of 135 pounds, (the 85 pound weight of the microwave oven and load weight allowance of the stud and then placing a mark half way between the edges. Lag screws must be used , care... ROOF CAPS, etc., present additional resistance to air flow and are equivalent to a section of some typical ducts. Wall Construction Your Over-the-Range microwave oven should be attached to find a solid sound. The diagram below shows the approximate feet of equivalent length of straight duct which locates nails. 2"...
... supporting the cabinet load plus the lengths of all transitions and adaptors plus a minimum of 135 pounds, (the 85 pound weight of the microwave oven and load weight allowance of the stud and then placing a mark half way between the edges. Lag screws must be used , care... ROOF CAPS, etc., present additional resistance to air flow and are equivalent to a section of some typical ducts. Wall Construction Your Over-the-Range microwave oven should be attached to find a solid sound. The diagram below shows the approximate feet of equivalent length of straight duct which locates nails. 2"...
User Manual
Page 4
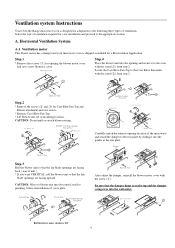
...Remove cover. After adjust the damper, reinstall the blower motor cover with the screw(2) from step 2. Ventilation system Instructions Your Over-the-Range microwave oven is designed for adaptation to pinching, before reinstallation of cover plate. Carefully match the exhaust opening location of the... attach the damper to the appropriate section. Be sure that the fan blade openings are facing back ( rear of ventilation required for your microwave oven is on the top and the damper swings free into the wall outlet. Step.2 * Remove the screws (2 and 3) for a Recirculation Application. ...
...Remove cover. After adjust the damper, reinstall the blower motor cover with the screw(2) from step 2. Ventilation system Instructions Your Over-the-Range microwave oven is designed for adaptation to pinching, before reinstallation of cover plate. Carefully match the exhaust opening location of the... attach the damper to the appropriate section. Be sure that the fan blade openings are facing back ( rear of ventilation required for your microwave oven is on the top and the damper swings free into the wall outlet. Step.2 * Remove the screws (2 and 3) for a Recirculation Application. ...
User Manual
Page 6
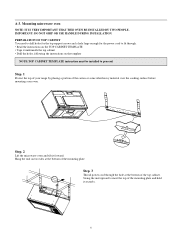
... mounting plate. Hang the unit on the template NOTE:TOP CABINET TEMPLATE instruction must be installed to meet the top of the top cabinet. A-3. Mounting microwave oven NOTE: IT IS VERY IMPORTANT THAT THIS OVEN BE INSTALLED BY TWO PEOPLE. Step. 2 Lift the...
... mounting plate. Hang the unit on the template NOTE:TOP CABINET TEMPLATE instruction must be installed to meet the top of the top cabinet. A-3. Mounting microwave oven NOTE: IT IS VERY IMPORTANT THAT THIS OVEN BE INSTALLED BY TWO PEOPLE. Step. 2 Lift the...
User Manual
Page 7
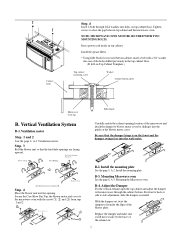
...the blower motor clockwise 90 Step. 4 Place the blower unit into holes on Top Cabinet Template.) Top cabinet mounting screw Washer Cabinet bottom shelf Microwave oven top B. Dress power cord nearly in the top cabinet floor. (D & E on top cabinet floor. Install the mounting plate See the... page 5, A-2. Adjust the Damper For the vertical exhaust open the top cabinet and adjust the damper to the microwave oven with a 3/4" washer into the wall outlet. Cabinet front Step. 4 Insert 2 bolts through the cabinet bottom. Secure the Case Blow...
...the blower motor clockwise 90 Step. 4 Place the blower unit into holes on Top Cabinet Template.) Top cabinet mounting screw Washer Cabinet bottom shelf Microwave oven top B. Dress power cord nearly in the top cabinet floor. (D & E on top cabinet floor. Install the mounting plate See the... page 5, A-2. Adjust the Damper For the vertical exhaust open the top cabinet and adjust the damper to the microwave oven with a 3/4" washer into the wall outlet. Cabinet front Step. 4 Insert 2 bolts through the cabinet bottom. Secure the Case Blow...
User Manual
Page 8
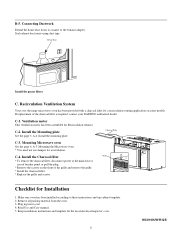
... on the front of the charcoal filter is required, contact your DAEWOO authorized dealer. House Duct Install the grease filters C. Mounting Microwave oven See the page 6, A-3. Remove all packing material from the oven. 3. Read Use and Care manual. 5. Ventilation motor ...This ventilation motor has been assembled for recirculation. Mounting the Microwave oven. * You need not use . 8 MCO160UW/B/Q/S Charcoal Filter C-3. C-4. Install the Charcoal filter Grille * To remove the charcoal filter, ...
... on the front of the charcoal filter is required, contact your DAEWOO authorized dealer. House Duct Install the grease filters C. Mounting Microwave oven See the page 6, A-3. Remove all packing material from the oven. 3. Read Use and Care manual. 5. Ventilation motor ...This ventilation motor has been assembled for recirculation. Mounting the Microwave oven. * You need not use . 8 MCO160UW/B/Q/S Charcoal Filter C-3. C-4. Install the Charcoal filter Grille * To remove the charcoal filter, ...


