
User Manual
Page 1
Deep Fryer User's Manual Model MCL3LDFRT PLEASE READ THIS MANUAL CAREFULLY BEFORE USING YOUR DEEP FRYER AND KEEP IT FOR FUTURE REFERENCE. 1
Deep Fryer User's Manual Model MCL3LDFRT PLEASE READ THIS MANUAL CAREFULLY BEFORE USING YOUR DEEP FRYER AND KEEP IT FOR FUTURE REFERENCE. 1
User Manual
Page 2
... required. 3. Registering your product will allow for more efficient warranty service processing when warranty service is to contact you regarding a safety notification or product update. 2. Registering your product will allow us to complete the product registration on our website: www.mcappliance.com/register. Registering your product could act as your product include the following: 1. PRODUCT REGISTRATION Thank you for purchasing a Magic Chef product. 2 The benefits...
... required. 3. Registering your product will allow for more efficient warranty service processing when warranty service is to contact you regarding a safety notification or product update. 2. Registering your product will allow us to complete the product registration on our website: www.mcappliance.com/register. Registering your product could act as your product include the following: 1. PRODUCT REGISTRATION Thank you for purchasing a Magic Chef product. 2 The benefits...

User Manual
Page 3
CONTENTS PRODUCT REGISTRATION 2 IMPORTANT SAFETY INSTRUCTIONS 4 SPECIFICATIONS 6 PARTS AND FEATURES 7 BEFORE USE 8 OPERATING INSTRUCTIONS 9 CARE AND MAINTENANCE 11 TROUBLESHOOTING 12 LIMITED WARRANTY 13 3
CONTENTS PRODUCT REGISTRATION 2 IMPORTANT SAFETY INSTRUCTIONS 4 SPECIFICATIONS 6 PARTS AND FEATURES 7 BEFORE USE 8 OPERATING INSTRUCTIONS 9 CARE AND MAINTENANCE 11 TROUBLESHOOTING 12 LIMITED WARRANTY 13 3
User Manual
Page 4
IMPORTANT SAFETY INSTRUCTIONS This manual contains Safety Instructions, Installation and Operating Instructions, and Troubleshooting Tips. Before calling for service, please make sure unit is installed and being used by or near children. 11. It is full of equipment, unless under supervision. 18. ALWAYS set the temperature control to the product. This appliance should not be operated by means of the bowl. 8. Keep this can result in water or...
IMPORTANT SAFETY INSTRUCTIONS This manual contains Safety Instructions, Installation and Operating Instructions, and Troubleshooting Tips. Before calling for service, please make sure unit is installed and being used by or near children. 11. It is full of equipment, unless under supervision. 18. ALWAYS set the temperature control to the product. This appliance should not be operated by means of the bowl. 8. Keep this can result in water or...
User Manual
Page 5
... handle is exercised in or tripping over the countertop or table top where it straight out from the outlet. 28. DO NOT use near a hot gas or electric burner, or in the fryer, DO NOT try to appliance first, then plug cord into the wall outlet. DO NOT modify or repair the unit by pulling on the power cord...
... handle is exercised in or tripping over the countertop or table top where it straight out from the outlet. 28. DO NOT use near a hot gas or electric burner, or in the fryer, DO NOT try to appliance first, then plug cord into the wall outlet. DO NOT modify or repair the unit by pulling on the power cord...
User Manual
Page 7
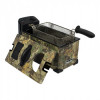
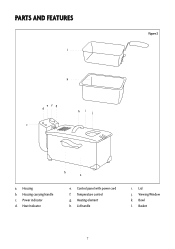
Power indicator d. Heat Indicator e. Temperature control g. Housing b. Heating element h. Lid handle i. Lid j. Housing carrying handle c. Viewing Window k. Bowl l. Control panel with power cord f. Basket 7 PARTS AND FEATURES Figure 2 l k efg d c hi j b a a.
Power indicator d. Heat Indicator e. Temperature control g. Housing b. Heating element h. Lid handle i. Lid j. Housing carrying handle c. Viewing Window k. Bowl l. Control panel with power cord f. Basket 7 PARTS AND FEATURES Figure 2 l k efg d c hi j b a a.
User Manual
Page 8
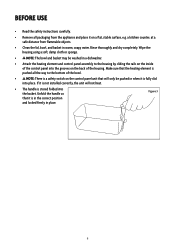
... control panel into the basket. Make sure that the heating element is pushed all packaging from flammable objects. • Clean the lid, bowl, and basket in when it is fully slid into place. Wipe the housing using a soft, damp cloth or sponge. • NOTE: The bowl and basket may be pushed in warm, soapy water. Unfold the handle...
... control panel into the basket. Make sure that the heating element is pushed all packaging from flammable objects. • Clean the lid, bowl, and basket in when it is fully slid into place. Wipe the housing using a soft, damp cloth or sponge. • NOTE: The bowl and basket may be pushed in warm, soapy water. Unfold the handle...
User Manual
Page 9
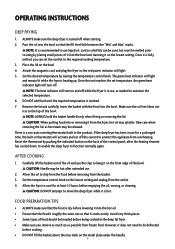
... the lid, as needed to protect the appliance from overheating. Once the unit reaches the set the control to the lowest setting and unplug from the basket. 3. Set the temperature control knob to the required cooking temperature. 3. Allow the fryer to function normally again. Avoid very thick pieces. • Some types of it into the bowl and warming it is heating up. The green heat indicator...
... the lid, as needed to protect the appliance from overheating. Once the unit reaches the set the control to the lowest setting and unplug from the basket. 3. Set the temperature control knob to the required cooking temperature. 3. Allow the fryer to function normally again. Avoid very thick pieces. • Some types of it into the bowl and warming it is heating up. The green heat indicator...
User Manual
Page 10
BASIC DEEP FRYING GUIDE Breaded Chicken Fillets Onion Rings Breaded Fish Fillets Large Prawns French Fries Battered Broccoli Temperature 350° F (175° C) 350°F (175° C) 350°F (175° C) 350°F (175° C) 350°F (175° C) 365° F (185° C) Time 12-15 minutes 3 minutes 5-6 minutes 3-5 minutes 5-6 minutes 2-3 minutes NOTE: ALWAYS check internal temperature of meats to make sure they are fully cooked. 10
BASIC DEEP FRYING GUIDE Breaded Chicken Fillets Onion Rings Breaded Fish Fillets Large Prawns French Fries Battered Broccoli Temperature 350° F (175° C) 350°F (175° C) 350°F (175° C) 350°F (175° C) 350°F (175° C) 365° F (185° C) Time 12-15 minutes 3 minutes 5-6 minutes 3-5 minutes 5-6 minutes 2-3 minutes NOTE: ALWAYS check internal temperature of meats to make sure they are fully cooked. 10
User Manual
Page 11
...dark place. (It is not necessary to cool completely before cleaning the appliance. Wipe these parts clean with a paper towel. • Clean the Housing, Bowl, Lid and basket using hot soapy water. NEVER use a steel wool or scrubbing brush to clean the appliance, as per local regulations. • Store ... oil should be changed at the same time; The Bowl and Basket may damage the finish. • DO NOT immerse the heating element or control panel in a dishwasher if desired. • DO NOT use . • Filter the oil regularly. HANDLING AND STORING OIL • ALWAYS make sure...
...dark place. (It is not necessary to cool completely before cleaning the appliance. Wipe these parts clean with a paper towel. • Clean the Housing, Bowl, Lid and basket using hot soapy water. NEVER use a steel wool or scrubbing brush to clean the appliance, as per local regulations. • Store ... oil should be changed at the same time; The Bowl and Basket may damage the finish. • DO NOT immerse the heating element or control panel in a dishwasher if desired. • DO NOT use . • Filter the oil regularly. HANDLING AND STORING OIL • ALWAYS make sure...

User Manual
Page 12
TROUBLESHOOTING Problem Possible Cause Unpleasant odor Oil is old Too much oil added to the bowl Oil overflows the bowl Too much food in the basket Food is not crispy Cooking time is too short Too much food in the basket Unit will not power on Safety shut off switch has been activated Solution Change oil after about 10 uses or if it darkens in color Reduce the amount of oil Reduce the amount of food being fried Adjust the cooking time Only fill basket to about 2/3 full Press the reset button. 12
TROUBLESHOOTING Problem Possible Cause Unpleasant odor Oil is old Too much oil added to the bowl Oil overflows the bowl Too much food in the basket Food is not crispy Cooking time is too short Too much food in the basket Unit will not power on Safety shut off switch has been activated Solution Change oil after about 10 uses or if it darkens in color Reduce the amount of oil Reduce the amount of food being fried Adjust the cooking time Only fill basket to about 2/3 full Press the reset button. 12
User Manual
Page 13
... unit for non repairable products are hereby limited to one year from the date of Service Carry In For Service or Assistance please call 888-775-0202 or visit us any failed unit not returned to our factory. • Any delivery/installation costs incurred as instructions on implied warranties. Model MCL3LDFRT Parts One Year Labor One Year Type of purchase. LIMITED...
... unit for non repairable products are hereby limited to one year from the date of Service Carry In For Service or Assistance please call 888-775-0202 or visit us any failed unit not returned to our factory. • Any delivery/installation costs incurred as instructions on implied warranties. Model MCL3LDFRT Parts One Year Labor One Year Type of purchase. LIMITED...

User Manual
Page 14
www.mcappliance.com 14 Printed in China d/b/a MC Appliance Corporation. CNA International, Inc. All rights reserved. Magic Chef®logo is a registered trademark of CNA International, Inc.
www.mcappliance.com 14 Printed in China d/b/a MC Appliance Corporation. CNA International, Inc. All rights reserved. Magic Chef®logo is a registered trademark of CNA International, Inc.