
User Manual
Page 3
BEFORE PUTTING INTO USE 2 SPECIFICATIONS 2 IMPORTANT SAFETY INSTRUCTIONS IMPORTANT SAFETY TIPS 3 NAME OF THE PARTS 4 OPERATING PROCEDURES & MAINTENANCE UNPACKING YOUR ICE MAKER 5 CONNECTING YOUR ICE MAKER 5 HOW TO CLEAN 6 CARE AND MAINTENANCE 6 USING YOUR ICE MAKER 7 TROUBLESHOOTING 8 ICE MAKER WARRANTY 9
BEFORE PUTTING INTO USE 2 SPECIFICATIONS 2 IMPORTANT SAFETY INSTRUCTIONS IMPORTANT SAFETY TIPS 3 NAME OF THE PARTS 4 OPERATING PROCEDURES & MAINTENANCE UNPACKING YOUR ICE MAKER 5 CONNECTING YOUR ICE MAKER 5 HOW TO CLEAN 6 CARE AND MAINTENANCE 6 USING YOUR ICE MAKER 7 TROUBLESHOOTING 8 ICE MAKER WARRANTY 9
User Manual
Page 4
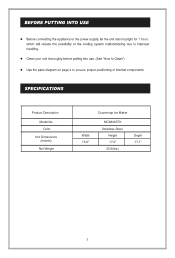
Product Description Model No. Color Unit Dimensions (Inches) Net Weight Width 15.0" Countertop Ice Maker MCIM40STK Stainless Steel Height 17.0" 33.5(lbs.) Depth 17.1"
Product Description Model No. Color Unit Dimensions (Inches) Net Weight Width 15.0" Countertop Ice Maker MCIM40STK Stainless Steel Height 17.0" 33.5(lbs.) Depth 17.1"
User Manual
Page 6
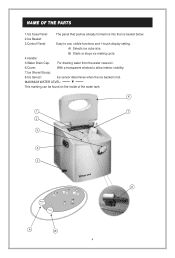
A) Selects ice cube size. MAXIMUM WATER LEVEL: This marking can be found on the inside of the water tank. B) Starts or stops ice making cycle. 4.Handle: 5.Water Drain Cap: For draining water from the water reservoir. 6.Cover: With a transparent window to use, visible functions and 1-touch display setting. 1.Ice Case Panel: The panel that pushes already formed ice into the ice basket below. 2.Ice Basket: 3.Control Panel: Easy to allow interior visibility. 7.Ice Shovel/Scoop: 8.Ice Sensor: Ice sensor determines when the ice basket is full.
A) Selects ice cube size. MAXIMUM WATER LEVEL: This marking can be found on the inside of the water tank. B) Starts or stops ice making cycle. 4.Handle: 5.Water Drain Cap: For draining water from the water reservoir. 6.Cover: With a transparent window to use, visible functions and 1-touch display setting. 1.Ice Case Panel: The panel that pushes already formed ice into the ice basket below. 2.Ice Basket: 3.Control Panel: Easy to allow interior visibility. 7.Ice Shovel/Scoop: 8.Ice Sensor: Ice sensor determines when the ice basket is full.
User Manual
Page 9
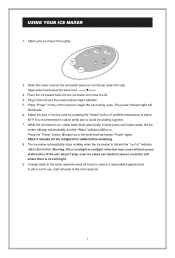
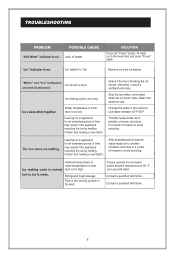
Place the ice basket back into the ice maker and close the lid. 4. 5. 6. 7. 8. Ice Full unit doesn't stop, even ice cubes can obstruct sensor, move the unit where there is no sunlinght. 9. 3.
Place the ice basket back into the ice maker and close the lid. 4. 5. 6. 7. 8. Ice Full unit doesn't stop, even ice cubes can obstruct sensor, move the unit where there is no sunlinght. 9. 3.
User Manual
Page 10
...high. Stop the ice maker, and restart when the ice block melts. Use water between 45°F-90°F. Refrigerant liquid leakage. Consult a quailified technician. Ice basket is too low. Remove ice from ice basket. Pipe in inner tank is full. Leaving ice in ...reservoir. After extended period transfer ready-made ice to avoid recycling. Ambient temperature or water temperature in the appliance recycling the ice by melting it down and making a new batch.. Transfer ready-made ice to the level mark and press "Power" again. Press the "Power" button, fill water...
...high. Stop the ice maker, and restart when the ice block melts. Use water between 45°F-90°F. Refrigerant liquid leakage. Consult a quailified technician. Ice basket is too low. Remove ice from ice basket. Pipe in inner tank is full. Leaving ice in ...reservoir. After extended period transfer ready-made ice to avoid recycling. Ambient temperature or water temperature in the appliance recycling the ice by melting it down and making a new batch.. Transfer ready-made ice to the level mark and press "Power" again. Press the "Power" button, fill water...
User Manual
Page 11
Limited Warranty MCIM40STK
Limited Warranty MCIM40STK

