User Manual
Page 5
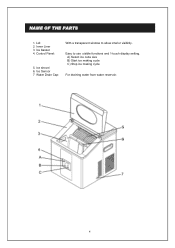
Lid: 2. Ice Sensor 7 Water Drain Cap: With a transparent window to use ,visible functions and 1-touch display setting. Easy to allow interior visibility. Ice basket 4. Inner Liner 3. NAME OF THE PARTS 1. Control Panel: 5. A) Select ice cube size B) Start ice making cycle C) Stop ice making cycle For draining water from water reservoir. 4 Ice shovel 6.
Lid: 2. Ice Sensor 7 Water Drain Cap: With a transparent window to use ,visible functions and 1-touch display setting. Easy to allow interior visibility. Ice basket 4. Inner Liner 3. NAME OF THE PARTS 1. Control Panel: 5. A) Select ice cube size B) Start ice making cycle C) Stop ice making cycle For draining water from water reservoir. 4 Ice shovel 6.
User Manual
Page 7
... of the ice maker should be maintained at the rear and sides of the unit and 8 inches at the top of the unit. Close the drain cap. 6. To attain proper performance, be cleaned on a regular basis. (See: "HOW TO CLEAN") It is not in direct contact with the compressor of minimum 5 ... will come in contact with water or moisture to the power cord, please ensure that it will come in proximity or in use, open water drain cap to sustain proper performance, dissipation of metal parts. Clean the interior with a soft cloth. 5. HOW TO CLEAN Remove the ice basket. 1. CARE AND MAINTENANCE ...
... of the ice maker should be maintained at the rear and sides of the unit and 8 inches at the top of the unit. Close the drain cap. 6. To attain proper performance, be cleaned on a regular basis. (See: "HOW TO CLEAN") It is not in direct contact with the compressor of minimum 5 ... will come in contact with water or moisture to the power cord, please ensure that it will come in proximity or in use, open water drain cap to sustain proper performance, dissipation of metal parts. Clean the interior with a soft cloth. 5. HOW TO CLEAN Remove the ice basket. 1. CARE AND MAINTENANCE ...

