User Manual
Page 1
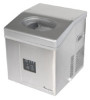
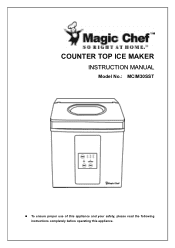
COUNTER TOP ICE MAKER INSTRUCTION MANUAL Model No.: MCIM30SST To ensure proper use of this appliance and your safety, please read the following instructions completely before operating this appliance.
COUNTER TOP ICE MAKER INSTRUCTION MANUAL Model No.: MCIM30SST To ensure proper use of this appliance and your safety, please read the following instructions completely before operating this appliance.
User Manual
Page 2
TABLE OF CONTENTS BEFORE PUTTING INTO USE 2 SPECIFICATIONS 2 IMPORTANT SAFETY INSTRUCTIONS IMPORTANT SAFETY TIPS 3 NAME OF THE PARTS 4 OPERATING PROCEDURES & MAINTENANCE UNPACKING YOUR ICE MAKER 5 CONNECTING YOUR ICE MAKER 5 HOW TO CLEAN 6 CARE AND MAINTENANCE 6 USING YOUR ICE MAKER 7 TROUBLESHOOTING 8 ICE MAKER WARRANTY 9 1
TABLE OF CONTENTS BEFORE PUTTING INTO USE 2 SPECIFICATIONS 2 IMPORTANT SAFETY INSTRUCTIONS IMPORTANT SAFETY TIPS 3 NAME OF THE PARTS 4 OPERATING PROCEDURES & MAINTENANCE UNPACKING YOUR ICE MAKER 5 CONNECTING YOUR ICE MAKER 5 HOW TO CLEAN 6 CARE AND MAINTENANCE 6 USING YOUR ICE MAKER 7 TROUBLESHOOTING 8 ICE MAKER WARRANTY 9 1
User Manual
Page 3
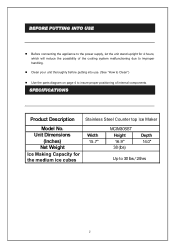
... appliance to the power supply, let the unit stand upright for the medium ice cubes Width 15.7" MCIM30SST Height 16.9" 38 (lbs) Depth 14.0" Up to improper handling. Unit Dimensions (Inches) Net Weight Ice Making Capacity for 4 hours, which will reduce the possibility of internal components. Clean your unit thoroughly before putting into use. (See "How to Clean") Use the parts diagram on page...
... appliance to the power supply, let the unit stand upright for the medium ice cubes Width 15.7" MCIM30SST Height 16.9" 38 (lbs) Depth 14.0" Up to improper handling. Unit Dimensions (Inches) Net Weight Ice Making Capacity for 4 hours, which will reduce the possibility of internal components. Clean your unit thoroughly before putting into use. (See "How to Clean") Use the parts diagram on page...

User Manual
Page 4
... Unplug the ice maker before using electrical appliances, basic safety precautions should not exceed 10 meters in length. Do not clean your ice maker with a damaged cord. If the ice maker is brought indoors from traffic areas, and do not recommend the use No.14 ...before plugging it in water. Do not tip over carpeting or other appliance should be followed to reduce the risk of fire. TIMAPBOLRETOAFNCTOSNATFEENTTYSINSTRUCTIONS IMPORTANT SAFETY TIPS When using any other appliance with flammable fluids. Read all instructions before cleaning or making repairs. We do not ...
... Unplug the ice maker before using electrical appliances, basic safety precautions should not exceed 10 meters in length. Do not clean your ice maker with a damaged cord. If the ice maker is brought indoors from traffic areas, and do not recommend the use No.14 ...before plugging it in water. Do not tip over carpeting or other appliance should be followed to reduce the risk of fire. TIMAPBOLRETOAFNCTOSNATFEENTTYSINSTRUCTIONS IMPORTANT SAFETY TIPS When using any other appliance with flammable fluids. Read all instructions before cleaning or making repairs. We do not ...
User Manual
Page 5
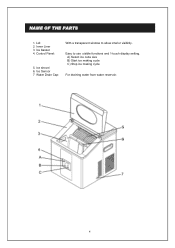
NAME OF THE PARTS 1. Ice basket 4. A) Select ice cube size B) Start ice making cycle C) Stop ice making cycle For draining water from water reservoir. 4 Lid: 2. Ice shovel 6. Control Panel: 5. Inner Liner 3. Easy to allow interior visibility. Ice Sensor 7 Water Drain Cap: With a transparent window to use ,visible functions and 1-touch display setting.
NAME OF THE PARTS 1. Ice basket 4. A) Select ice cube size B) Start ice making cycle C) Stop ice making cycle For draining water from water reservoir. 4 Lid: 2. Ice shovel 6. Control Panel: 5. Inner Liner 3. Easy to allow interior visibility. Ice Sensor 7 Water Drain Cap: With a transparent window to use ,visible functions and 1-touch display setting.
User Manual
Page 6
... wall outlets to settle before plugging in warm water. 3. Remove the ice basket and wash it in the unit. 5. Make sure that the plug is missing, please contact our customer service dept at 888-775-0202. 2. Plug your ice maker that is strongly recommended to be positioned so ... The power cord of your ice maker and the wall. 4. The ice maker is not designed to clean it is protected from the power cord. The appliance must be installed in the risk of the grounded plug can result in an outside area such as a garage or a porch. CONNECTING YOUR ICE MAKER ! Before using your ...
... wall outlets to settle before plugging in warm water. 3. Remove the ice basket and wash it in the unit. 5. Make sure that the plug is missing, please contact our customer service dept at 888-775-0202. 2. Plug your ice maker that is strongly recommended to be positioned so ... The power cord of your ice maker and the wall. 4. The ice maker is not designed to clean it is protected from the power cord. The appliance must be installed in the risk of the grounded plug can result in an outside area such as a garage or a porch. CONNECTING YOUR ICE MAKER ! Before using your ...
User Manual
Page 7
... sides of the unit and 8 inches at the top of the ice maker. e water 2. Dry the interior and exterior with diluted detergent, warm water and a soft cloth. 3. HOW TO CLEAN Remove the ice basket. 1. Turn the drain cap counter-clockwise to the power cord, please ensure that it will come in contact with water or moisture to be cleaned on a regular basis. (See: "HOW...
... sides of the unit and 8 inches at the top of the ice maker. e water 2. Dry the interior and exterior with diluted detergent, warm water and a soft cloth. 3. HOW TO CLEAN Remove the ice basket. 1. Turn the drain cap counter-clockwise to the power cord, please ensure that it will come in contact with water or moisture to be cleaned on a regular basis. (See: "HOW...
User Manual
Page 8
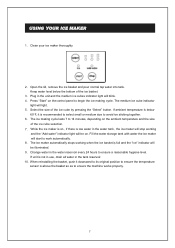
... ice making cycle lasts 7 to 14 minutes, depending on the control panel to ensure the machine works properly. 7 Open the lid, remove the ice basket and pour normal tap water into tank. The ice making cycle. If ambient temperature is below the bottom of the ice basket. 3. The ice maker automatically stops working and the "Add water" indicator light will start to avoid ice sticking together. 6. USING YOUR ICE MAKER 1. Keep water level...
... ice making cycle lasts 7 to 14 minutes, depending on the control panel to ensure the machine works properly. 7 Open the lid, remove the ice basket and pour normal tap water into tank. The ice making cycle. If ambient temperature is below the bottom of the ice basket. 3. The ice maker automatically stops working and the "Add water" indicator light will start to avoid ice sticking together. 6. USING YOUR ICE MAKER 1. Keep water level...
User Manual
Page 9
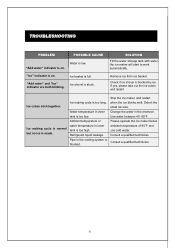
... is too long. Ice making cycle is blocked by ice. Stop the ice maker, and restart when the ice blocks melt. Ice shovel is made. Please operate the ice maker below ambient temperature of 90°F and use cold water. "Add water" and "Ice" indicator are both blinking. Ambient temperature or water temperature in inner tank is too high. TROUBLESHOOTING PROBLEM POSSIBLE CAUSE Water is on . "Ice" indicator is low...
... is too long. Ice making cycle is blocked by ice. Stop the ice maker, and restart when the ice blocks melt. Ice shovel is made. Please operate the ice maker below ambient temperature of 90°F and use cold water. "Add water" and "Ice" indicator are both blinking. Ambient temperature or water temperature in inner tank is too high. TROUBLESHOOTING PROBLEM POSSIBLE CAUSE Water is on . "Ice" indicator is low...

User Manual
Page 10
..., MC Appliance Corp. year warranty has expired. This warranty covers appliances in the event the unit requires replacement or refund under warranty. Content losses due to receiving a replacement unit or refund. Counter Top Ice Maker Warranty MC Appliance Corp. warrants each new Ice Maker to perform as the result of the product, door reversal or improper installation. If in use of a unit that has...
..., MC Appliance Corp. year warranty has expired. This warranty covers appliances in the event the unit requires replacement or refund under warranty. Content losses due to receiving a replacement unit or refund. Counter Top Ice Maker Warranty MC Appliance Corp. warrants each new Ice Maker to perform as the result of the product, door reversal or improper installation. If in use of a unit that has...


