User Manual
Page 1
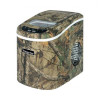
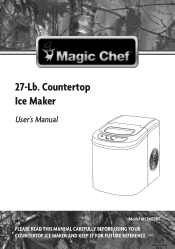
Countertop Ice Maker User's Manual Model MCIM22RT PLEASE READ THIS MANUAL CAREFULLY BEFORE USING YOUR COUNTERTOP ICE MAKER AND KEEP IT FOR FUTURE REFERENCE. 1 27-Lb.
Countertop Ice Maker User's Manual Model MCIM22RT PLEASE READ THIS MANUAL CAREFULLY BEFORE USING YOUR COUNTERTOP ICE MAKER AND KEEP IT FOR FUTURE REFERENCE. 1 27-Lb.
User Manual
Page 2
... REGISTRATION Thank you for purchasing a Magic Chef product. 2 Once again, thank you regarding a safety notification or product update. 2. The benefits of insurance loss. Registering your product could act as your proof of purchase in the event of registering your product will allow for more efficient warranty service processing when warranty service is to complete the product registration...
... REGISTRATION Thank you for purchasing a Magic Chef product. 2 Once again, thank you regarding a safety notification or product update. 2. The benefits of insurance loss. Registering your product could act as your proof of purchase in the event of registering your product will allow for more efficient warranty service processing when warranty service is to complete the product registration...

User Manual
Page 3
CONTENTS PRODUCT REGISTRATION 2 IMPORTANT SAFETY INSTRUCTIONS 4 SPECIFICATIONS 5 PARTS AND FEATURES 6 INSTALLATION INSTRUCTIONS 7 OPERATING INSTRUCTIONS 8 CARE AND MAINTENANCE 9 TROUBLESHOOTING 10 LIMITED WARRANTY 11 3
CONTENTS PRODUCT REGISTRATION 2 IMPORTANT SAFETY INSTRUCTIONS 4 SPECIFICATIONS 5 PARTS AND FEATURES 6 INSTALLATION INSTRUCTIONS 7 OPERATING INSTRUCTIONS 8 CARE AND MAINTENANCE 9 TROUBLESHOOTING 10 LIMITED WARRANTY 11 3
User Manual
Page 4
...ice maker is used near children/ • DO NOT clean your ice maker with a damaged cord. • Connect to properly polarized outlets only. DO NOT cover the cord. If you must use an extension cord, use No. 14 AWG minimum size and rated no less than 1875 watts. • Unplug the ice maker before plugging it in water... shock, and injury to room temperature before cleaning or making repairs. • Exercise caution and use of an extension cord, as it a few hours to adjust to persons or property. IMPORTANT SAFETY INSTRUCTIONS When using any appliance. • DO NOT operate this...
...ice maker is used near children/ • DO NOT clean your ice maker with a damaged cord. • Connect to properly polarized outlets only. DO NOT cover the cord. If you must use an extension cord, use No. 14 AWG minimum size and rated no less than 1875 watts. • Unplug the ice maker before plugging it in water... shock, and injury to room temperature before cleaning or making repairs. • Exercise caution and use of an extension cord, as it a few hours to adjust to persons or property. IMPORTANT SAFETY INSTRUCTIONS When using any appliance. • DO NOT operate this...

User Manual
Page 5
SPECIFICATIONS Figure 1 12.9" (327 mm) 9.5" (241 mm) Dimensions (W x H x D) Weight Ice Producing Capacity 14.1" (358 mm) 9.5" x 12.9" x 14.1" (241 mm x 327 mm x 358 mm) 17.8 lbs (8.0 kg) Up to 27 Lbs a day 5
SPECIFICATIONS Figure 1 12.9" (327 mm) 9.5" (241 mm) Dimensions (W x H x D) Weight Ice Producing Capacity 14.1" (358 mm) 9.5" x 12.9" x 14.1" (241 mm x 327 mm x 358 mm) 17.8 lbs (8.0 kg) Up to 27 Lbs a day 5
User Manual
Page 6
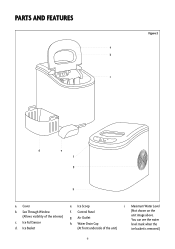
Ice Full Sensor f. You can see the water level mark when the d. Water Drain Cap (Not shown on the unit image above. Ice Basket (At front underside of the interior) c. PARTS AND FEATURES Figure 2 a b c d e f g h a. Ice Scoop i. See Through Window (Allows visibility of the unit) ice basket is removed.) 6 Air Outlet h. Maximum Water Level b. Control Panel g. Cover e.
Ice Full Sensor f. You can see the water level mark when the d. Water Drain Cap (Not shown on the unit image above. Ice Basket (At front underside of the interior) c. PARTS AND FEATURES Figure 2 a b c d e f g h a. Ice Scoop i. See Through Window (Allows visibility of the unit) ice basket is removed.) 6 Air Outlet h. Maximum Water Level b. Control Panel g. Cover e.
User Manual
Page 7
..., please call our customer service at least 5 inches of space between the back and sides of electric shock. 2. NOTE: Before using your appliance into an exclusive, properly installed, grounded wall outlet. Clean the interior with lukewarm water and a soft cloth. Make sure that ice basket and ice scoop is protected from the power cord. INSTALLATION INSTRUCTIONS UNPACKING YOUR ICE MAKER 1. The appliance must be...
..., please call our customer service at least 5 inches of space between the back and sides of electric shock. 2. NOTE: Before using your appliance into an exclusive, properly installed, grounded wall outlet. Clean the interior with lukewarm water and a soft cloth. Make sure that ice basket and ice scoop is protected from the power cord. INSTALLATION INSTRUCTIONS UNPACKING YOUR ICE MAKER 1. The appliance must be...
User Manual
Page 8
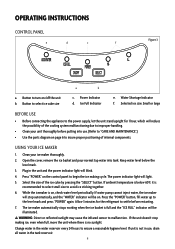
OPERATING INSTRUCTIONS CONTROL PANEL e d c f Figure 3 a b a. Ice Full Indicator e. Clean your unit thoroughly before restarting. 7. Select the size of internal components. The ice maker automatically stops working when the ice basket is recommended to select small size to avoid ice sticking together. 6. Change water in the tank reservoir. 8 Button to ensure a reasonable hygiene level. Power Indicator d. USING YOUR ICE MAKER 1. If water pump cannot inject water, the ice maker will stop making cycle. Allow 3 minutes for 1 hour...
OPERATING INSTRUCTIONS CONTROL PANEL e d c f Figure 3 a b a. Ice Full Indicator e. Clean your unit thoroughly before restarting. 7. Select the size of internal components. The ice maker automatically stops working when the ice basket is recommended to select small size to avoid ice sticking together. 6. Change water in the tank reservoir. 8 Button to ensure a reasonable hygiene level. Power Indicator d. USING YOUR ICE MAKER 1. If water pump cannot inject water, the ice maker will stop making cycle. Allow 3 minutes for 1 hour...

User Manual
Page 9
... the unit and 8 inches at the top of metal parts. • The ice maker should not be installed near any circumstances to allow the unit to be cleaned on a regular basis. • It is not in use, open water drain cap to drain water completely from the front underside to the power cord, please ensure that it will come in contact with a mild...
... the unit and 8 inches at the top of metal parts. • The ice maker should not be installed near any circumstances to allow the unit to be cleaned on a regular basis. • It is not in use, open water drain cap to drain water completely from the front underside to the power cord, please ensure that it will come in contact with a mild...
User Manual
Page 10
... avoid recycling. TROUBLESHOOTING Problem "ADD WATER" indicator is on . Pipe in the reservoir. Check if ice is stuck. Change the water in the cooling system is blocked. Ice basket is on. Ambient temperature or water temperature in the appliance recycling the ice by melting it down and making cycle is too long. Consult a qualified technician. 10 Ice cubes are both Ice shovel is...
... avoid recycling. TROUBLESHOOTING Problem "ADD WATER" indicator is on . Pipe in the reservoir. Check if ice is stuck. Change the water in the cooling system is blocked. Ice basket is on. Ambient temperature or water temperature in the appliance recycling the ice by melting it down and making cycle is too long. Consult a qualified technician. 10 Ice cubes are both Ice shovel is...
User Manual
Page 11
... requires replacement or refund under this product. LIMITED WARRANTY MC Appliance Corporation warrants each new Ice Maker to be free from defects in material and workmanship for a period of five years. Model MCIM22RT Parts & Labor One Year Compressor (Parts Only) Five Years Type of Service Carry In For Service or Assistance please call 888-775-0202 or visit us any subsequent owner(s).
... requires replacement or refund under this product. LIMITED WARRANTY MC Appliance Corporation warrants each new Ice Maker to be free from defects in material and workmanship for a period of five years. Model MCIM22RT Parts & Labor One Year Compressor (Parts Only) Five Years Type of Service Carry In For Service or Assistance please call 888-775-0202 or visit us any subsequent owner(s).

User Manual
Page 12
Magic Chef®logo is a registered trademark of CNA International, Inc. d/b/a MC Appliance Corporation. www.mcappliance.com 12 Printed in China All rights reserved. CNA International, Inc.
Magic Chef®logo is a registered trademark of CNA International, Inc. d/b/a MC Appliance Corporation. www.mcappliance.com 12 Printed in China All rights reserved. CNA International, Inc.

