User Manual
Page 1
Model MCDR1000WE / MCDR1000BE / MCDR1000ST 10.1 Cu. Top Mount Refrigerator Specifications are subject to change without prior notice for purpose of product improvement. Ft.
Model MCDR1000WE / MCDR1000BE / MCDR1000ST 10.1 Cu. Top Mount Refrigerator Specifications are subject to change without prior notice for purpose of product improvement. Ft.
User Manual
Page 4
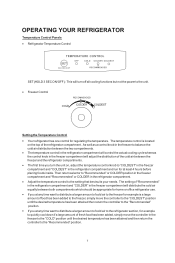
TEMPERATURE CONTROL PANELS SETTING THE TEMPERATURE CONTROL FREEZING FRESH FOODS LED LIGHT LIMITED WARRANTY 4 - 5 6 6 6 7 7 8 8 9 - 11 12 12 12 12 13 - 14 15 2
TEMPERATURE CONTROL PANELS SETTING THE TEMPERATURE CONTROL FREEZING FRESH FOODS LED LIGHT LIMITED WARRANTY 4 - 5 6 6 6 7 7 8 8 9 - 11 12 12 12 12 13 - 14 15 2

User Manual
Page 5
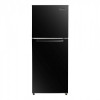
Freezer Section 2. Vegetable Crisper With Glass Cover 7. Refrigerator Temperature Control 5. Leveling Leg 8. Freezer Door Bins 10. Freezer Shelf 3. Freezer Door 9. Refrigerator Door 11. Refrigerator Door Bins 3 MCDR1000WE / MCDR1000BE / MCDR1000ST 1. Freezer Temperature Control 4. Refrigerator Shelves 6.
Freezer Section 2. Vegetable Crisper With Glass Cover 7. Refrigerator Temperature Control 5. Leveling Leg 8. Freezer Door Bins 10. Freezer Shelf 3. Freezer Door 9. Refrigerator Door 11. Refrigerator Door Bins 3 MCDR1000WE / MCDR1000BE / MCDR1000ST 1. Freezer Temperature Control 4. Refrigerator Shelves 6.
User Manual
Page 8
All other servicing should be referred to a qualified technician, so as to minimize the risk of possible ignition due to repair or replace any part of your refrigerator unless it specifically recommended in this manual. Do not attempt to incorrect parts or improper service. 6
All other servicing should be referred to a qualified technician, so as to minimize the risk of possible ignition due to repair or replace any part of your refrigerator unless it specifically recommended in this manual. Do not attempt to incorrect parts or improper service. 6
User Manual
Page 9
... unit. Then return selector to the setting that best suits your needs. As well as a control knob in the freezer compartment will distribute the cold air equally between the two compartments. Freezer Control Setting the Temperature Control Your refrigerator has one control for home or office refrigerator use. If you turn off all cooling functions but not the power to balance the cold air distribution between both compartments which should...
... unit. Then return selector to the setting that best suits your needs. As well as a control knob in the freezer compartment will distribute the cold air equally between the two compartments. Freezer Control Setting the Temperature Control Your refrigerator has one control for home or office refrigerator use. If you turn off all cooling functions but not the power to balance the cold air distribution between both compartments which should...
User Manual
Page 10
.... If there are instructions on the packet, carefully follow these conditions. This compartment is designed for replacement. 8 Place frozen food into account hygienic precautions will improve the operations of adequate quality and suitable for illumination. Use correct packaging and wrap it for freezing. NOTE: For installations where the temperatures will drop below 50ºF set the freezer temperature control to restart before...
.... If there are instructions on the packet, carefully follow these conditions. This compartment is designed for replacement. 8 Place frozen food into account hygienic precautions will improve the operations of adequate quality and suitable for illumination. Use correct packaging and wrap it for freezing. NOTE: For installations where the temperatures will drop below 50ºF set the freezer temperature control to restart before...
User Manual
Page 11
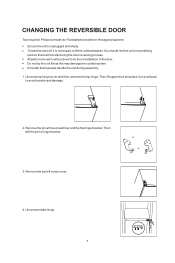
..., it will not slip during assembly. 1. Remove the pin with a screwdriver and flip the hinge bracket. Remove the top left screw cover. 4. All parts removed must be saved to hinge bracket. 3. Unscrew top hinge cover and then unscrew the top hinge. Then lift upper door and place it on something solid so that 2 people handle the unit during the door reversing process. You should rest the...
..., it will not slip during assembly. 1. Remove the pin with a screwdriver and flip the hinge bracket. Remove the top left screw cover. 4. All parts removed must be saved to hinge bracket. 3. Unscrew top hinge cover and then unscrew the top hinge. Then lift upper door and place it on something solid so that 2 people handle the unit during the door reversing process. You should rest the...
User Manual
Page 12
Unscrew bottom hinge. Move shaft sleeve and pin hole plug from left side to right side. 9. Then remove the adjustable feet from spare parts bags and fix it. 10 Disassemble right hinge, find out right bottom hinge from both side. 8. Move the bottom hinge hole covers from left side to right side. 6. 5. Move the middle hinge hole covers from left side to right side. 7.
Unscrew bottom hinge. Move shaft sleeve and pin hole plug from left side to right side. 9. Then remove the adjustable feet from spare parts bags and fix it. 10 Disassemble right hinge, find out right bottom hinge from both side. 8. Move the bottom hinge hole covers from left side to right side. 6. 5. Move the middle hinge hole covers from left side to right side. 7.
User Manual
Page 13
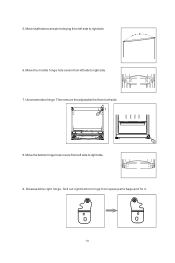
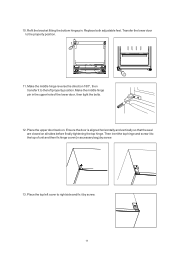
.... Make the middle hinge pin in the upper hole of unit and then fix hinge cover (in accessary bag) by screw. 11 Ensure the door is aligned horizontally and vertically so that the seal are closed on . Transfer the lower door to the top of the lower door, then tight the bolts. 12. 10. Replace both adjustable feet. Place the upper door...
.... Make the middle hinge pin in the upper hole of unit and then fix hinge cover (in accessary bag) by screw. 11 Ensure the door is aligned horizontally and vertically so that the seal are closed on . Transfer the lower door to the top of the lower door, then tight the bolts. 12. 10. Replace both adjustable feet. Place the upper door...

User Manual
Page 17
Refrigerator MCDR1000WE MCDR1000BE MCDR1000ST In Home In Home In Home 15
Refrigerator MCDR1000WE MCDR1000BE MCDR1000ST In Home In Home In Home 15

User Manual
Page 34
MCDR1000WE MCDR1000BE MCDR1000ST En Casa En Casa En Casa 15
MCDR1000WE MCDR1000BE MCDR1000ST En Casa En Casa En Casa 15


